
These Homemade Garlic Rolls are soft, fluffy, and layered with rich garlic butter in every bite. After testing this recipe, I found that adding rosemary and granulated garlic directly to the dough builds flavor from the inside out, while folding in garlic butter keeps the rolls extra rich and tender. They’re perfect for pasta night, holiday dinners, or anytime you want warm homemade bread without a complicated process.

🔍 At a Glance
- ⏱️ Ready in: 2 hours 35 minutes (25 min. prep, 1 hr. 45 min. rise, 24 min. cook)
- 👥 Serves: 15 rolls
- 📌 Main Ingredients: Bread flour, garlic butter, rosemary
- 🔥 Cook Method: Oven
- 😋 Flavor Profile: Buttery, garlicky, herbaceous
- 📝 Great For: Pasta night, holidays, dinner parties, family meals
Table of Contents
Why These Garlic Rolls Work
- Bread flour creates a soft, fluffy texture: The higher protein content helps develop enough gluten for rolls that are tender with a light, slightly chewy bite.
- Garlic butter adds flavor in every layer: Filling the dough with garlic parsley butter and brushing the tops after baking gives the rolls rich flavor throughout.
- Rosemary and garlic flavor the dough itself: Mixing both directly into the dough makes the rolls taste savory and well seasoned, not just buttery on the outside.
Ingredients & Why They Matter

- Milk: Adds moisture and helps create soft, tender rolls. Warm water or half milk and half water also work.
- Salted Butter: Adds richness to both the dough and the garlic butter. Unsalted butter works too; just add a pinch more salt.
- Egg: Adds richness and improves the texture. The rolls will still work without it, but they will be slightly less tender.
- Instant Yeast: Helps the dough rise quickly and reliably. Active dry yeast works too, but it should be proofed in the warm milk first.
- Dried Rosemary: Adds earthy, herby flavor. Fresh rosemary can be used instead.
- Granulated Garlic: Flavors the dough evenly. Garlic powder also works.
- Bread Flour: Gives the rolls structure while keeping them soft. All-purpose flour can work, but the texture will be slightly less chewy.
- Morton Kosher Salt: Seasons the dough. If using table salt, use less.
- Fresh Garlic: The main flavor in the garlic butter filling. Garlic paste or roasted garlic can also work.
- Fresh Parsley: Adds freshness and color to the garlic butter. Dried parsley works in a pinch.
Find the full ingredient list and exact measurements in the recipe card below.
Garlic Rolls Step by Step
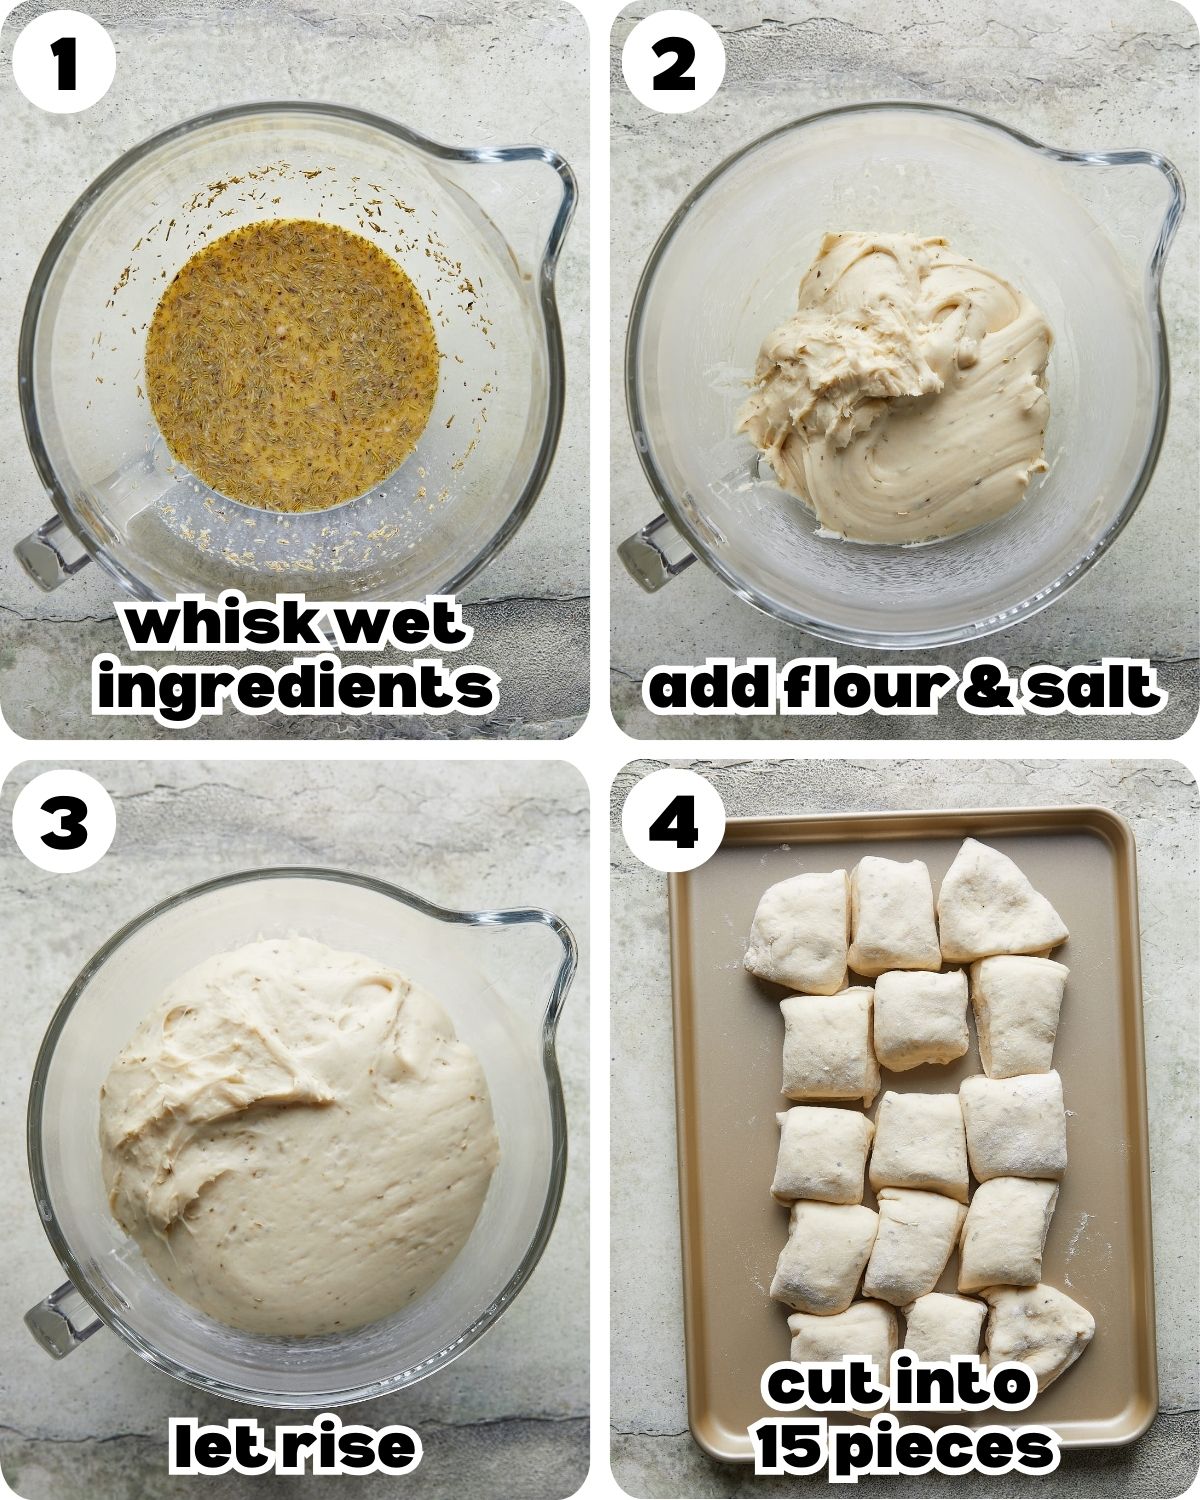
- Mix the wet ingredients: In the bowl of a stand mixer, whisk together the warm milk, melted butter, egg, yeast, rosemary, and granulated garlic.
- Make the dough: Using the dough hook, mix in about one-third of the flour and the salt on low speed until absorbed. Add another third of the flour and mix again. Add the remaining flour and mix until a dough forms. Increase to medium-high speed and knead for 5 minutes, or until the dough is smooth and elastic. It should pull away from the sides of the bowl and wrap around the hook.
- Let the dough rise: Cover the bowl and let the dough rise in a warm place for about 1 hour, or until doubled in size.
- Divide the dough: Punch down the dough and transfer it to a lightly floured surface. Shape it into a rectangle and divide it into 15 pieces.

- Shape the rolls: Take one piece of dough and pull the edges into the center to form a ball. Pinch the seam closed. Place it seam-side down and gently roll it against the counter with your hand to create tension. Repeat with the remaining dough pieces. Cover loosely with a towel.

- Make the garlic butter: In a small saucepan, melt the butter with the garlic over medium-low heat. Cook for 3 to 4 minutes, just until fragrant. Remove from the heat and stir in the parsley. Reserve about 3 tablespoons for brushing the baked rolls. Grease a 9×13-inch baking dish.
- Flatten the dough: Flatten each dough ball into a small oval with your hands.
- Fill the rolls: Spread a thin layer of garlic butter over each oval, then fold it in half.
- Arrange in the pan: Place the folded rolls in the greased baking dish. Drizzle the remaining garlic butter over the tops, leaving out the reserved portion for finishing.
- Let the rolls rise again: Cover and let the rolls rise for 45 minutes, or until puffy. About halfway through, preheat the oven to 350°F.
- Bake & finish: Bake for 22 to 26 minutes, or until the tops are golden brown and the centers are cooked through. Brush the warm rolls with the reserved garlic butter right after baking so the tops stay soft and extra flavorful.
Pro Tips for Perfect Garlic Rolls
- Use a kitchen scale: For the most accurate measurements and most consistent results, weigh the ingredients, especially the flour.
- Use a stand mixer if you have one: It makes kneading much easier and more consistent. If kneading by hand, expect it to take longer for the dough to become smooth and elastic.
- Check the dough consistency: The dough should feel smooth, elastic, and slightly tacky. If it is very sticky, add a little more flour. If it feels dry or stiff, add a small splash of milk.
- Proof in a warm place: Let the dough rise in a warm, draft-free spot, such as an oven with the light on or a warm area in your kitchen.
- Let the dough fully double: The first rise should double the dough in size, not just make it slightly puffy. This helps the rolls bake up lighter and softer.
- Do not skip the second rise: The shaped rolls should look puffy before they go into the oven. This helps create a lighter, airier texture.
- Brush the tops while the rolls are hot: Brushing them right after baking helps the rolls absorb more garlic butter and keeps the tops soft.
Common Mistakes
- Adding too much flour: Too much flour will make the dough dry and heavy, which leads to dense rolls instead of soft, fluffy ones.
- Using milk that is too hot: Hot milk can kill the yeast and prevent the dough from rising properly.
- Not kneading the dough enough: Under-kneaded dough will not develop enough gluten, which can lead to rolls with less structure and a heavier texture.
- Rushing either rise: If the dough does not have enough time to rise fully, the rolls can turn out dense instead of light and airy.
- Letting the garlic brown too much: Garlic should cook just until fragrant. If it browns too much, it can taste bitter.
- Overbaking the rolls: Bake just until the tops are golden brown so the rolls stay soft and tender.
Swap It Up: Variations to Try
- Cheesy garlic rolls: Sprinkle shredded mozzarella or parmesan over the garlic butter before folding the dough.
- Italian herb garlic rolls: Add 1 teaspoon Italian seasoning to the dough for extra herb flavor.
- Pull-apart rolls: Skip flattening and folding, shape the dough into balls, place them in the pan, and brush with garlic butter instead.
Make Ahead
- Refrigerate overnight: After the rolls are filled and arranged in the baking dish, cover the pan tightly and refrigerate overnight for up to 12 hours.
- Let them rise before baking: The next day, let the rolls sit at room temperature for 2 to 3 hours, or until they look puffy and have nearly doubled in size.
- Bake as directed: Once the rolls have finished rising, bake for 22 to 26 minutes.
What To Serve With This Recipe
These garlic rolls pair best with hearty mains, soups, and pasta dishes. Try them with:
- Easy Creamy Garlic Chicken Pasta: A rich, creamy pasta that pairs perfectly with buttery rolls.
- One Pot Lemon Chicken Orzo: Bright, cozy, and easy enough for a weeknight dinner.
- Baked Tuscan Chicken: The creamy sauce makes these rolls especially good for dipping.
- Creamy Italian Sausage Soup: A hearty soup with lots of flavor and a great bread pairing.
- Dutch Oven Minestrone: A vegetable-packed soup that works well with soft homemade rolls.

Garlic Rolls
Ingredients
- 1 1/4 cup (296 ml) 2% or whole milk, warmed to 110 degrees F
- 2 Tablespoons (28 g) salted butter, melted & cooled slightly
- 1 large egg
- 2 1/4 teaspoon instant yeast*
- 1 Tablespoon dried rosemary
- 1 1/2 teaspoon granulated garlic
- 3 1/2 cups (455 g) bread flour*
- 1 1/2 teaspoons Morton kosher salt*
- 6 Tablespoons (85 g) salted butter
- 8 cloves garlic, finely minced
- 3 Tablespoons chopped fresh parsley
Instructions
- Mix the wet ingredients: In the bowl of a stand mixer, whisk together the warm milk, melted butter, egg, yeast, rosemary, and granulated garlic.1 1/4 cup (296 ml) 2% or whole milk, warmed to 110 degrees F, 2 Tablespoons (28 g) salted butter, melted & cooled slightly, 1 large egg, 2 1/4 teaspoon instant yeast*, 1 Tablespoon dried rosemary, 1 1/2 teaspoon granulated garlic
- Make the dough: Using the dough hook, mix in about one-third of the flour and the salt on low speed until absorbed. Add another third of the flour and mix again. Add the remaining flour and mix until a dough forms. Increase to medium-high speed and knead for 5 minutes, or until the dough is smooth and elastic. It should pull away from the sides of the bowl and wrap around the hook.3 1/2 cups (455 g) bread flour*, 1 1/2 teaspoons Morton kosher salt*
- Let the dough rise: Cover the bowl and let the dough rise in a warm place for about 1 hour, or until doubled in size.
- Divide the dough: Punch down the dough and transfer it to a lightly floured surface. Shape it into a rectangle and divide it into 15 pieces.
- Shape the rolls: Take one piece of dough and pull the edges into the center to form a ball. Pinch the seam closed. Place it seam-side down and gently roll it against the counter with your hand to create tension. Repeat with the remaining dough pieces. Cover loosely with a towel.
- Make the garlic butter: In a small saucepan, melt the butter with the garlic over medium-low heat. Cook for 3 to 4 minutes, just until fragrant. Remove from the heat and stir in the parsley. Reserve about 3 tablespoons for brushing the baked rolls. Grease a 9×13-inch baking dish.6 Tablespoons (85 g) salted butter, 8 cloves garlic, finely minced, 3 Tablespoons chopped fresh parsley
- Flatten the dough: Flatten each dough ball into a small oval with your hands.
- Fill the rolls: Spread a thin layer of garlic butter over each oval, then fold it in half.
- Arrange in the pan: Place the folded rolls in the greased baking dish. Drizzle the remaining garlic butter over the tops, leaving out the reserved portion for finishing.
- Let the rolls rise again: Cover and let the rolls rise for 45 minutes, or until puffy. About halfway through, preheat the oven to 350°F.
- Bake & finish: Bake for 22 to 26 minutes, or until the tops are golden brown and the centers are cooked through. Brush the warm rolls with the reserved garlic butter right after baking so the tops stay soft and extra flavorful.
Notes
- Instant Yeast: Active dry yeast can be used instead, but it should be proofed in the warm milk first.
- Bread Flour: All-purpose flour can work, but bread flour gives the rolls a better texture.
- Morton Kosher Salt: If using table salt, reduce the amount slightly.
- Use a kitchen scale: For the most accurate measurements and most consistent results, weigh the ingredients, especially the flour.
Nutrition
Nutrition information is automatically calculated, so should only be used as an approximation.
Recipe FAQs
Old yeast, overly hot milk, a cool room, or too much flour are the most common reasons. For best results, let the dough rise in a warm spot until doubled and keep the dough soft and slightly tacky.
Store leftover garlic rolls in an airtight container in the refrigerator for up to 4 days.
Warm them in a 300°F oven for 5 to 8 minutes or microwave for about 15 to 20 seconds.
Yes. Let them cool completely, then freeze in a freezer-safe bag or container for up to 3 months. Thaw and warm before serving.
More Bread Recipes
Did you make this recipe?
If you try this recipe, please leave a star rating in the recipe card below and/or comment! I always appreciate your feedback.
Follow me on all of the platforms below.








I made the garlic bread rolls and they turned out soft, buttery, and full of homemade goodness.
I really can’t get over how perfect these came out! So buttery and delicious..this one is now a staple for us!!