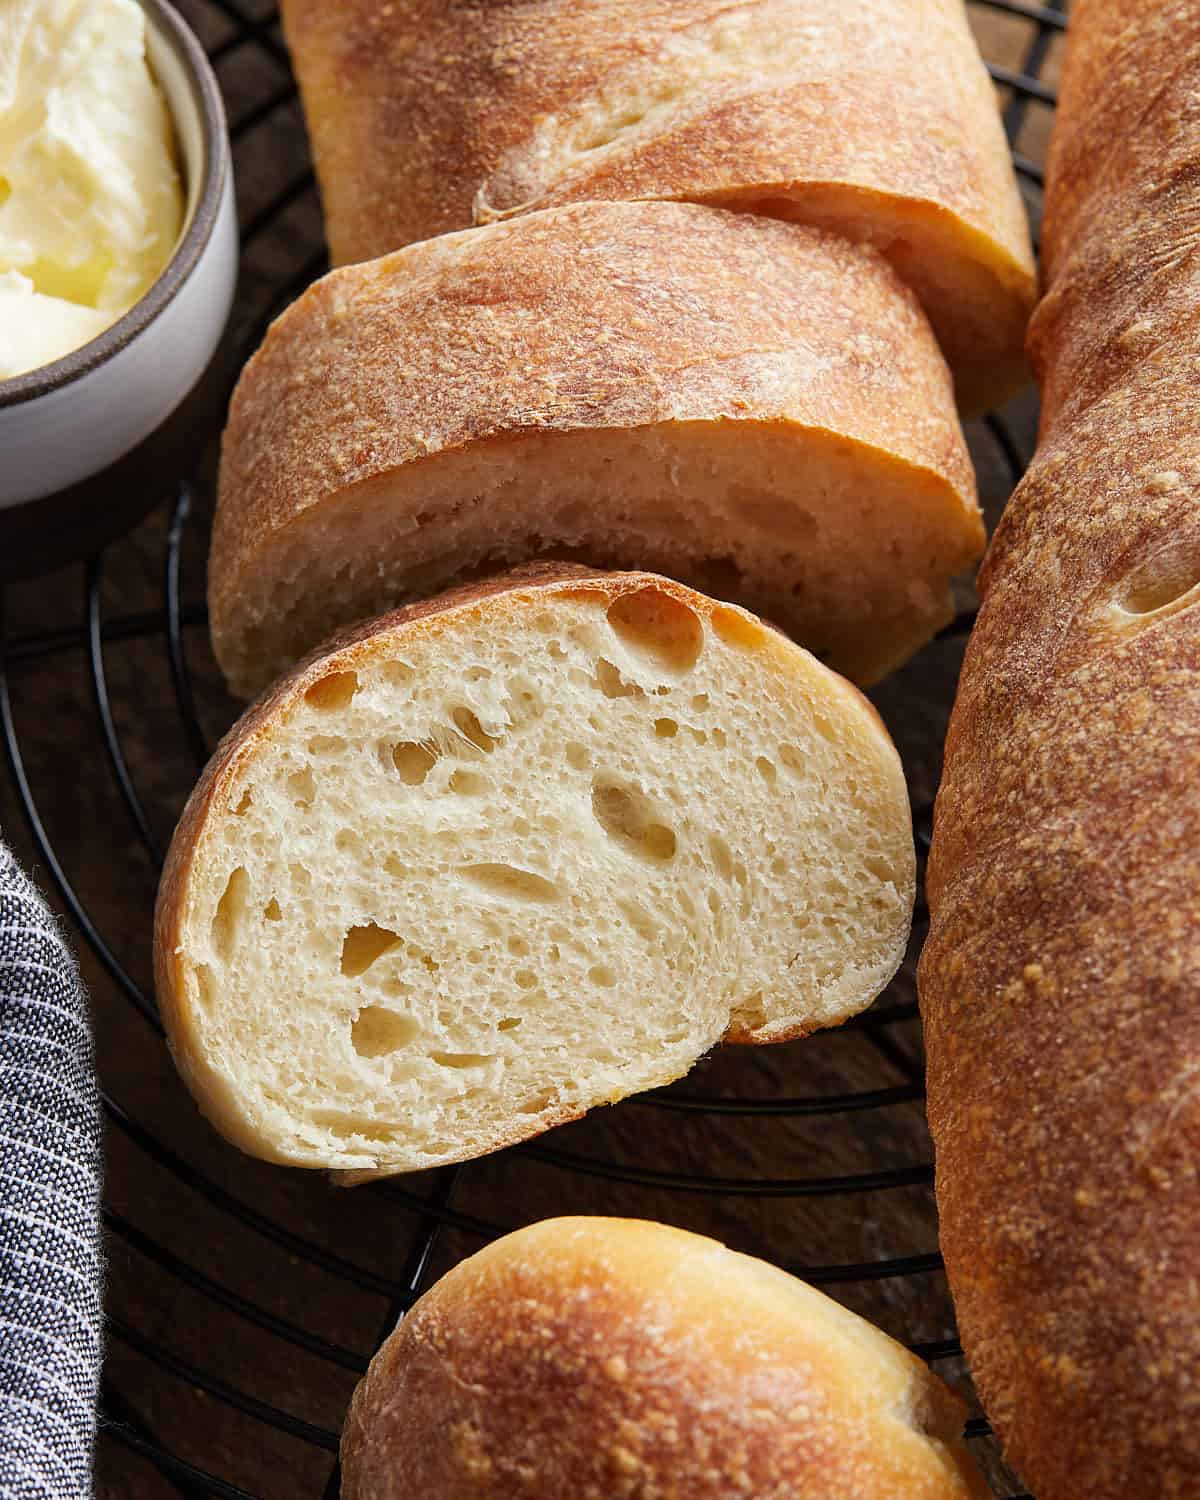
This easy French Bread Recipe is bakery-worthy but simple enough for beginners. With just 4 basic ingredients, you’ll get two golden, crusty loaves with soft, fluffy centers—perfect for sandwiches, garlic bread, or soaking up soup. And the best part? No fancy equipment or overnight rise required. Just a little steam, a hot oven, and some patience for that irresistible crackly crust.
I enjoy baking bread. It can be almost therapeutic in a sense! Once you get the hang of it, you’ll want homemade bread all the time. If you’re looking for a bread recipe that is similar to this French bread, you’ll enjoy my Rustic Bread Recipe – it is the perfect beginner-friendly loaf.
If you prefer something a little softer, try my Garlic Bread Rolls or my Old Fashioned Yeast Rolls! Ideal for any dinner table, these rolls are sure to impress your family and guests.
Table of Contents
Why You’ll Love This Recipe
- Simple & Rustic: Just flour, yeast, salt, and water—no butter or eggs required.
- Two Full Loaves: Make one for now, freeze one for later (or just devour both).
- Incredible Crust: Steam baking gives you that signature golden, shattery crust.
- Beginner-Friendly: No sourdough starter or long fermentation needed.
Ingredients & Substitutions

- Bread Flour: High-protein bread flour gives the loaves that perfect chew and structure. You can use all-purpose flour, but the crust may be softer.
- Active Dry Yeast: Make sure it’s fresh and not expired for the best rise. Instant yeast also works—just skip the warm water wait time.
- Kosher Salt: All of my recipes are tested with Morton kosher salt unless noted otherwise. It is the best salt for everyday cooking because of its size and flavor. If using table salt, the amount should be reduced. I highly recommend picking up some kosher next time you are at the store!
- Warm Water: Around 105–110°F is ideal to activate the yeast. Too hot can kill it, too cold will slow the rise.
Complete list of ingredients and amounts is located on the recipe card below.
How to Make French Bread Recipe
Quick Overview
- Make dough.
- Rise.
- Divide into two pieces.
- Shape & score.
- Final proof.
- Bake & cool.
Step by Step Instructions

Quick Tip From Bri
When shaping the loaves, roll the dough tightly and pinch the seam well to keep them from unraveling during baking.
- Mix the Dough: In a large mixing bowl or the bowl of a stand mixer, whisk together the bread flour, yeast, and salt. Add the warm water and stir with a wooden spoon or spatula until a rough, shaggy dough forms. If using a stand mixer, knead with the dough hook on medium-high speed for 5 to 6 minutes. If kneading by hand, transfer the dough to a lightly floured surface and knead for 8 to 10 minutes, until smooth, elastic, and slightly tacky. The dough should stick just a bit to your hands but pull away cleanly.
- First Rise (Bulk Fermentation): Place the dough back into the mixing bowl and cover with plastic wrap or a damp kitchen towel. Let rise at room temperature for about 90 minutes, or until doubled in size. To check if it has risen enough, gently press your fingertip into the dough—if the indentation springs back slowly, it’s ready.
- Divide and Pre-Shape: Turn the risen dough out onto a lightly floured surface and gently press it down to release some of the air. Divide into two equal pieces. Shape each into a rough rectangle about 12 by 6 inches.
- Shape the First Loaf: Starting from a long side, roll one rectangle tightly into a log and pinch the seam to seal.

Quick Tip From Bri
Pour the hot water into the preheated pan right before baking and shut the oven door quickly to trap the steam for that perfectly crispy crust.
- Repeat with Second Loaf and Score: Place seam-side down on a parchment-lined baking sheet. Repeat the shaping process with the second rectangle of dough and place it on the same parchment-lined baking sheet, leaving space between the loaves. Use a sharp knife or lame to score each loaf with 3 to 4 diagonal slashes across the top.
- Final Proof and Preheat Oven: Loosely cover the loaves with a kitchen towel or lightly greased plastic wrap. Let rise at room temperature for 30 to 45 minutes, until noticeably puffy but still holding their shape. While the loaves are proofing, preheat the oven to 425°F (218°C). Place an empty metal baking dish or cast iron skillet on the bottom rack of the oven to preheat as well.
- Bake: Once the loaves are ready to bake, pour 1 cup of hot water into the preheated pan in the bottom of the oven to create steam. Quickly transfer the baking sheet with the loaves to the oven and close the door immediately to trap the steam. Bake for 26 to 29 minutes, or until the crust is deeply golden brown and the loaves sound hollow when tapped on the bottom. You can also check for doneness with a thermometer—the internal temperature should be around 200°F.
- Transfer & Let Cool: Remove the loaves from the baking sheet and transfer to a wire rack. Let cool for at least 1 hour before slicing to allow the interior to set properly. Cutting too early can result in a gummy crumb.
Recipe Serving Suggestions
I love pairing warm and crispy bread with a cozy soup! Here are some of my favorite fall soup recipes:
- Chicken Broccoli Cheddar Soup: It’s a protein-packed twist on classic broccoli cheddar soup—and the perfect one-pot meal for chilly nights.
- Creamy Italian Sausage Soup: This soup will easily become your new cozy favorite!
- Creamy Lasagna Soup: This recipe is everything you love about lasagna, but in a soup version!
- Slow Cooker Creamy Chicken and Corn Soup: This recipe is great for a crowd or meal prep.
Expert Tips
- Weigh Your Ingredients: For best results, use a kitchen scale. Measuring flour by volume can vary drastically, leading to dry or dense bread. This recipe was tested using 480 grams of bread flour and 340 grams of water for precision.
- Set a Timer While Kneading: You don’t want to under-knead the dough.
- Use Steam for a Crisp Crust: Don’t skip the steam! Pouring hot water into a preheated pan in the oven creates steam, which helps form that iconic golden, shatteringly crisp crust. A metal or cast iron pan works best—avoid glass.
- Don’t Rush the Rise: Be patient with both proofing stages. The dough should double in size during the first rise and puff noticeably during the second. A slow, proper rise leads to better texture and flavor.
Most Common Mistakes
- Cutting Too Early: Wait at least 1 hour for the crumb to set or it’ll be gummy.
- Too Much Flour: Avoid packing the flour if using measuring cups—spoon and level or use a scale.
- Don’t Overwork the Dough: The shape doesn’t have to be perfect!
- Skipping the Score: Not scoring the tops of your loaves before baking prevents steam from escaping properly. This can cause the crust to crack unpredictably and result in uneven rising.
Additions & Variations
- Herb French Bread: Mix in 2 teaspoons of dried herbs like rosemary or Italian seasoning during step 1.
- Garlic Lover’s Loaf: Add 1–2 teaspoons of garlic powder or roasted garlic to the dough.
- Cheesy Twist: Add ½ cup shredded sharp cheddar or parmesan before rolling into loaves.

More Bread Recipes


Did you make this recipe?
If you try this recipe, please leave a star rating in the recipe card below and/or comment! I always appreciate your feedback.
Follow me on all of the platforms below.

Homemade French Bread Recipe
Equipment
- Wooden Spoon
- Lame
Ingredients
- 3 2/3 cups (480g) bread flour
- 2¼ teaspoons (7g) active dry yeast
- 2 teaspoons (10g) Morton kosher salt
- 1½ cups (340g) warm water (about 105–110°F)
Instructions
- Mix the Dough: In a large mixing bowl or the bowl of a stand mixer, whisk together the bread flour, yeast, and salt. Add the warm water and stir with a wooden spoon or spatula until a rough, shaggy dough forms. If using a stand mixer, knead with the dough hook on medium-high speed for 5 to 6 minutes. If kneading by hand, transfer the dough to a lightly floured surface and knead for 8 to 10 minutes, until smooth, elastic, and slightly tacky. The dough should stick just a bit to your hands but pull away cleanly.3 2/3 cups (480g) bread flour, 2¼ teaspoons (7g) active dry yeast, 2 teaspoons (10g) Morton kosher salt, 1½ cups (340g) warm water (about 105–110°F)
- First Rise (Bulk Fermentation): Place the dough back into the mixing bowl and cover with plastic wrap or a damp kitchen towel. Let rise at room temperature for about 90 minutes, or until doubled in size. To check if it has risen enough, gently press your fingertip into the dough—if the indentation springs back slowly, it's ready.
- Divide and Pre-Shape: Turn the risen dough out onto a lightly floured surface and gently press it down to release some of the air. Divide into two equal pieces. Shape each into a rough rectangle about 12 by 6 inches.
- Shape the First Loaf: Starting from a long side, roll one rectangle tightly into a log and pinch the seam to seal.
- Repeat with Second Loaf and Score: Place seam-side down on a parchment-lined baking sheet. Repeat the shaping process with the second rectangle of dough and place it on the same parchment-lined baking sheet, leaving space between the loaves. Use a sharp knife or lame to score each loaf with 3 to 4 diagonal slashes across the top.
- Final Proof and Preheat Oven: Loosely cover the loaves with a kitchen towel or lightly greased plastic wrap. Let rise at room temperature for 30 to 45 minutes, until noticeably puffy but still holding their shape. While the loaves are proofing, preheat the oven to 425°F (218°C). Place an empty metal baking dish or cast iron skillet on the bottom rack of the oven to preheat as well.
- Bake: Once the loaves are ready to bake, pour 1 cup of hot water into the preheated pan in the bottom of the oven to create steam. Quickly transfer the baking sheet with the loaves to the oven and close the door immediately to trap the steam. Bake for 26 to 29 minutes, or until the crust is deeply golden brown and the loaves sound hollow when tapped on the bottom. You can also check for doneness with a thermometer—the internal temperature should be around 200°F.
- Transfer & Let Cool: Remove the loaves from the baking sheet and transfer to a wire rack. Let cool for at least 1 hour before slicing to allow the interior to set properly. Cutting too early can result in a gummy crumb.
Notes
- Kosher Salt: All of my recipes are tested with Morton kosher salt unless noted otherwise. It is the best salt for everyday cooking because of its size and flavor. If using table salt, the amount should be reduced. I highly recommend picking up some kosher next time you are at the store!
- Weigh Your Ingredients: For best results, use a kitchen scale. Measuring flour by volume can vary drastically, leading to dry or dense bread. This recipe was tested using 480 grams of bread flour and 340 grams of water for precision.
- Use Steam for a Crisp Crust: Don’t skip the steam! Pouring hot water into a preheated pan in the oven creates steam, which helps form that iconic golden, shatteringly crisp crust. A metal or cast iron pan works best—avoid glass.
- Don’t Rush the Rise: Be patient with both proofing stages. The dough should double in size during the first rise and puff noticeably during the second. A slow, proper rise leads to better texture and flavor.
Nutrition
Nutrition information is automatically calculated, so should only be used as an approximation.


This French bread is amazing! It’s such a great family recipe.
This homemade French bread recipe is amazing! A crowd pleaser for sure!
This is such a beginner-friendly recipe! The inside was so soft and the crust turned out perfectly crisp.
My family loved this! Will be making again!!
Such an amazing recipe!! The aroma from the oven was so enticing and the results were delicious.