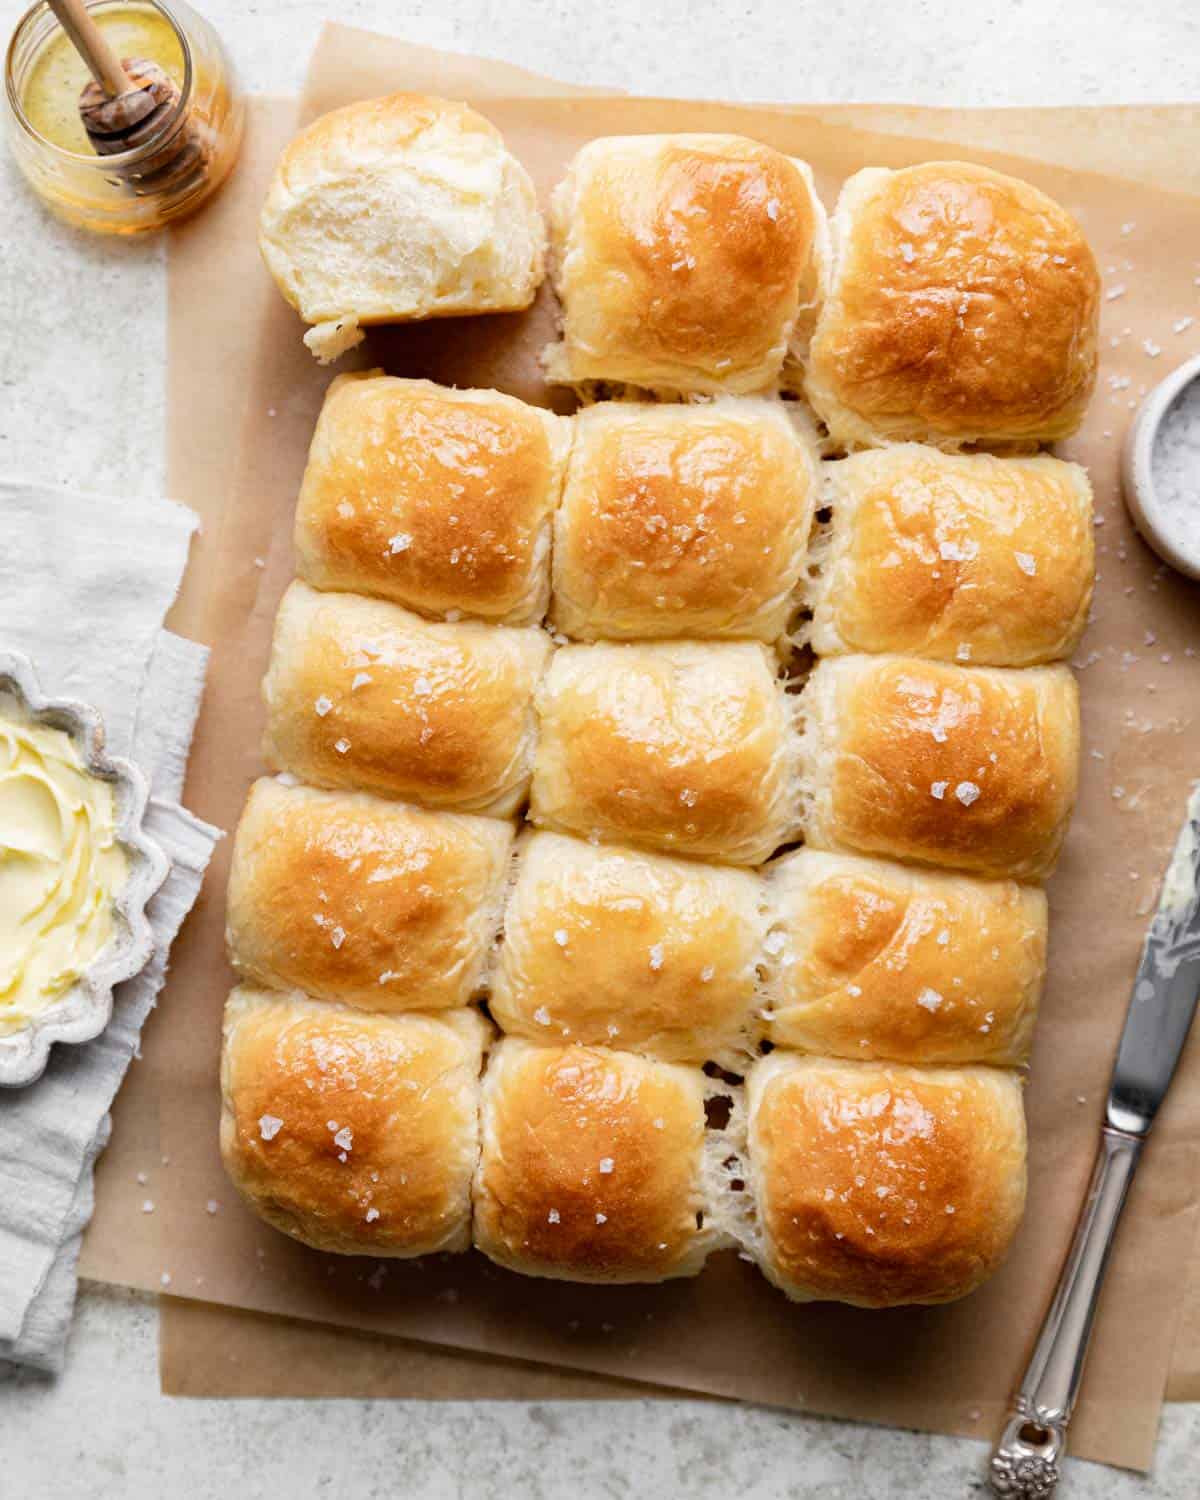
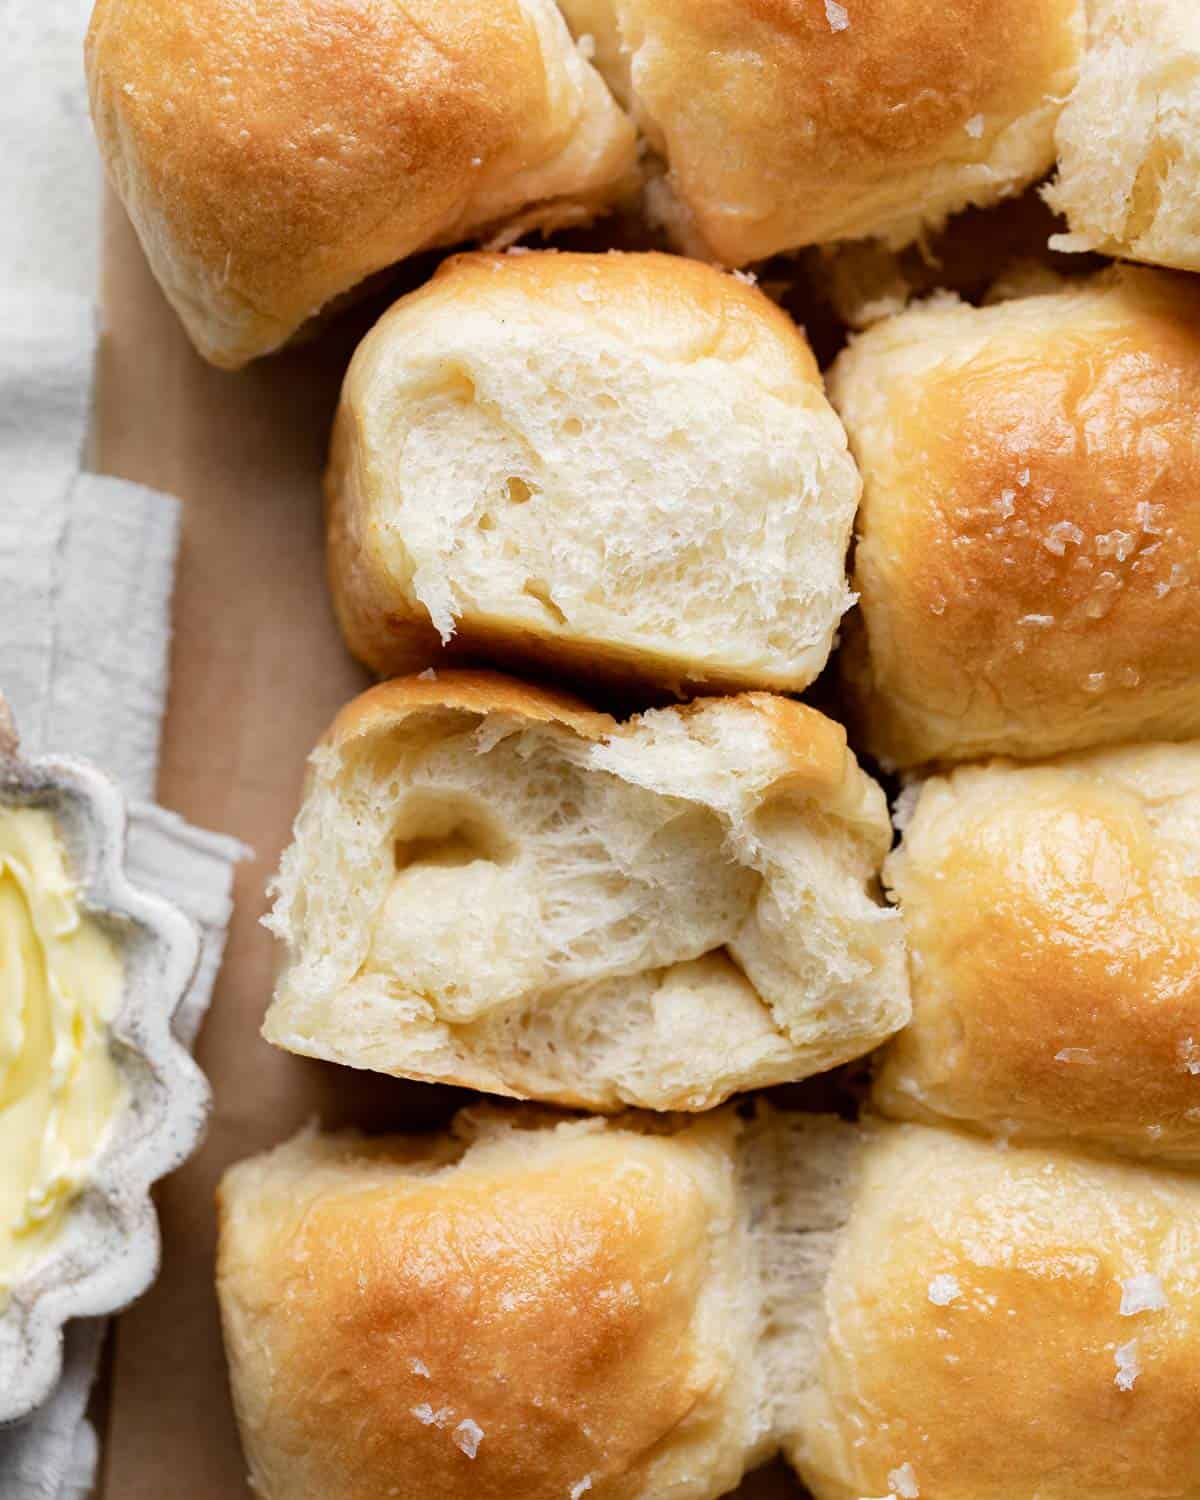
These Old Fashioned Yeast Rolls Recipe are rich, fluffy, salty, a little sweet, and absolutely delicious. Between the heavy cream and the honey butter, these dinner rolls are full of moisture. So addicting and worth all of the work, I promise.
Baking homemade bread, like these yeast rolls or my Rosemary Parmesan Bread, has been something I have recently fallen in love with.
If you are new to bread making, start with my Easy Rustic Bread. For something a littler more involved, but absolutely worth the time, try my Cream Cheese Frosting Cinnamon Rolls.
Looking for a quick bread instead? Try this Blackberry Lemon Loaf.
Table of Contents
Why You’ll Love This Recipe
- Rich, moist, & buttery
- Finished with honey butter & heavy cream
- Light, fluffy, & super soft
- Salty & a little sweet
- The perfect homemade holiday buttery yeast rolls
- Everyone’s favorite side dish
Ingredients & Substitutions
Dough
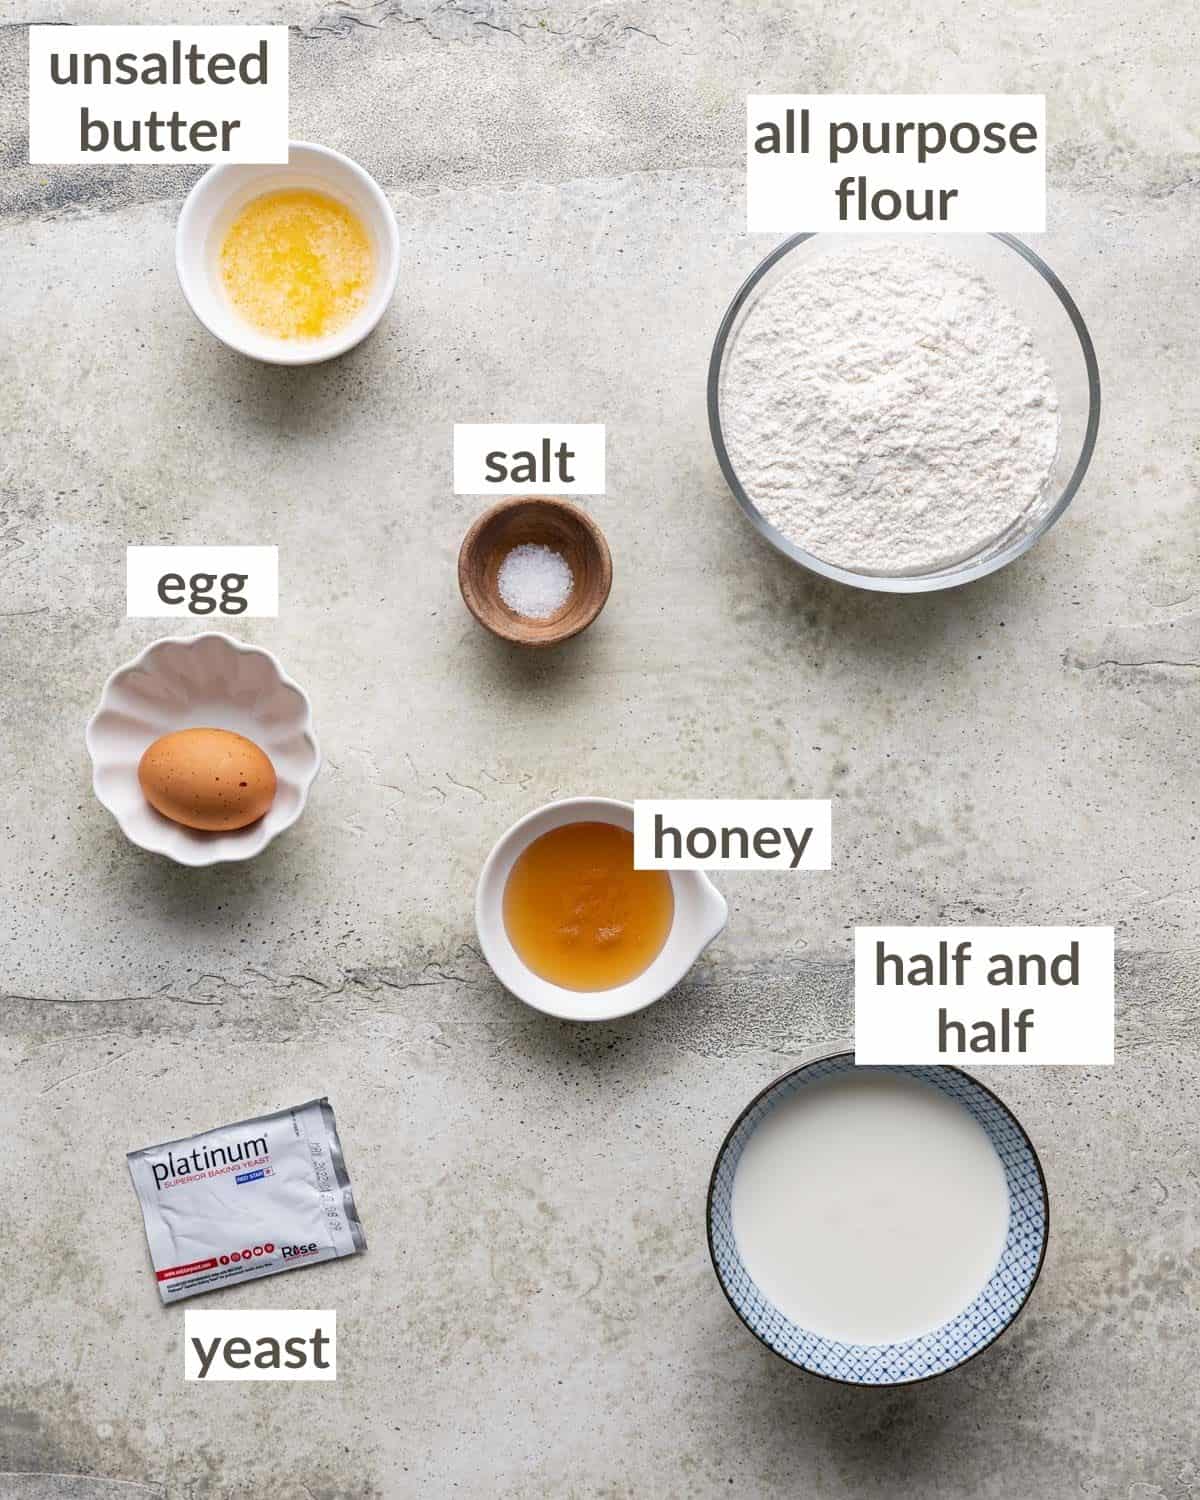
- Honey: Swap for white sugar.
- Instant Yeast: Red Star Platinum Superior Baking Yeast is my favorite. It is an instant yeast, but active dry yeast can be used as well. Rising may take longer though.
- Bread Flour: You can substitute this for all purpose flour without making any other changes to the recipe. I prefer to use bread flour because it produces a chewier dinner roll.
Topping

Complete list of ingredients and amounts is located on the recipe card below.
How To Make Old Fashioned Yeast Rolls
Quick Overview
- Make the dough with warm water.
- Cover with plastic wrap and let it rise.
- Punch down & shape roll.
- Let the rolls rise.
- Brush & bake.
Step by Step Instructions
Step 1: In a stand mixer fitted with the dough hook attachment, add the milk, honey, and yeast to the bowl. Whisk until combined. Let stand for 5 minutes. The mixture should be bubbly/frothy.
Step 2: Add the melted butter, egg, 1 cup of the flour, and the salt. Mix on medium until just combined.

Step 3: Add another 1 1/2 cups of flour. Mix on medium until a dough forms.
Step 4: Depending on what your dough looks like, you may need to add more flour (see photo above). I typically add another 1/3-1/2 cup of the flour. The dough should be slightly wet but not sticking to the sides of the bowl. Mix on high for 4-5 minutes. The dough should have more elasticity now.

TIP – The dough will be slightly sticky. Do not add too much flour!
Step 5: Place the dough into a bowl greased with melted butter or oil. Let it rise in a warm environment (see recipe notes) for 1-2 hours or until it has doubled in size.
Step 6: Punch the dough down and gently form it into a thick rectangle (see photo above). Use a knife or bench scraper to divide the dough into 15 pieces.

TIP – Do not overwork the dough.
Step 7: Take each piece and form it into a ball. Pull the sides around toward the bottom and pinch the seam. This should form a round top. Place into a greased 9 x 13 glass baking dish.
Step 8: Let the rolls rise for another hour in a warm environment. They should puff up quite a bit. Preheat the oven to 350 degrees about halfway through the second rise.

TIP – Don’t stress too much about shaping the rolls. They will taste great regardless.
Step 9: Microwave the heavy cream for 10-15 seconds to take the chill off it. Brush the rolls with it and pour the remainder on top of them.
Step 10: Bake for 22-26 minutes or until the tops are golden and the rolls are cooked through. Mix the melted butter and honey together while the rolls bake. Brush warm rolls with honey butter and serve immediately.

TIP – These rolls are best right out of the oven!
Expert Tips & Recipe Notes
- Use a thermometer to take the temperature of the half and half. If the milk is too hot, it will kill the yeast. Pour the milk into a small microwave safe bowl. Microwave it in 10 second increments until it is about 110 degrees.
- Cool the butter to room temperature. After you melt the butter, let it cool while you prepare the other ingredients. This will ensure it does not cook the egg.
- Measure the flour with a scale or carefully spoon & level it. A scale is the best way to accurately measure the flour. If you do not have one, you can just use measuring cups. Gently spoon the flour into the measuring cup and use a knife to level the top of it.
- Use a stand mixer with a dough hook. While these rolls can be made without a mixer, it really makes the process so much easier. The dough hook does all of the kneading for you resulting in a dough with the perfect texture.
- Grease the bowl and pan well. Don’t skimp on the butter or oil. The dough should be greased enough that it doesn’t stick to your hands while shaping the rolls. I don’t even use flour.
- Let the rolls rise in a warm environment. If it is warm and sunny outside, put your covered dough on a window sill. You can also use your oven. Preheat the oven as low as it can go, then turn it off once it has come to temperature. Wait above 5 minutes and then put the dough in the oven with the door cracked. After 20-30 minutes, close the door so that too much heat does not escape. You can repeat this for the second proof as well.
- Don’t overwork the dough. After the first rise, gently punch the dough down and shape the rolls. They do not need to look perfect and some may be different sizes. That is okay! The more you work the dough, the tougher and more dense the rolls will be.
- Keep an eye on the rolls while they bake. If the rolls reach desired color before they are finished cooking, loosely cover them with foil for the remainder of the baking.
- Don’t skip out on the honey butter & salt. Brush the rolls with the honey butter right when they come out of the oven and sprinkle with sea salt.
Recipe FAQs
Store leftovers in the refrigerator in an airtight container for 5-7 days.
Yes. The day before you want to bake the rolls, complete the recipe through step 7. Cover the baking dish and place the rolls in the refrigerator overnight. Let the rolls rise on the counter for 1-2 hours before baking. Pick back up on step 9.
You can freeze these rolls raw or cooked. To freeze the dough, shape the rolls into balls. Place the balls not touching on a baking sheet lined with parchment paper in the freezer for 3-4 hours. Then you can place them into an airtight bag. Place the frozen rolls into a greased pan and thaw on the counter for 4 hours. Bake according to the recipe. Repeat the same freezing process with cooked rolls so they do not stick together in the freezer. Thaw in the microwave, on the counter, or in the fridge.
Too much flour will create a dense roll. Be sure to measure correctly! Overworking the dough will also create a tough roll.
There are a couple of reasons why the rolls might not be rising. Check to make sure the yeast was not expired. Second, if the milk was too hot, it could kill the yeast. Be sure to use a thermometer. Lastly, too much flour will make the dough too heavy and unable to rise.
More Bread Recipes


Old Fashioned Yeast Rolls Recipe
Equipment
Ingredients
Dough
- 1 cup half and half warmed to 110 degrees
- 2 Tablespoons honey*
- 2 1/4 teaspoons active dry instant yeast 1 standard packet*
- 3 Tablespoons (43 g) unsalted butter melted & cooled
- 1 large egg
- 2 3/4 – 3 cups (357-390g) bread flour*
- 1 teaspoon salt
Topping
- 1/4 cup heavy cream
- 2 Tablespoons unsalted butter melted
- 1 Tablespoon honey
Instructions
- Review all recipe notes and instructions before beginning.
- In a stand mixer fitted with the dough hook attachment, add the milk, honey, and yeast to the bowl. Whisk until combined. Let stand for 5 minutes. The mixture should be bubbly/frothy.
- Add the melted butter, egg, 1 cup of the flour, and the salt. Mix on medium until just combined.
- Add another 1 1/2 cups of flour. Mix on medium until a dough forms.
- Depending on what your dough looks like, you may need to add more flour (see photo above). I typically add another 1/3-1/2 cup of the flour. The dough should be slightly wet but not sticking to the sides of the bowl. Mix on high for 4-5 minutes. The dough should have more elasticity now.
- Place the dough into a bowl greased with melted butter or oil. Let it rise in a warm environment (see recipe notes) for 1-2 hours or until it has doubled in size.
- Punch the dough down and gently form it into a thick rectangle (see photo above). Use a knife or bench scraper to divide the dough into 15 pieces.
- Take each piece and form it into a ball. Pull the sides around toward the bottom and pinch the seam. This should form a round top. Place into a greased 9 x 13 glass baking dish.
- Let the rolls rise for another hour in a warm environment. They should puff up quite a bit. Preheat the oven to 350 degrees about halfway through the second rise.
- Microwave the heavy cream for 10-15 seconds to take the chill off it. Brush the rolls with it and pour the remainder on top of them.
- Bake for 22-26 minutes or until the tops are golden and the rolls are cooked through. Mix the melted butter and honey together while the rolls bake. Brush warm rolls with honey butter and serve immediately.
Notes
- Honey: Swap for white sugar.
- Instant Yeast: Red Star Platinum Superior Baking Yeast is my favorite. It is an instant yeast, but active dry yeast can be used as well. Rising may take longer though.
- Bread Flour: You can substitute this for all purpose flour without making any other changes to the recipe. I prefer to use bread flour because it produces a chewier dinner roll.
- Use a thermometer to take the temperature of the half and half. If the milk is too hot, it will kill the yeast. Pour the milk into a small microwave safe bowl. Microwave it in 10 second increments until it is about 110 degrees.
- Cool the butter to room temperature. After you melt the butter, let it cool while you prepare the other ingredients. This will ensure it does not cook the egg.
- Measure the flour with a scale or carefully spoon & level it. A scale is the best way to accurately measure the flour. If you do not have one, you can just use measuring cups. Gently spoon the flour into the measuring cup and use a knife to level the top of it.
- Use a stand mixer with a dough hook. While these rolls can be made without a mixer, it really makes the process so much easier. The dough hook does all of the kneading for you resulting in a dough with the perfect texture.
- Grease the bowl and pan well. Don’t skimp on the butter or oil. The dough should be greased enough that it doesn’t stick to your hands while shaping the rolls. I don’t even use flour.
- Let the rolls rise in a warm environment. If it is warm and sunny outside, put your covered dough on a window sill. You can also use your oven. Preheat the oven as low as it can go, then turn it off once it has come to temperature. Wait above 5 minutes and then put the dough in the oven with the door cracked. After 20-30 minutes, close the door so that too much heat does not escape. You can repeat this for the second proof as well.
- Don’t overwork the dough. After the first rise, gently punch the dough down and shape the rolls. They do not need to look perfect and some may be different sizes. That is okay! The more you work the dough, the tougher and more dense the rolls will be.
- Keep an eye on the rolls while they bake. If the rolls reach desired color before they are finished cooking, loosely cover them with foil for the remainder of the baking.
- Don’t skip out on the honey butter & salt. Brush the rolls with the honey butter right when they come out of the oven and sprinkle with sea salt.


OMG! EVERYONE loved these! (I had to convince some people to, “just try one bite,” and then they couldn’t stop eating!)
Thank you!
I had to hide a couple so I can try them at a day old. (I can’t imagine they won’t be just as wonderful but I will find out tomorrow!)
I’ve never made homemade rolls and found yours while looking for a recipe that called for 1/2 & 1/2 instead of milk. I made ahead for Thanksgiving and could not get the second rise going after being in the fridge all night. Bro in Law suggested putting them on a heating pad and worked like a charm. I was worried about adding more 1/2 & 1/2 while baking but they came out perfectly and now I’m tasked to make them ever year. So thanks a lot? Ha, no, I will be making these again very soon! Delicious!
Awesome! I am so glad you enjoyed them. They are a favorite of mine too.