This dutch oven no knead Easy Rustic Bread is the perfect beginner friendly loaf. You only need 4 ingredients to make it and no sourdough starter. This rustic bread can be made start to finish in a few hours or you can rest it overnight in the fridge.
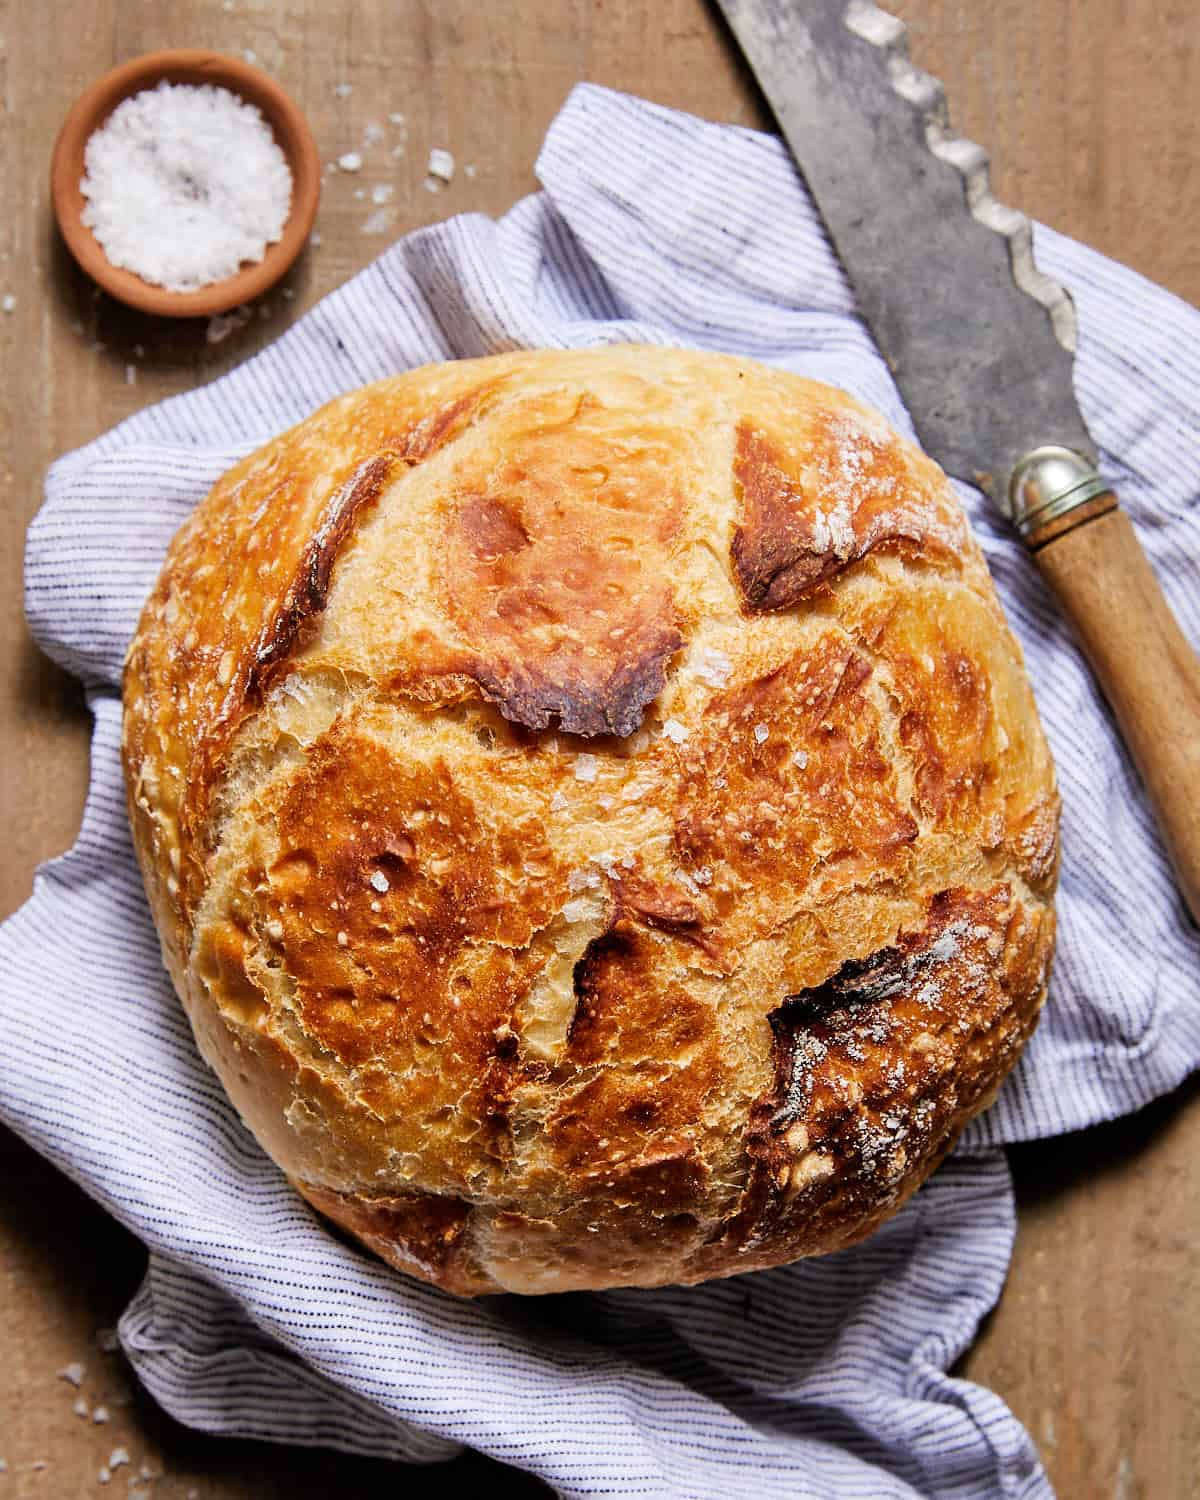
I’ve made bread so many times so I wanted to create this artisan crusty bread recipe for beginners with all of the tips and tricks.
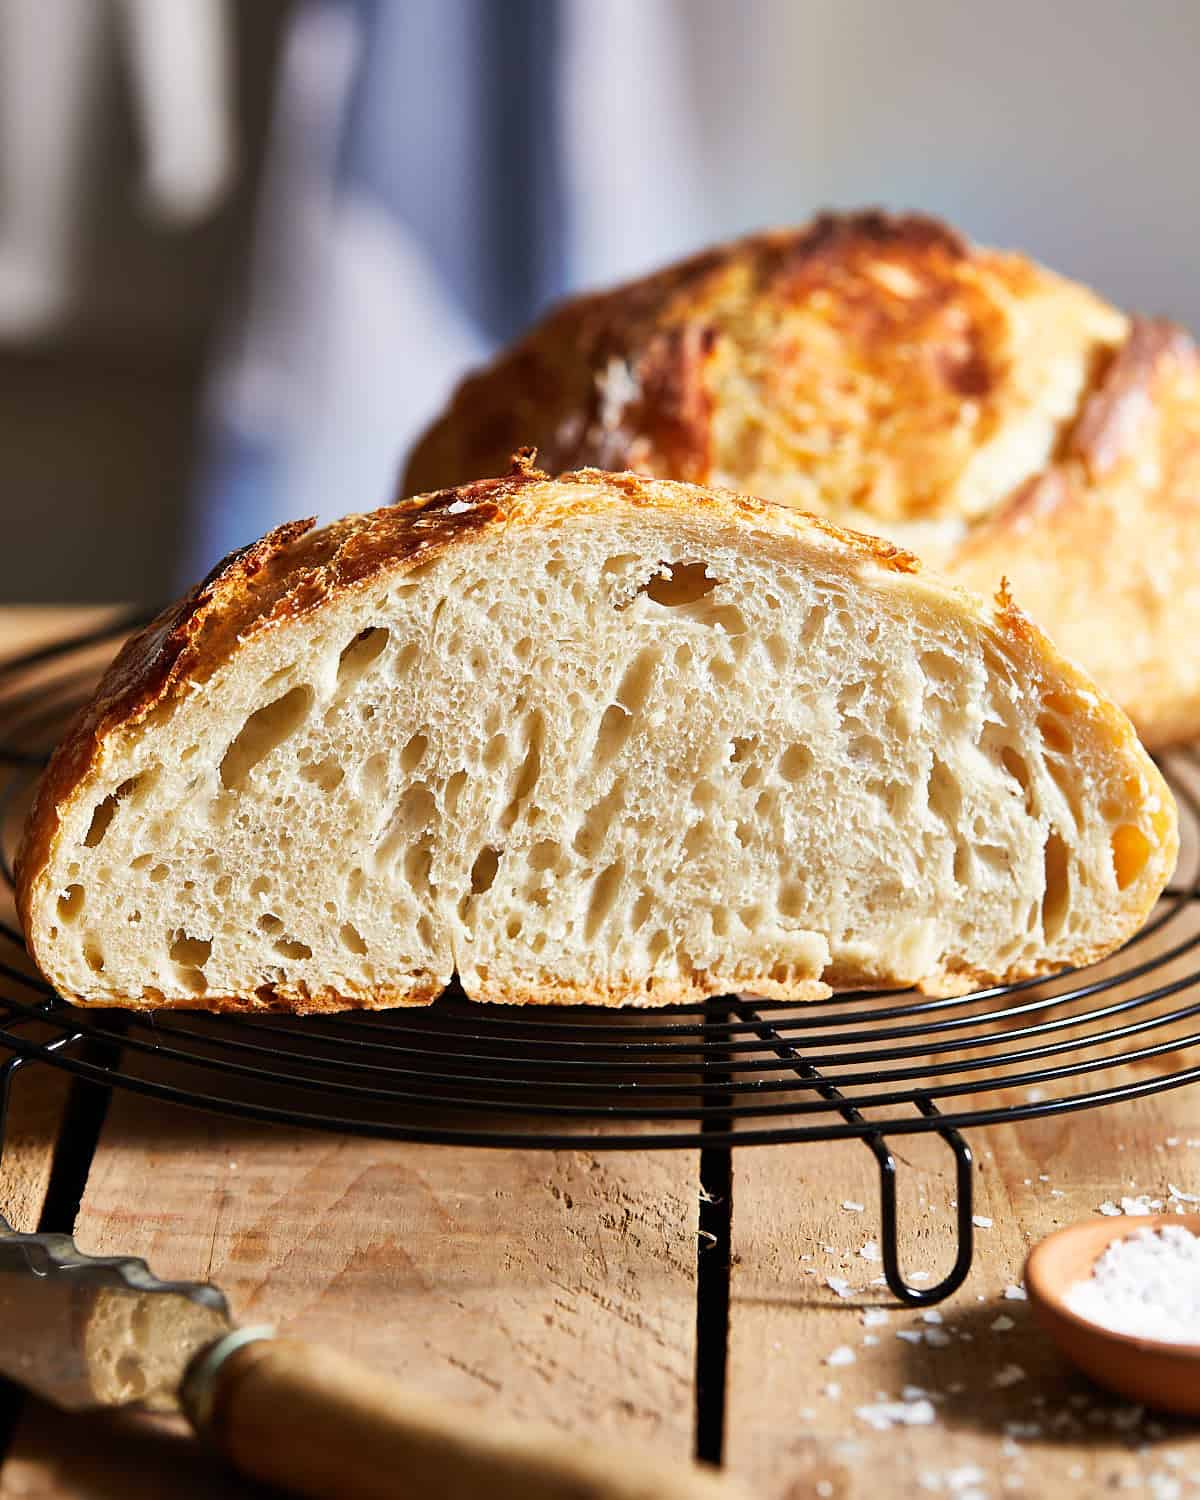
This rise time is long, but this ensures the bread is full of holes.
If you enjoy this recipe, try my 72 Hour Pizza Dough Recipe or Parmesan Rosemary Bread next time.
Short on time? Try this Texas Toast Garlic Bread, Homemade Drop Biscuits without Milk, or super moist Cornbread without Buttermilk. My classic rolled Homemade Biscuits are always a great option too.
Jump to:
Ingredients & Substitutions
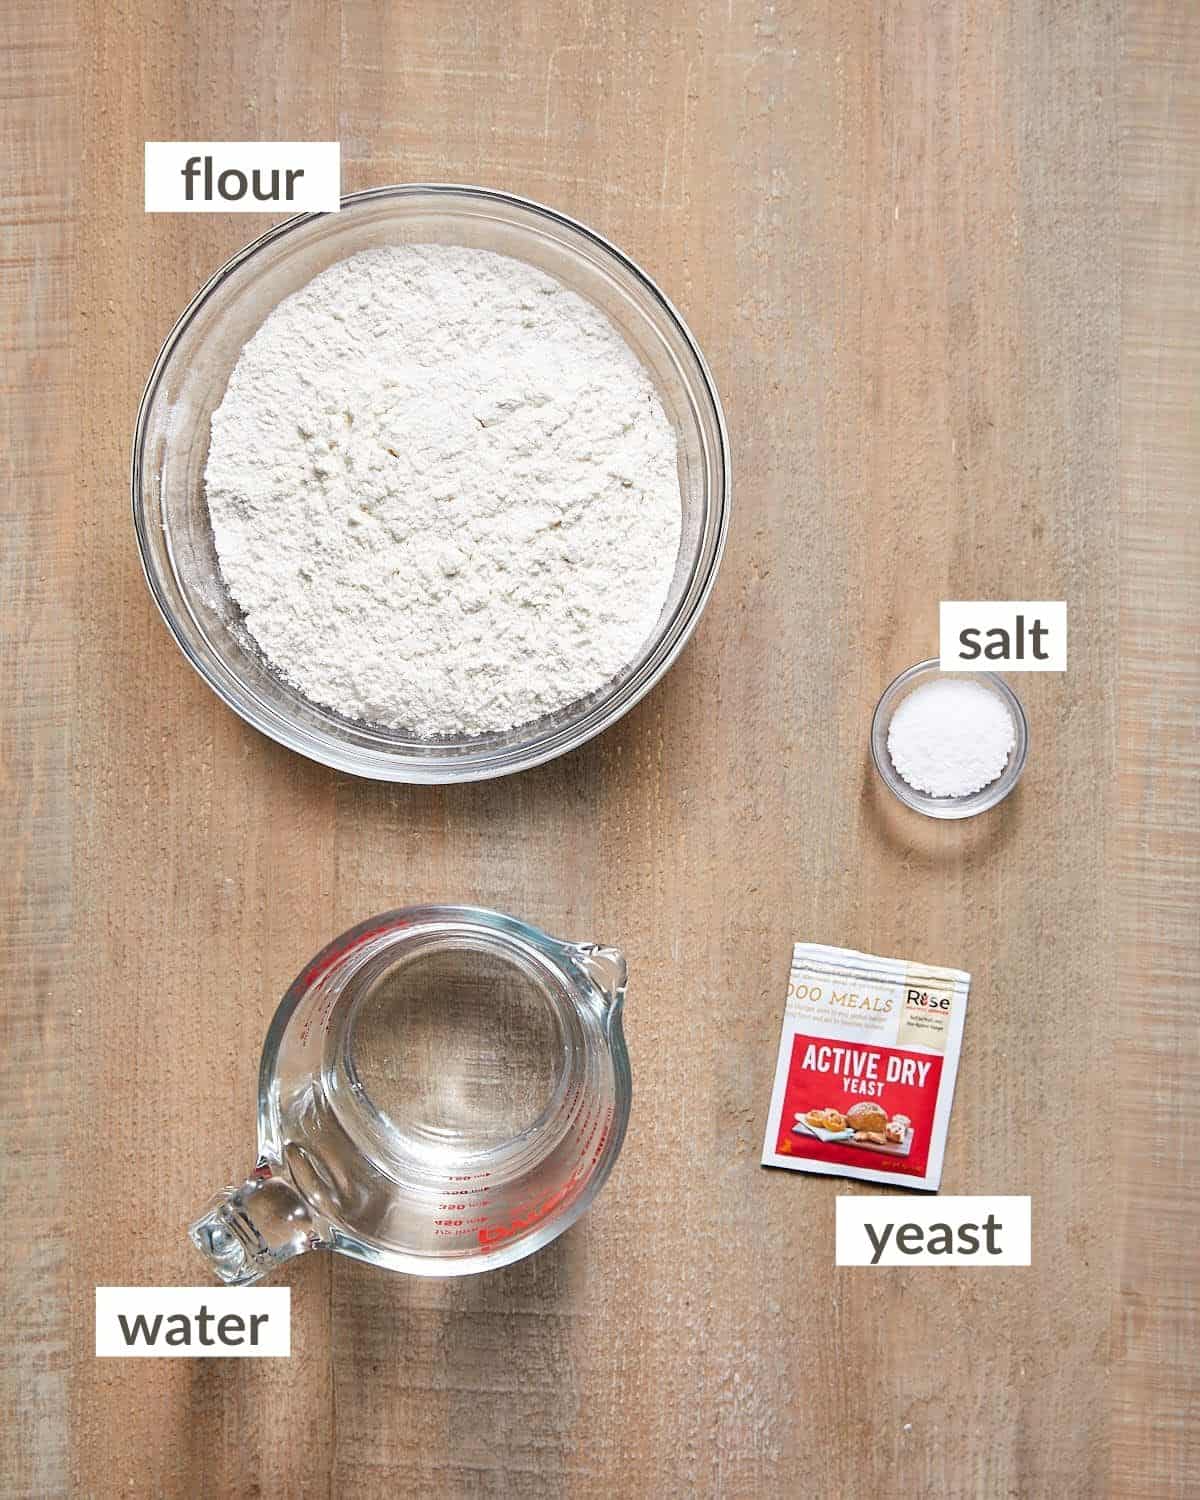
- Flour: I highly recommend King Arthur Bread Flour. Bread flour can be found next to the all purpose flour at most supermarkets. It gives the bread a chewier texture which is preferred for rustic breads. In a pinch, you can use all purpose flour. I have not tested this recipe with whole wheat flour, but I do not recommend it, as it makes loaves denser.
- Yeast: You can use active dry yeast or instant yeast. I use Red Star Active Dry Yeast. If you do use instant yeast, you may not need to let the dough rise as long. See photo above.
- Salt: I recommend a coarse salt like kosher or sea salt. It gives the bread a better taste. If you only have table salt, only use 1 ½ teaspoons.
- Water: You can use a thermometer or just feel the water. It should be warm, but not hot water.
Complete list of ingredients and amounts is located on the recipe card below.
How to Make Rustic Bread
Quick Overview
- Make dough.
- Let it rise in a warm place.
- Preheat the oven.
- Gently shape dough.
- Bake the bread covered.
- Finish baking uncovered.
Step by Step Instructions
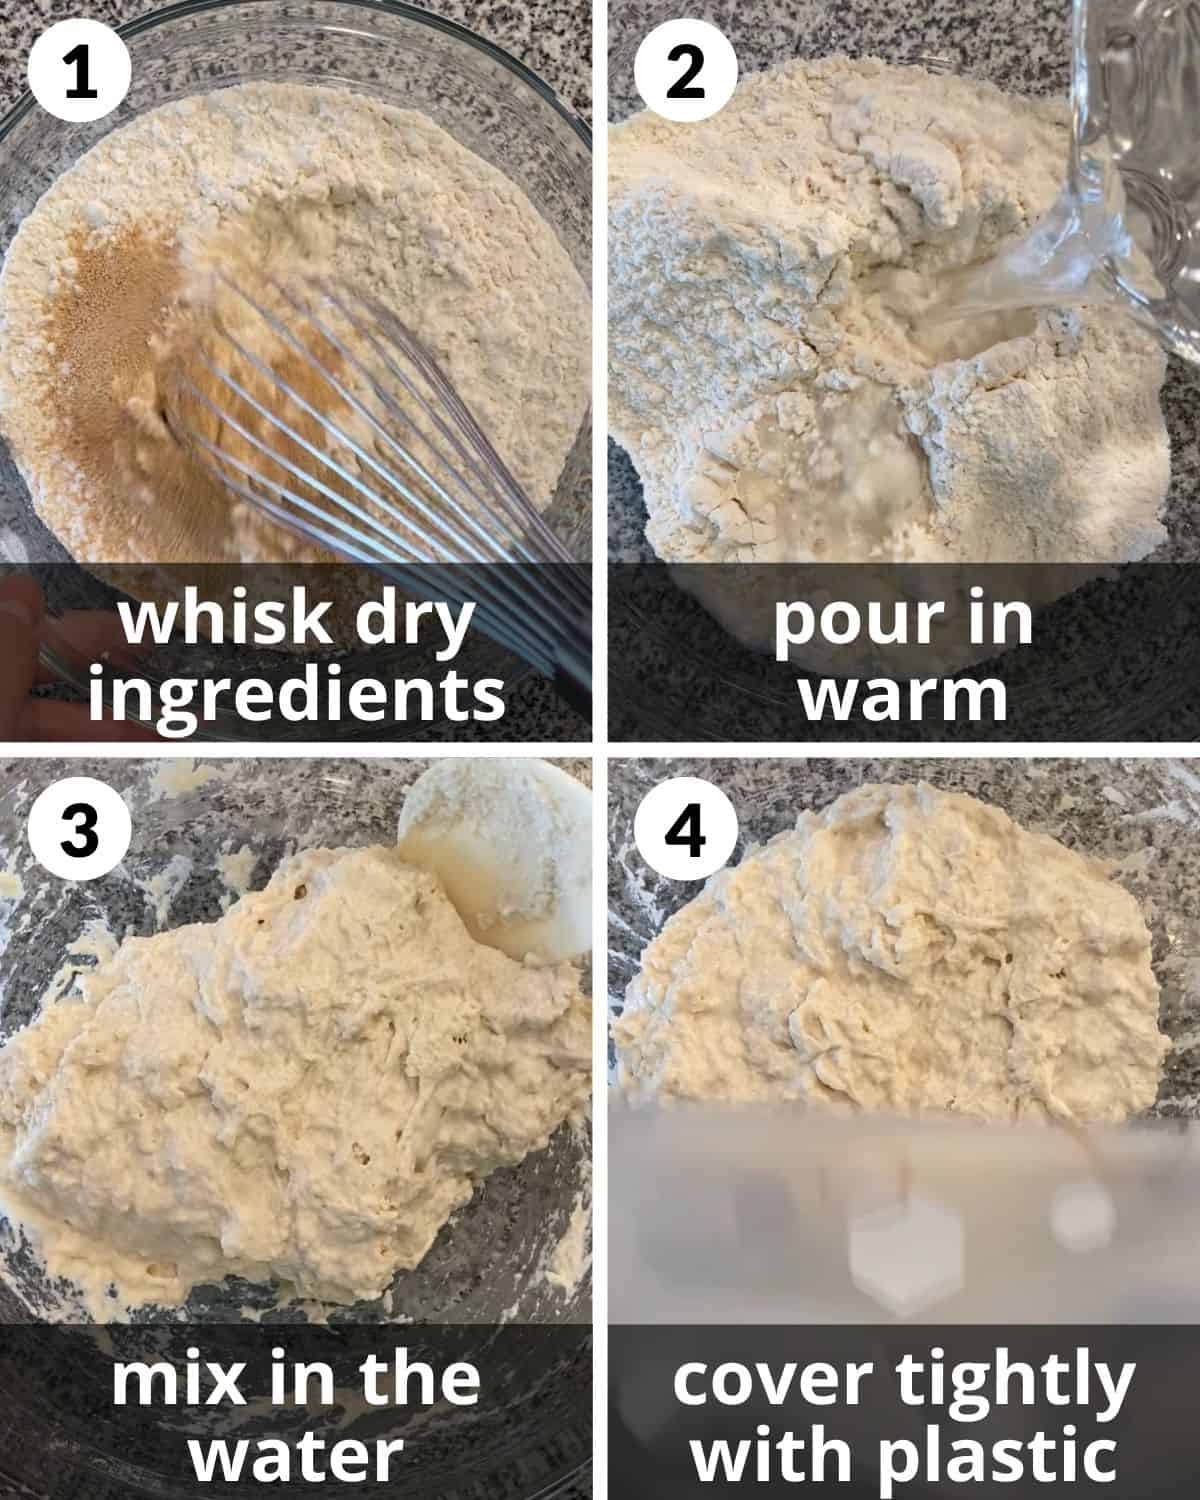
The dough should still be sticking to sides of bowl and unable to handle.
Step 1: In a large mixing bowl, whisk together the bread flour, yeast, and salt.
Step 2: Pour warm water over dry ingredients.
Step 3: Mix in the water, until all of the flour is absorbed. The dough will be very wet and sticky.
Step 4: Push all of the dough towards the center of the bowl and cover tightly with plastic wrap.
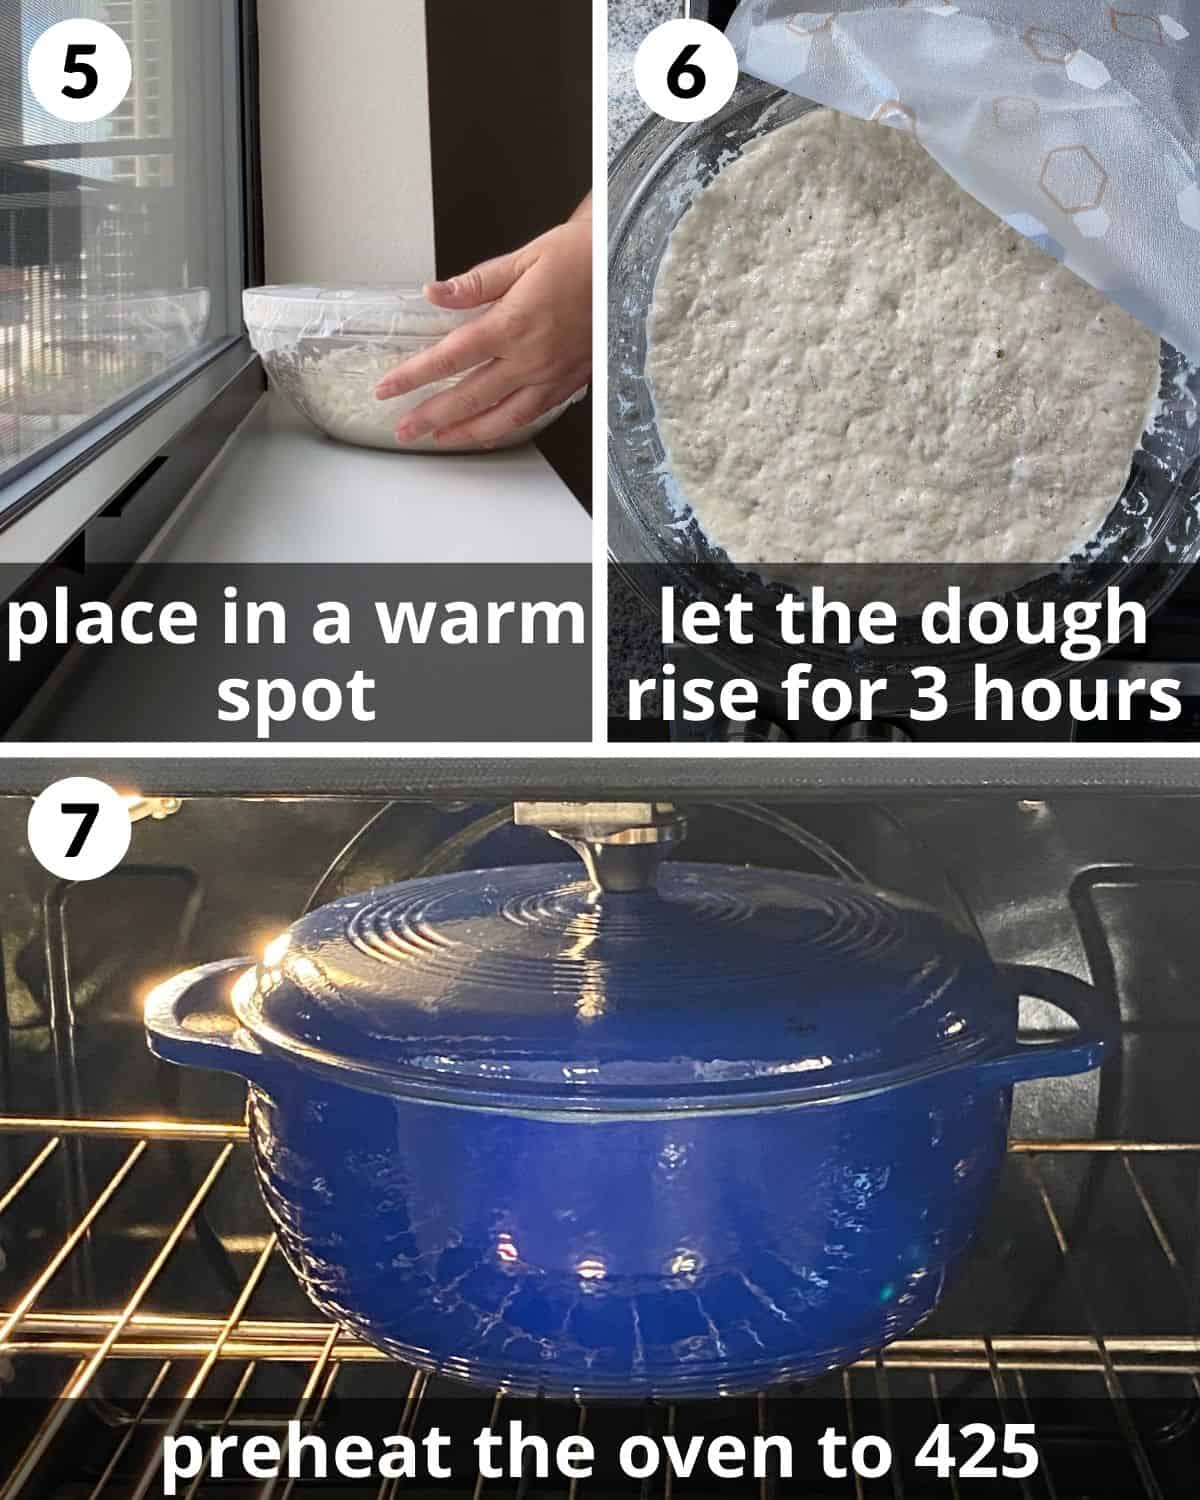
There should be lots of bubbles in dough.
Step 5: Place the dough in a warm spot, like a window sill, near the oven, or even in the oven with just the light on.
Step 6: Let the dough rise for 3 hours. Optional: Place covered dough in the refrigerator overnight or for up to 3 days.
Step 7: If the bread was in the refrigerator, allow it to come to room temperature for about an hour. Preheat the oven to 450 degrees with a dutch oven placed on the middle rack so it can preheat as well. If you do not have a dutch oven, use a pizza stone or baking sheet. See notes.
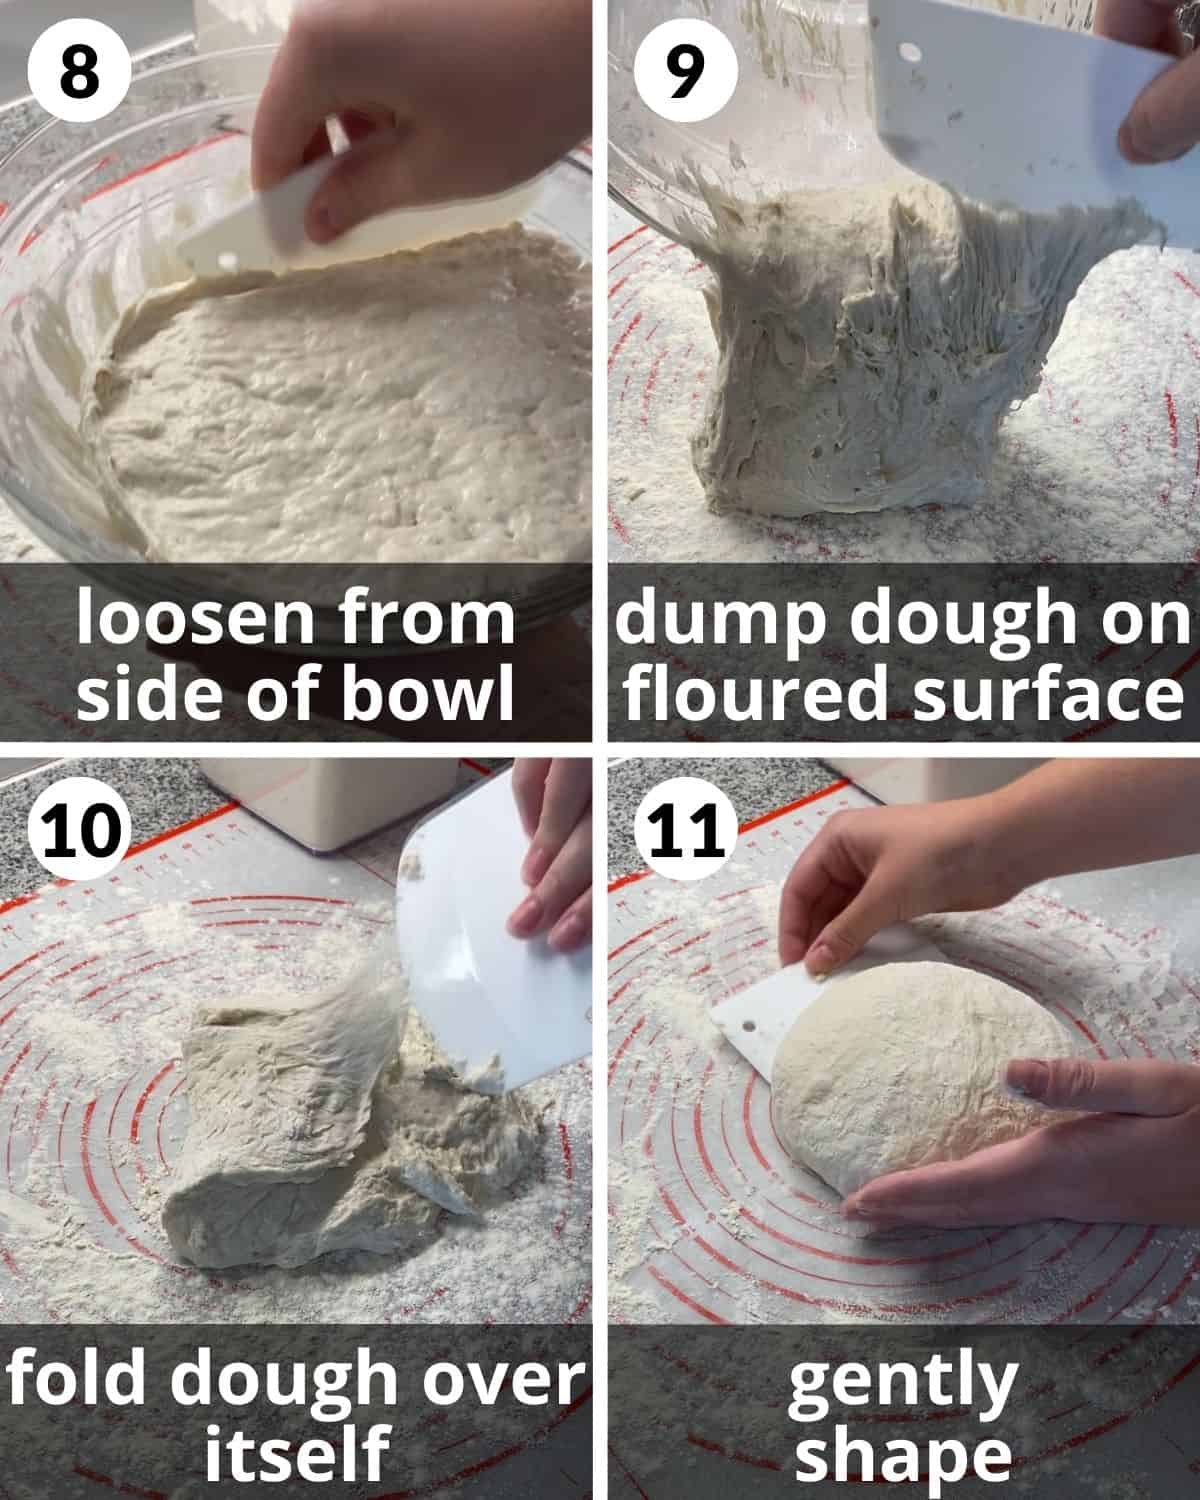
It should be very sticky so make sure there is lots of flour on the work surface.
Step 8: Using a spatula or plastic bench scraper, loosen the dough from the sides of the bowl by scraping the dough inward.
Step 9: Dump the dough on a well floured surface.
Step 10: Use the scraper to fold the dough gently over itself a few times until it starts to stick together.
Step 11: Flip the dough so the folded seam side is down. Use your hand and the scraper to gently tap the dough into a round loaf.
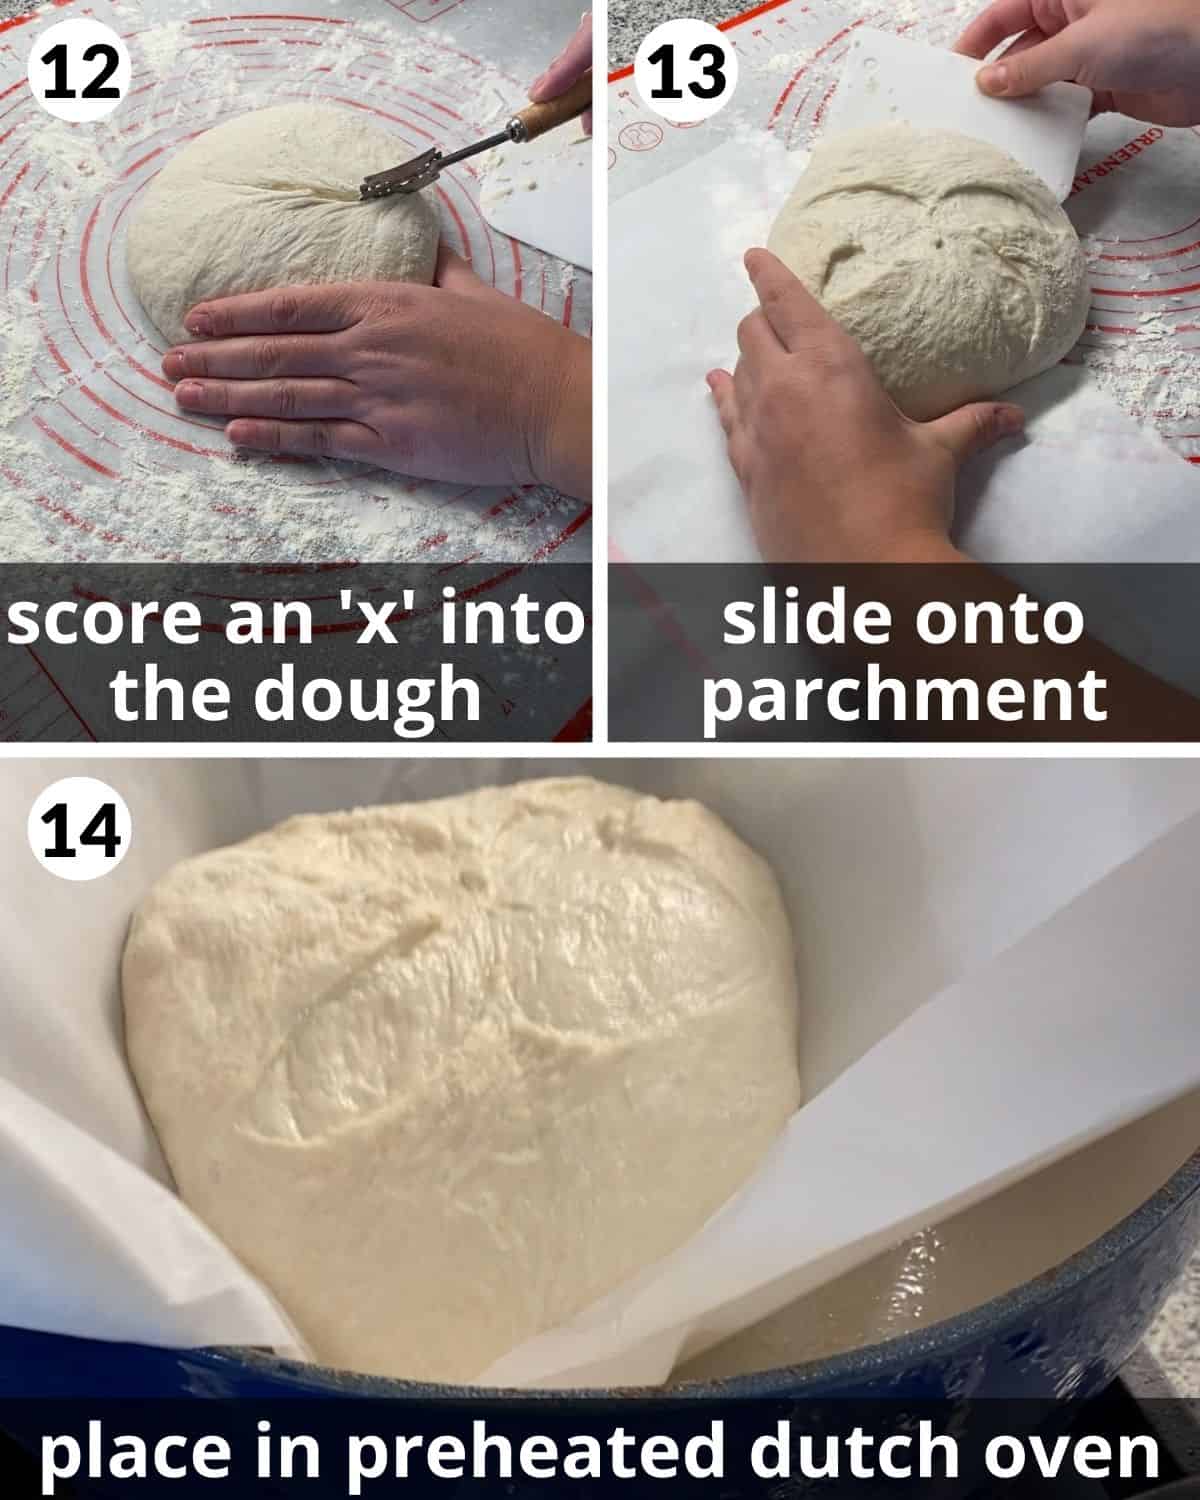
Step 12: Use a sharp knife or bread lame to score an ‘x’ into the top of the loaf.
Step 13: Gently twist the loaf with one hand on the side and the scraper underneath onto a sheet of parchment paper.
Step 14: Transfer the loaf to the preheated dutch oven (or pan/stone) holding the ends of the paper.
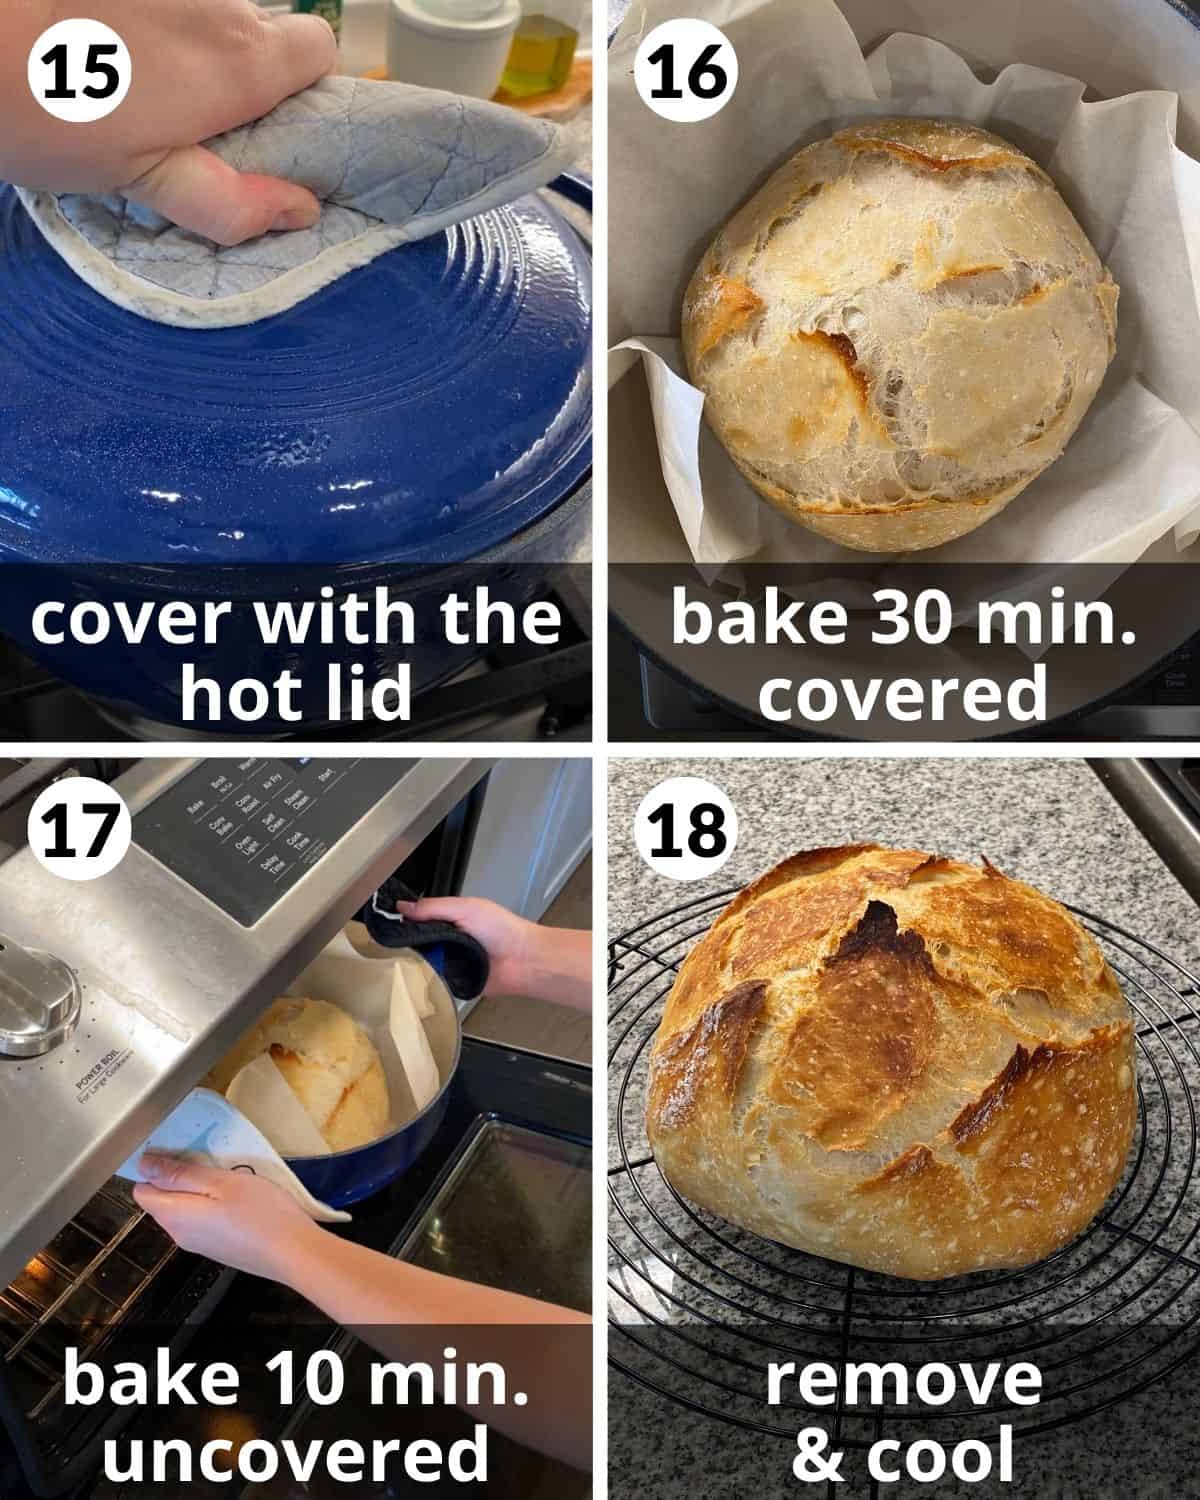
The loaf should be golden brown.
Step 15: Cover the dutch oven with the preheated lid.
Step 16: Bake for 30 minutes covered. If not using a dutch oven, bake uncovered for 30-40 minutes.
Step 17: Uncover and bake for another 10-15 minute or until deep golden brown.
Step 18: Remove the bread for the dutch oven and cool on a wire rack for about an hour before slicing.
Expert Tips & Variations
- Weigh the ingredients. This is the most accurate way to measure the ingredients. If you do not have a scale, be sure to spoon the flour into a measuring cup and level it with a knife. Scooping flour compacts it too much in the measuring cup.
- Do not add too much flour. The dough should be extremely sticky when you combine all of the ingredients. You won’t be able to handle it with your hands. This is why is is a no knead bread. This helps create those airy holes.
- Place dough in a warm place to rise. A sunny window sill is my favorite place to let dough rise. You can also put it in the oven with just the light on.
- Refrigerate dough for more flavor. If you have time, allow the dough to rest for 12-72 hours in the fridge. This is a great option if you want to make dough in advance.
- Be gentle. When shaping the dough or transferring it, do not use a lot of pressure. This will deflate the air bubbles and you won’t get those holes in the loaf. If the bread came out dense, it was likely overworked. The shape of the loaf does not matter.
- Use parchment paper. This prevents the bread from sticking while it bakes.
- Steam makes the crust crispy. If you are using a dutch oven, steam will be created while the bread bakes covered. If you do not have a dutch oven, you can still create steam by using another pan of water. Place a metal or any oven safe 9 x 13 pan on the rack below the baking sheet or stone. Pour boiling water into it right before baking the bread.
Storing Rustic Bread
- Store rustic bread at room temperature for 2-3 days.
- Freezing: Baked bread can be frozen for up to 3 months. Be sure to wrap it tightly two times and place it in a freezer bag. Thaw in the fridge overnight or on the counter. You can also freeze slices and pop them in the toaster to thaw instantly. The dough can also be frozen. After Step 6, wrap the dough and place it in a freezer bag. Thaw in the fridge overnight and continue the recipe as stated.
Recipe Serving Suggestions
Serve this crusty rustic loaf with:
- Pasta: Instant Pot Chicken Spaghetti, Easy Pink Sauce Pasta, or Creamy Bolognese
- Soup: Instant Pot Chicken and Rice Soup, Crockpot Cream Cheese Chicken Chili or Instant Pot Chili (No Beans)
- Dip: Pizza Bowls or Keto Buffalo Chicken Dip
- Under: Easy Garlic Bread Spread or Over Hard Eggs
You can also use leftover bread to make croutons, French Toast, Air Fryer Garlic Bread, or Oven Toast.
Recipe FAQs
Rustic bread is roughly shaped and not baked in a loaf pan. It is usually made of only yeast, flour, salt, and water. It has an “imperfect” look.
Rustic bread is only made of 4 simple ingredients and has no added fat.
White bread is usually made with white flour instead of whole wheat flour.
More Bread Recipes
If you try this recipe, please leave a star rating in the recipe card below and/or comment! I always appreciate your feedback. Follow me on Pinterest, Facebook & Instagram.
Rustic Bread Recipe
Equipment:
Ingredients:
- 3 ⅓ cups (434 g) bread flour*
- 1 standard packet, 2 ¼ teaspoons active dry yeast*
- 2 teaspoons kosher salt*
- 1 ⅔ cups (395 ml) warm water, 110 degrees
Instructions:
- In a large mixing bowl, whisk together the bread flour, yeast, and salt.
- Pour warm water over dry ingredients.
- Mix in the water, until all of the flour is absorbed. The dough will be very wet and sticky.
- Push all of the dough towards the center of the bowl and cover tightly with plastic wrap.
- Place the dough in a warm spot, like a window sill, near the oven, or even in the oven with just the light on.
- Let the dough rise for 3 hours. Optional: Place covered dough in the refrigerator overnight or for up to 3 days.
- If the bread was in the refrigerator, allow it to come to room temperature for about an hour. Preheat the oven to 450 degrees with a dutch oven placed on the middle rack so it can preheat as well. If you do not have a dutch oven, use a pizza stone or baking sheet. See notes.
- Using a spatula or plastic bench scraper, loosen the dough from the sides of the bowl by scraping the dough inward.
- Dump the dough on a well floured surface.
- Use the scraper to fold the dough gently over itself a few times until it starts to stick together.
- Flip the dough so the folded seam side is down. Use your hand and the scraper to gently tap the dough into a round loaf.
- Use a sharp knife or bread lame to score an ‘x’ into the top of the loaf.
- Gently twist the loaf with one hand on the side and the scraper underneath onto a sheet of parchment paper.
- Transfer the loaf to the preheated dutch oven (or pan/stone) holding the ends of the paper.
- Cover the dutch oven with the preheated lid.
- Bake for 30 minutes covered. If not using a dutch oven, bake uncovered for 30-40 minutes.
- Uncover and bake for another 10-15 minute or until deep golden brown.
- Remove the bread for the dutch oven and cool on a wire rack for about an hour before slicing.
Notes:
- Flour: I highly recommend King Arthur Bread Flour. Bread flour can be found next to the all purpose flour at most supermarkets. It gives the bread a chewier texture which is preferred for rustic breads. In a pinch, you can use all purpose flour. I have not tested this recipe with whole wheat flour, but I do not recommend it, as it makes loaves denser.
- Yeast: You can use active dry yeast or instant yeast. I use Red Star Active Dry Yeast. If you do use instant yeast, you may not need to let the dough rise as long. See photo above.
- Salt: I recommend a coarse salt like kosher or sea salt. It gives the bread a better taste. If you only have table salt, only use 1 ½ teaspoons.
- Freezing: Baked bread can be frozen for up to 3 months. Be sure to wrap it tightly two times and place it in a freezer bag. Thaw in the fridge overnight or on the counter. You can also freeze slices and pop them in the toaster to thaw instantly. The dough can also be frozen. After Step 6, wrap the dough and place it in a freezer bag. Thaw in the fridge overnight and continue the recipe as stated.
- Weigh the ingredients. This is the most accurate way to measure the ingredients. If you do not have a scale, be sure to spoon the flour into a measuring cup and level it with a knife. Scooping flour compacts it too much in the measuring cup.
- Do not add too much flour. The dough should be extremely sticky when you combine all of the ingredients. You won’t be able to handle it with your hands. This is why is is a no knead bread. This helps create those airy holes.
- Refrigerate dough for more flavor. If you have time, allow the dough to rest for 12-72 hours in the fridge. This is a great option if you want to make dough in advance.
- Be gentle. When shaping the dough or transferring it, do not use a lot of pressure. This will deflate the air bubbles and you won’t get those holes in the loaf. If the bread came out dense, it was likely overworked. The shape of the loaf does not matter.
- Use parchment paper. This prevents the bread from sticking while it bakes.
- Steam makes the crust crispy. If you are using a dutch oven, steam will be created while the bread bakes covered. If you do not have a dutch oven, you can still create steam by using another pan of water. Place a metal or any oven safe 9 x 13 pan on the rack below the baking sheet or stone. Pour boiling water into it right before baking the bread.




Very good recipe, flavor depth and texture are better than the $10 loaves at my local stores, and the ingredients only cost about $2 made at home! This is A stellar recipe from a baker who is very easy on the eyes to boot! 😉
Thank you!! This recipe is one of my favorites as well.
I am new to bread making and do not know what you mean by “mix in the water, until all flour is absorbed.” Do I stir it or just push the water around?
This just means to mix until all of the water is incorporated.
Can I cut this in half for a smaller bread pan?
I am not sure! I have not tried that.
Excellent recipe, really easy to follow and most importantly the bread is delicious!! Thank you 🙂
Thank you so much!
Does this double ok? Or should I just do separate bowls?
I would make 2 separate loaves.
I love this recipe and the resulting bread! It is a never fail bread recipe. The directions are exact and easy to follow. All of my family loves it! Thank you for sharing
That makes me so happy to hear! Merry Christmas! ?
This bread was as easy as shown. The texture is outstanding
Awesome! Glad you enjoyed.
Loved the recipe. Especially the no-knead part!
I recommend this recipe instead: https://biteswithbri.com/cast-iron-skillet-chicken-breast/
Have made this recipe many times, and where others have failed, this is a winner every time. I’ve spruced it up by adding Kalimata olives and rosemary for savory sometimes, and dried cranberries and honey for slightly sweet others, but the plain white is also great.
I am so glad! Thank you.
My bread turned out good, but a little too salty.
Did anyone else find it too salty?
Oh no! Haven't had any other readers say this. Feel free to reduce the salt next time. I love salt!!
Hello! If I want to put the dough in the fridge, should I let it rise first for the three hours and then put it in? Or do I let it rise, shape it with flour and then leave it in the fridge? I’m new to this so I’m sorry if it’s a silly question!
Let it rise for 3 hours then put it in the fridge. Shape it after!
I have made this bread twice. Super easy and super delicious! I love that It can be made ahead of time and put in the fridge to bake fresh later in the week. Two thumbs up from everyone in my family!
Thank you!!
Easy and tastes great! I will be making this again.
Thank you!
Thank you!
Thank you for this great recipe