This 72 Hour Pizza Dough is a labor of love, but worth every minute. It is chewy, airy, and the perfect base for a Neapolitan style pizza. It is made out of only 4 simple ingredients: bread flour, water, yeast, and salt.
This restaurant style 72 hour pizza dough will give your local pizza shop a run for their money.
My Hearty Marinara Sauce is the perfect pizza sauce. Layered on top of this 72 hour pizza dough, you have the perfect base for your homemade pizza.
If you love restaurant style inspired recipes, try these Parmesan Rosemary Breadsticks or this Crusty Rustic Bread. These Cream Cheese Frosting Cinnamon Rolls are better than your local bakery, I promise.
And if you feel like you need some greens to accompany all of these carbs, make this Panera Copycat Greek Salad.
Looking for a low carb alternative? Try this Pizza Bowl Recipe.
Table of Contents
Why You’ll Love This Recipe & What You’ll Learn
- The dough only requires 4 ingredients: bread flour, water, yeast, and salt.
- This 72 hour pizza dough recipe is hands off. Most of the time the dough is rising in the refrigerator.
- The long rise allows the dough to develop a ton of flavor.
- The dough is pillowy and chewy at the same time.
- Customize this 72 hour pizza dough with your favorite toppings.
Ingredient Notes & Substitutions
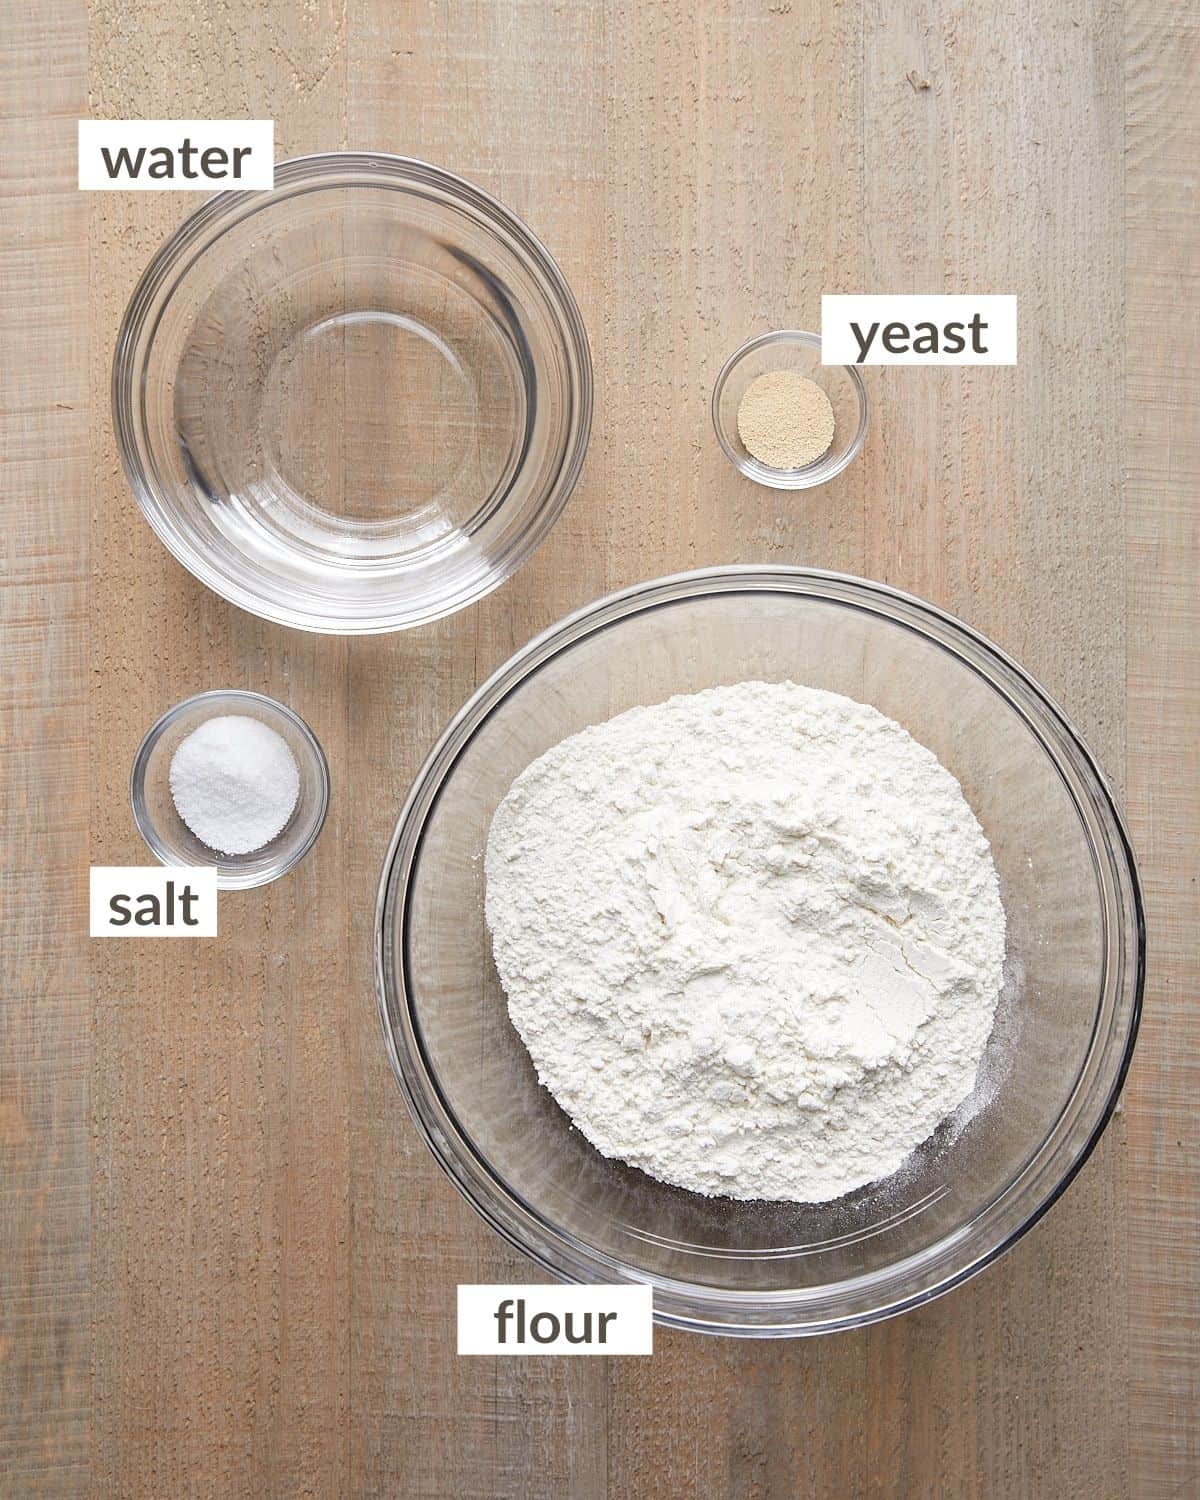
- Bread Flour: I highly recommend bread flour for this 72 hour recipe. It will give the crust an incredible chew because it has a higher protein content. I have not tested this recipe with all purpose flour.
- Active Dry Yeast: Yeast is imperative for making pizza dough. It causes the dough to rise. I typically use Red Star Active Dry Yeast.
- Warm Water: Be sure the water is around 105 degrees. If it is too hot, it will kill the yeast.
Complete list of ingredients and amounts is located on the recipe card below.
Helpful Equipment & Tools
- Nicewell Food Scale
- Large Silicone Pastry Mat Extra Thick Non Stick Baking Mat
- GoodCook AirPerfect 15.75″ Round Nonstick Carbon Steel Pizza Pan
How to Make 72 Hour Pizza Dough
Quick Overview
- Day 1: Make the dough & let it rise at room temperature.
- Day 2 & 3: Let dough ferment in the refrigerator.
- Day 4: Let dough rest at room temperature. Shape into pizza crust.
Step by Step Instructions
Day 1
Step 1: In a large bowl, whisk together the bread flour, salt, and yeast.
Step 2: Slowly add the water to the flour mixture, stirring simultaneously.
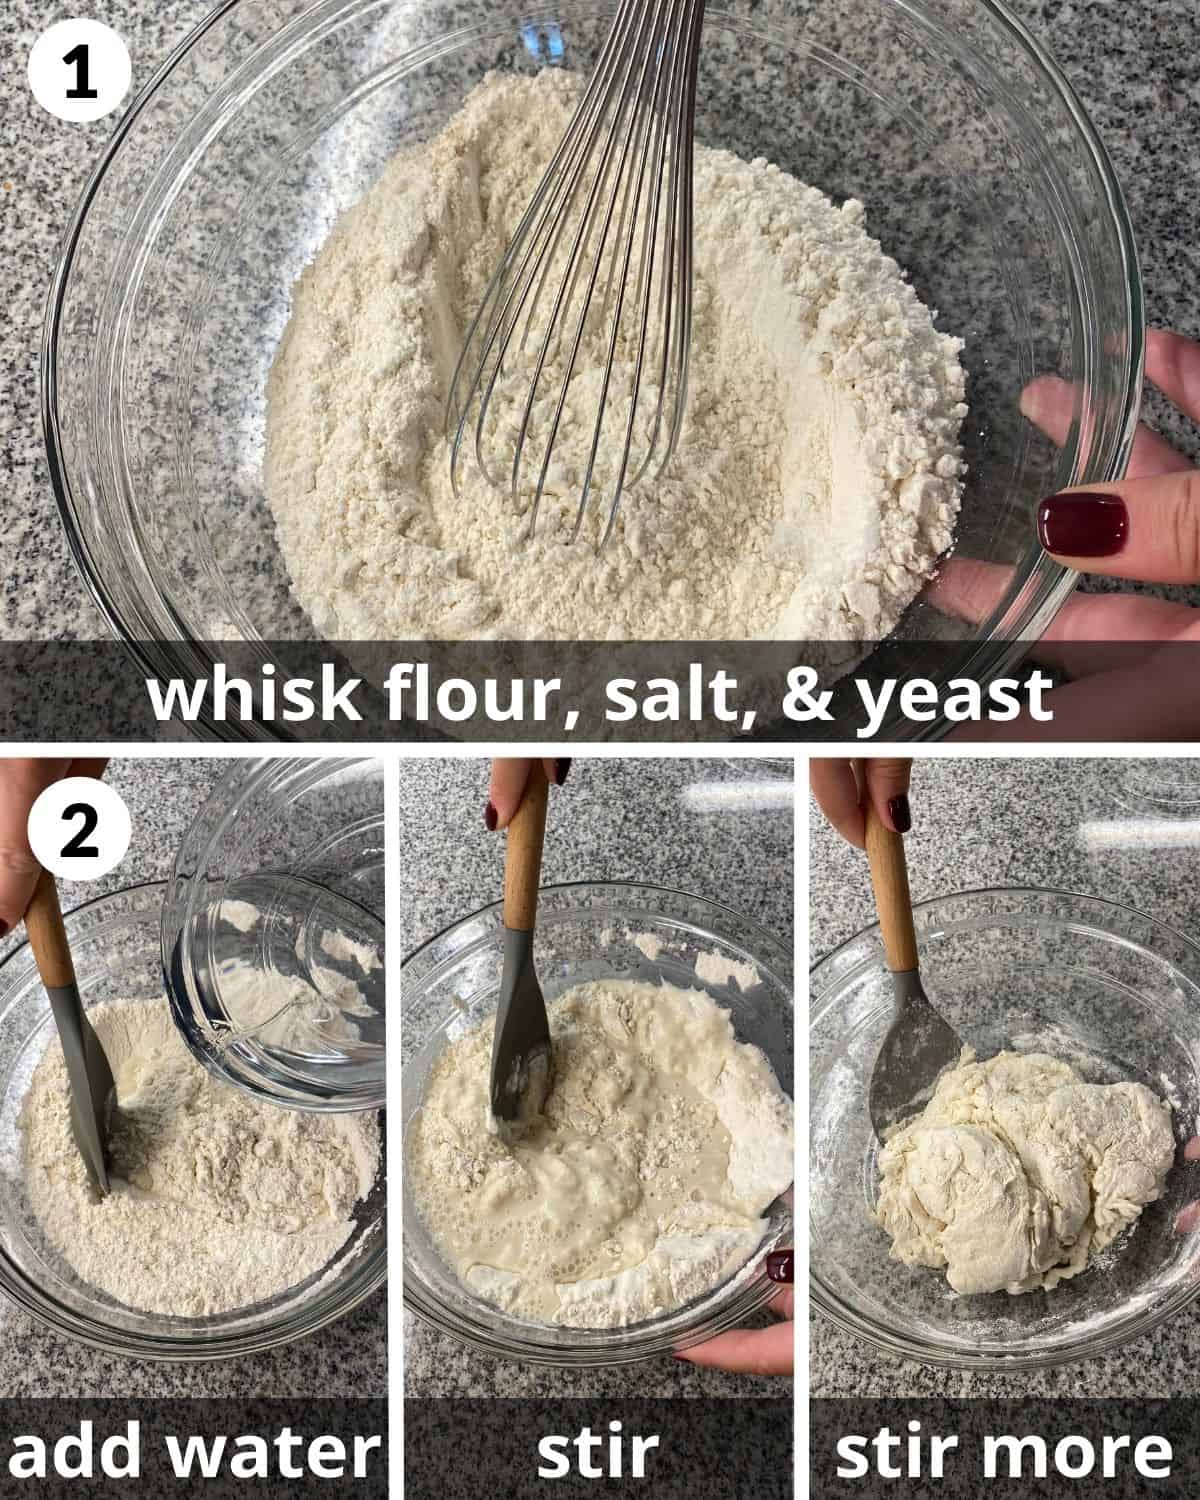
Dough should be shaggy with excess flour in the bottom of the bowl.
Step 3: Once the dough has come together, dump the dough and any flour remaining in the bowl on a floured surface.
Step 4: Knead for about 10 minutes. The dough should be slightly sticky but not sticking to your hands. Add more flour to your hands/surface if needed.
Step 5: Form the dough into a ball.
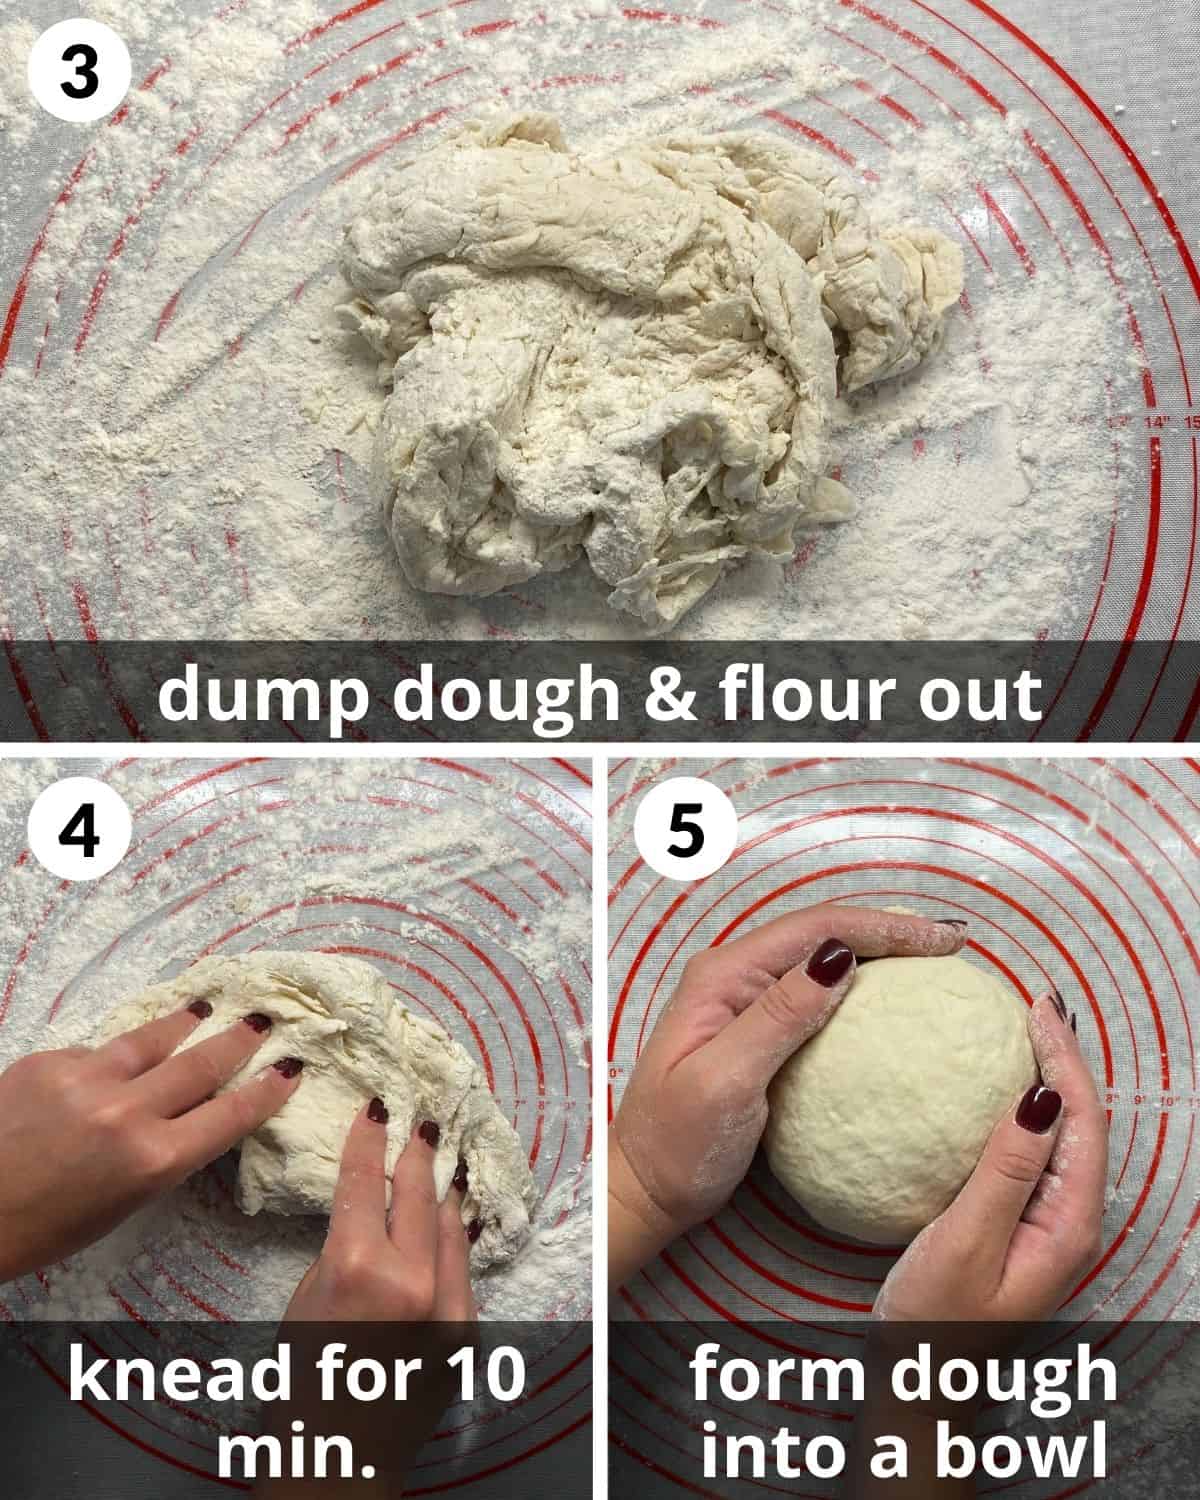
Most of the flour should be absorbed and the dough should not be sticking to your hands.
Step 6: Place the dough in a greased bowl.
Step 7: Cover tightly with a lid or plastic wrap.
Step 8: Let the dough rise at room temperature for 20-24 hours.
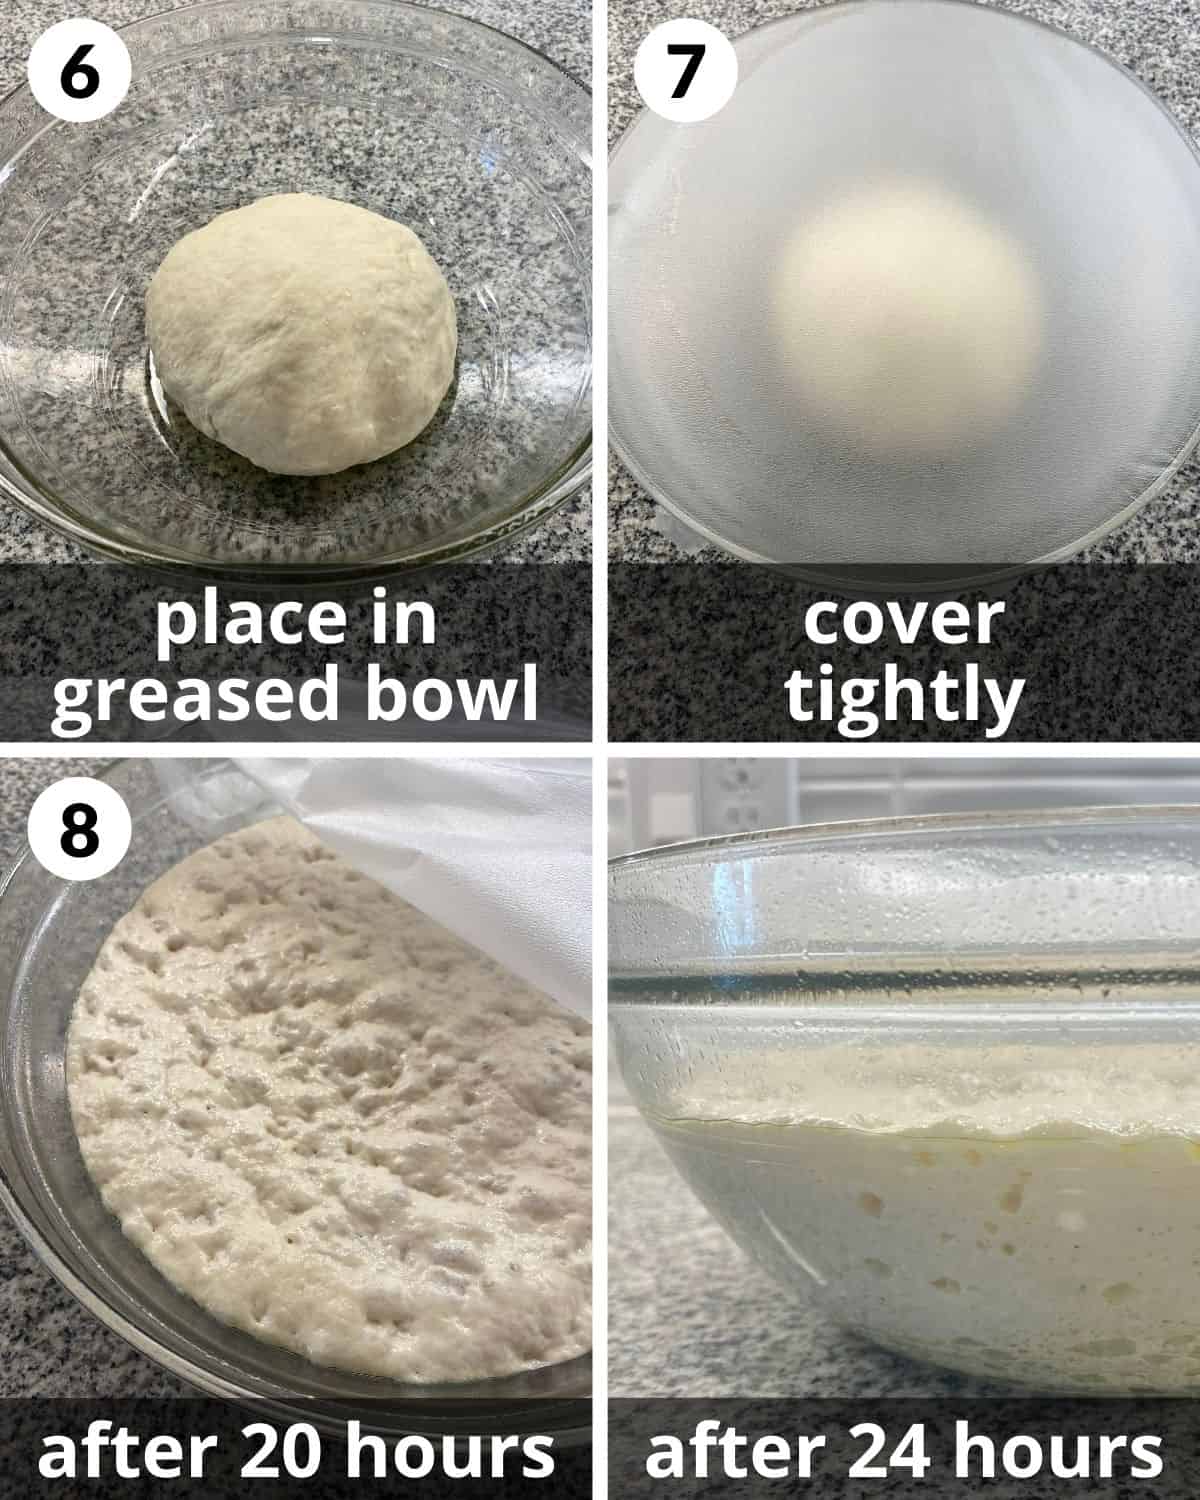
There should be lots of bubbles throughout the dough.
Day 2
Step 9: Place the dough into the refrigerator. Refrigerate for 48 hours. See note below to make multiple pizzas.
Day 4
Step 10: Remove the dough from the refrigerator 1-2 hours before baking.
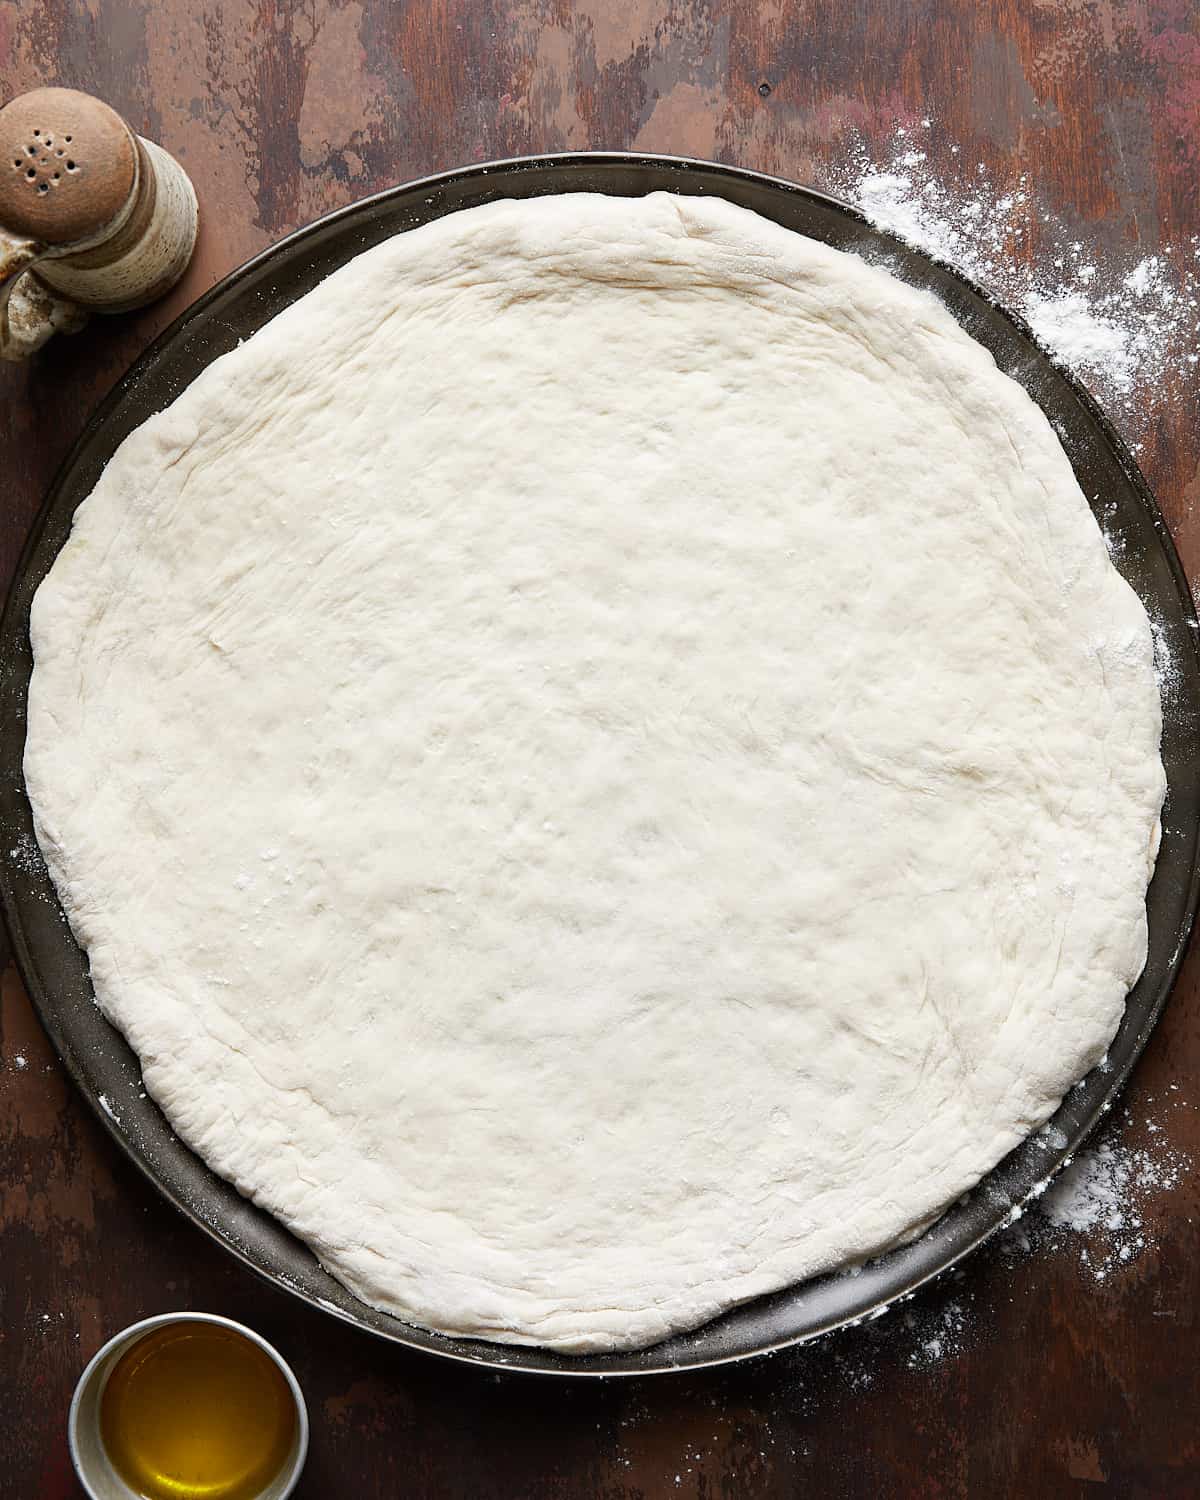
Step 11: After 1-2 hours, place the dough onto a lightly surface. The side of the dough that was touching the bowl should remain the bottom the entire time.
Step 12: Use your hands to spread flour on both sides of the dough.
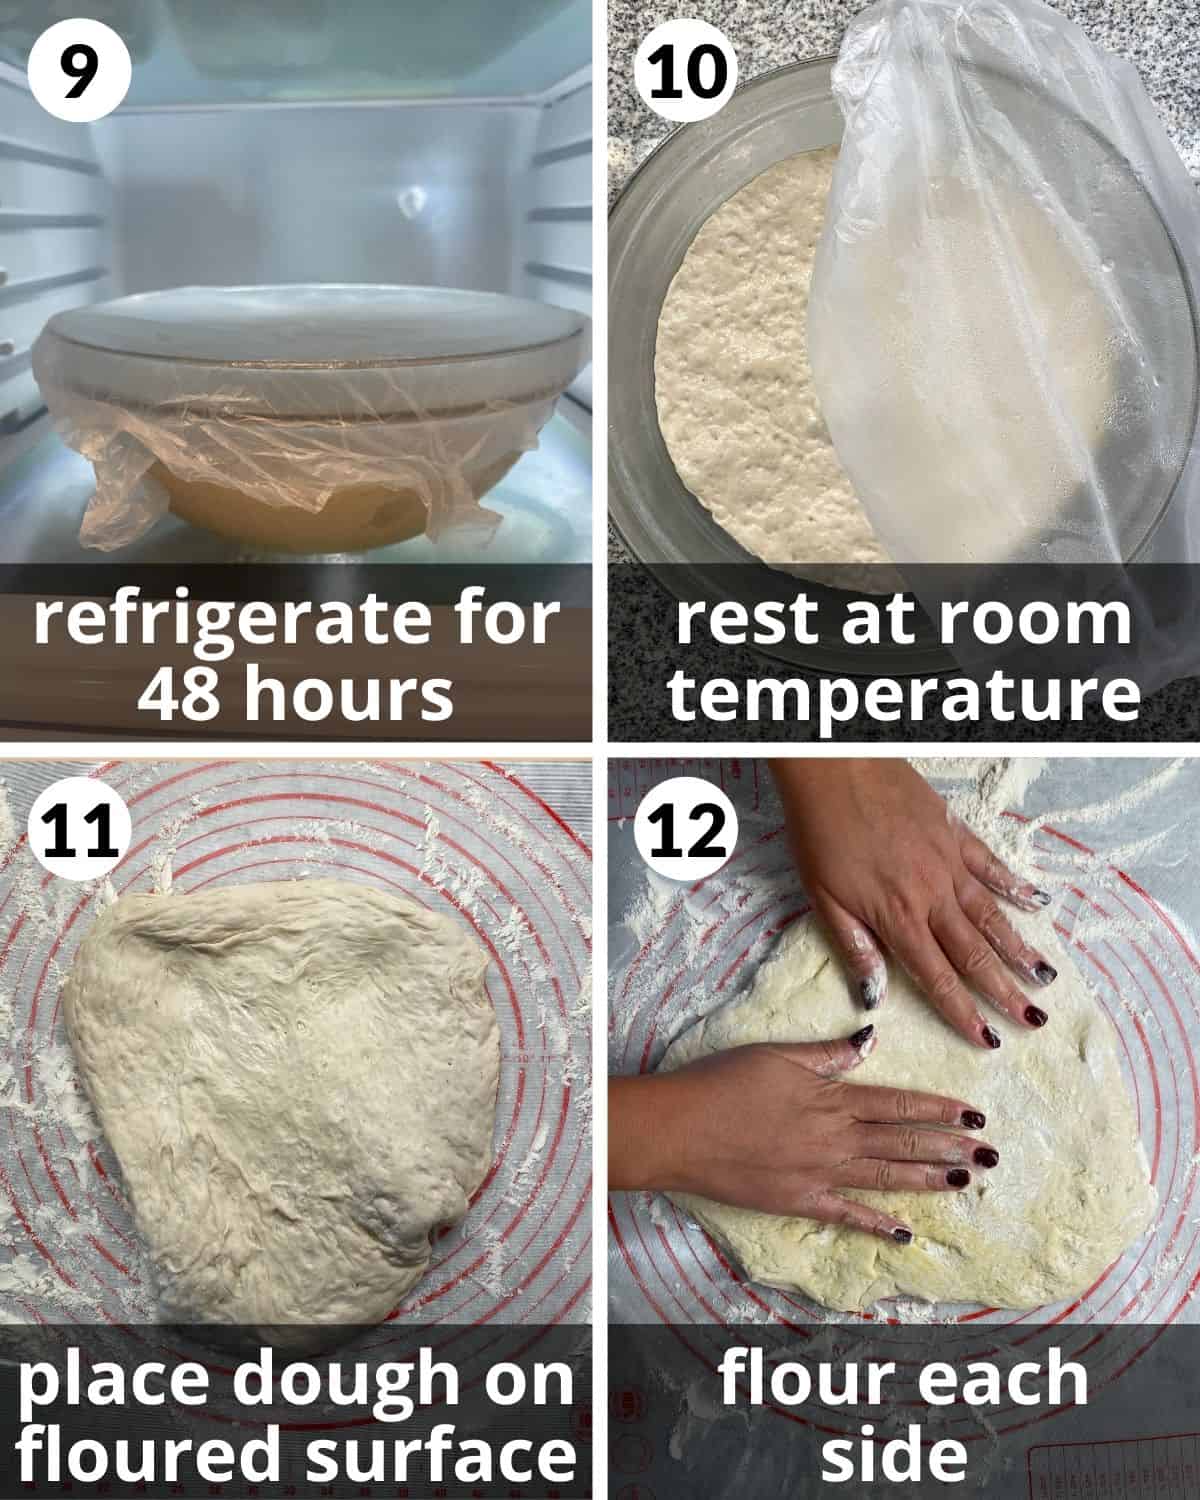
The dough should spread out very easily.
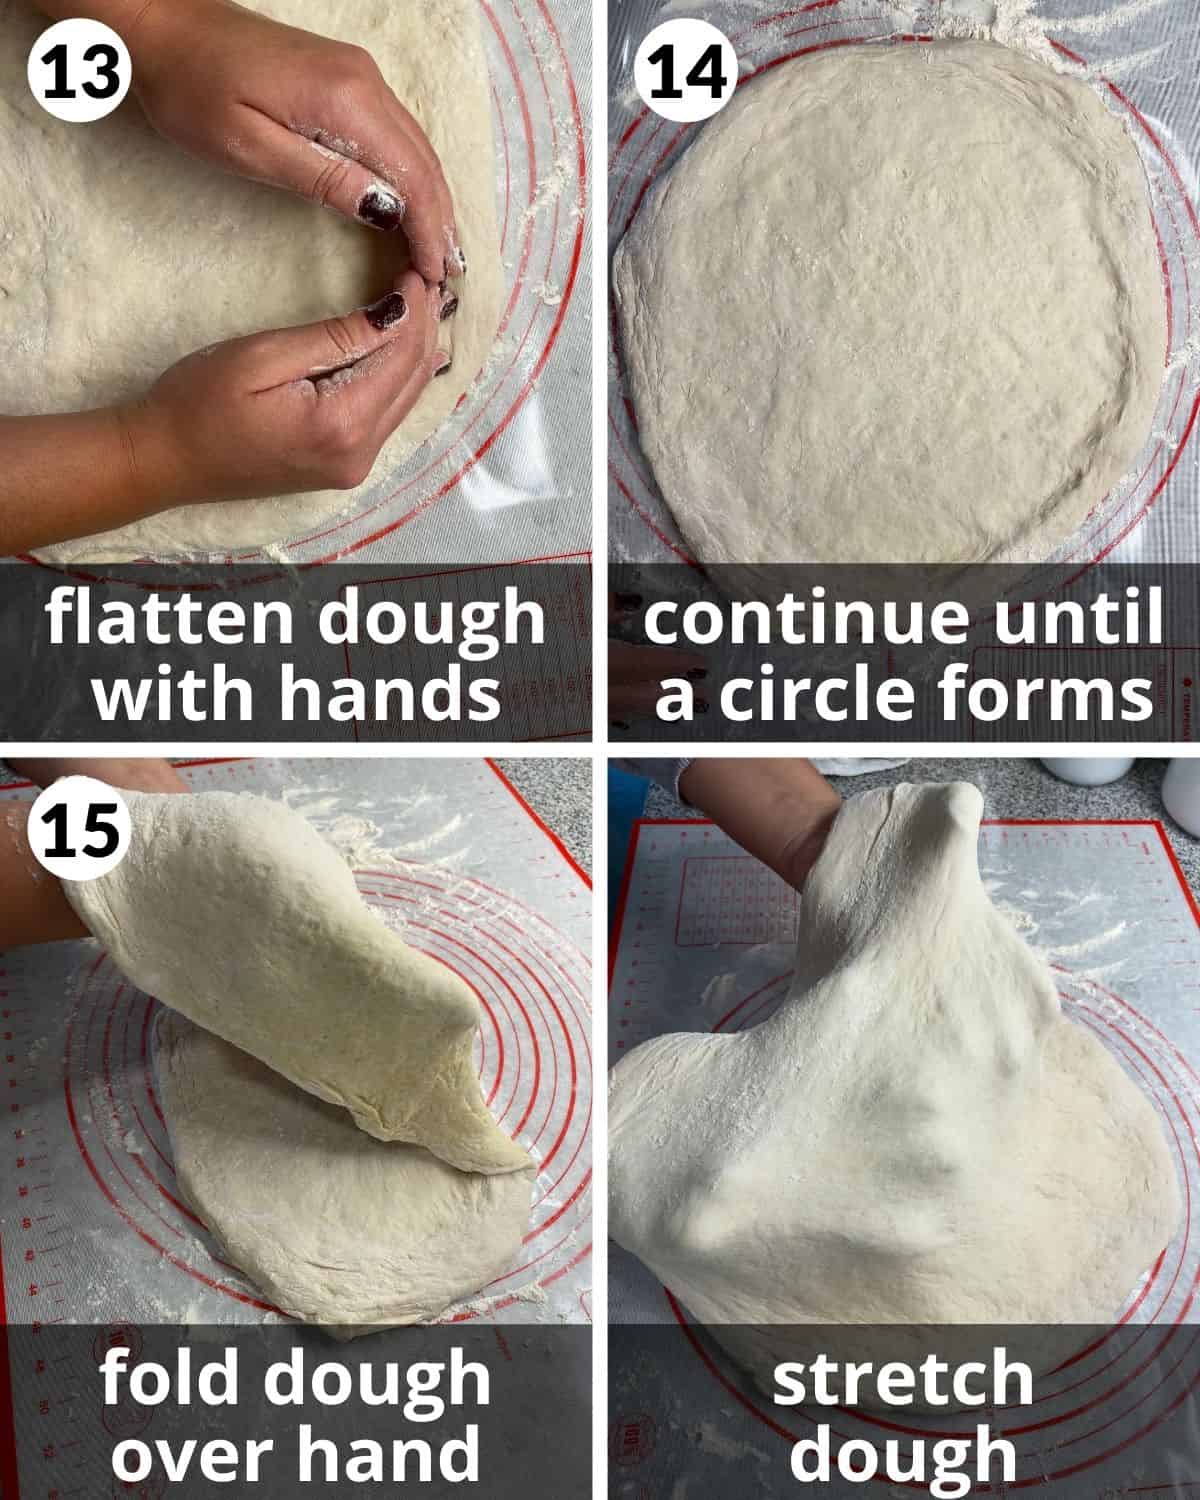
Step 13: Gently begin to use the sides of your hands to press the center of the dough and begin to flatten it out. Leave the crust thicker and do not press the edge at all.
Step 14: Repeat this process until the dough is shaped in (somewhat) of a circle.
Step 15: Fold the crust over one of your hands. Flip the crust back and forth between your hands. Continue stretching the dough until it has thinned out.
Step 16: Place one hand flat on the dough and the other on its outside of the crust. Gently reinforce the crust.
Step 17: Continue to round out the pizza. Do not overwork. See notes for more info about baking a homemade pizza.
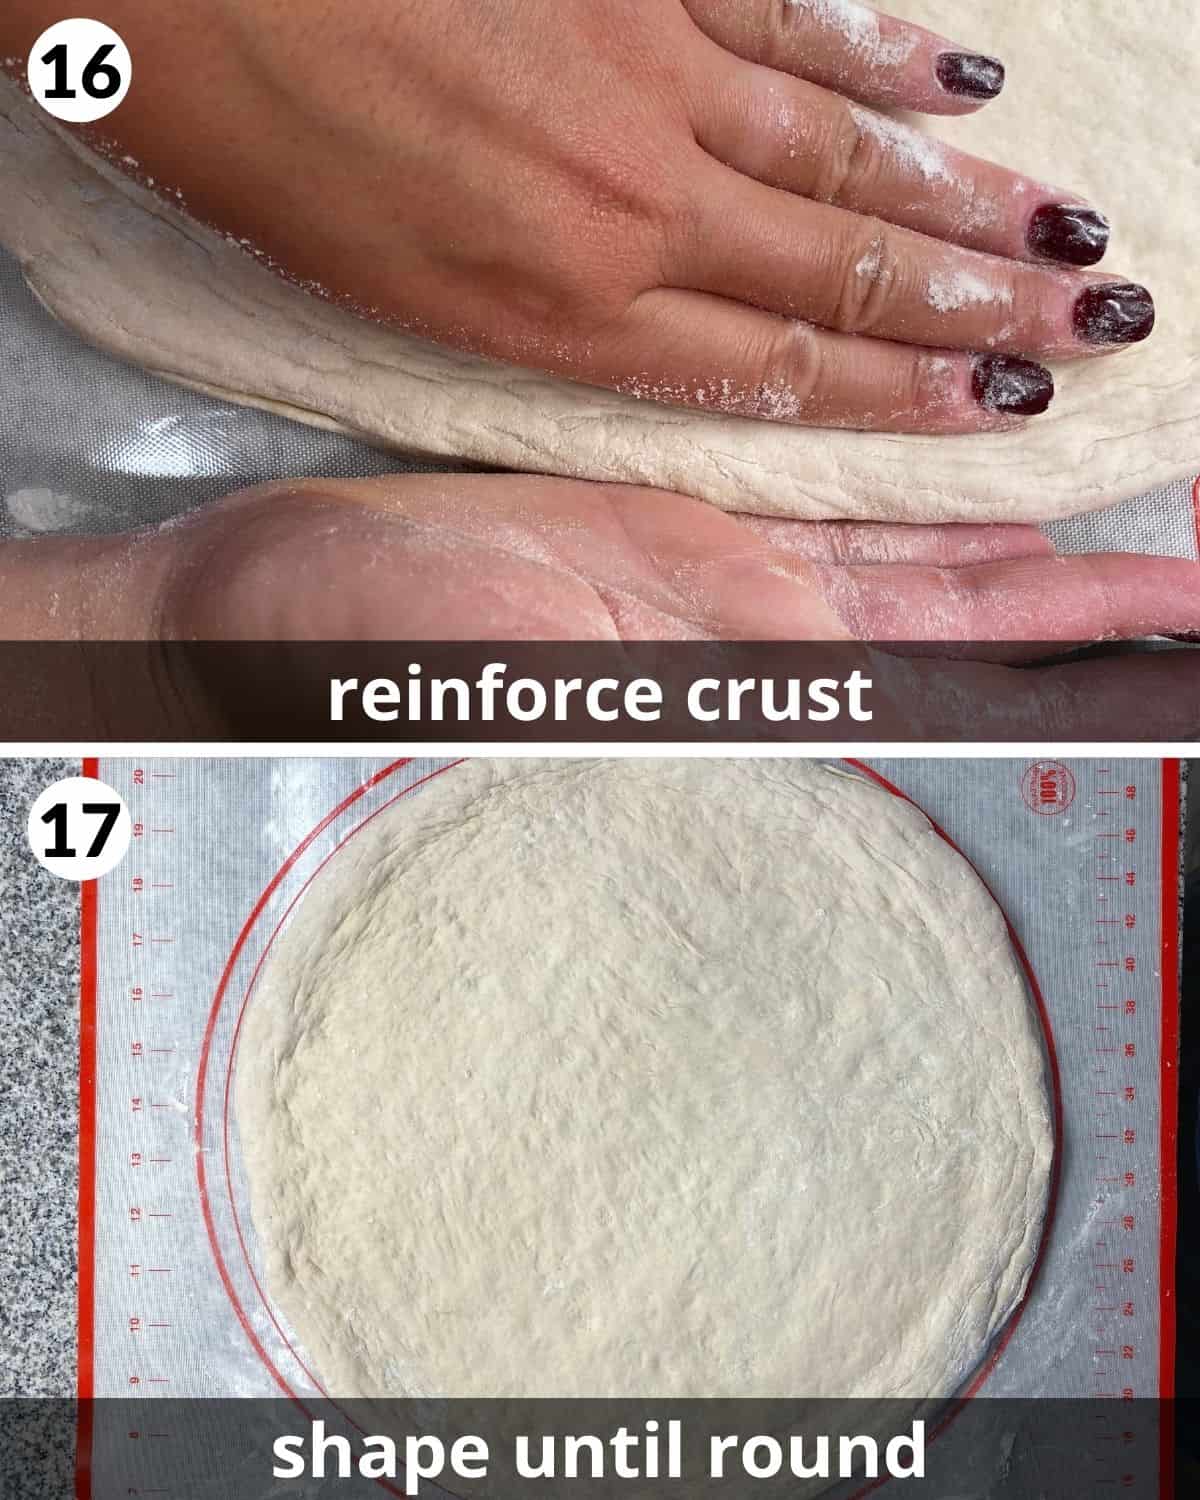
The crust should be thicker than the center.
Make Ahead & Storage
- Refrigerator: The dough can rest in the refrigerator for up to 96 hours. After that it should either be baked or frozen for later.
- Freezer: After the dough has fermented (rested in the refrigerator for 40-96 hours), transfer it to the freezer in either lightly greased airtight baggies or airtight containers. Store for 2-3 months.
- Thawing: Place the frozen 72 hour pizza dough into a greased bowl. Cover and place in the refrigerator overnight. Remove from the refrigerator 2-3 hours before baking. Continue to step 11.
Expert Tips
- Precision is key. You will have better (and more accurate) results if you measure the water and flour with a food scale. Use the back of a butter knife to level off the yeast in the measuring spoon.
- Be patient. The 72 hour fermentation process results in the best taste and texture. It doesn’t even compare to a same day pizza dough recipe.
- Be gentle. When handling the dough, do not press or punch the dough with pressure. This will burst all of the air bubbles. Instead gently flatten and stretch the dough. It should not resist you at all. This is one of the benefits of a long fermentation period. The glutens relax and the dough is much more malleable.
- Do not be afraid of flour. The dough should not be very sticky. During the kneading process I typically add at least a couple of tablespoons of flour to get the dough to come together and not stick to my hands. When shaping the crust, be sure to spread flour on the bottom so it does not stick during the baking process.
- Do not use a rolling pin. The dough is extremely malleable and should be stretched with your hands. Rolling pins pop all of the air bubbles that formed during fermentation.
- Making good pizza dough takes practice. Each time I make this recipe, it is a little better. The more familiar you get with what the dough should feel like, look like, etc. the better your pizzas will taste.
Recipe Notes
- This recipe can make 2 medium pizzas (12-13 inches) or 1 extra large pizza (17-18 inches). To make 2 medium pizzas, after Step 8, place the dough on a lightly floured surface. Split it into 2 balls. Place each ball into separate grease containers. Continue to Step 9. I recommend making 2 to fit in a standard size oven.
- Baking: Preheat your oven with a pan or stone inside for 45 minutes as hot as it will go (mine gets up to 550 degrees). Prepare your pizza on a peel or pan that is lightly floured. Be sure the bottom of your crust is well floured so it does not stick. It should slide off this pan to the pan or stone in the oven easily. Read more about baking a pizza with or without a stone.

Variations
- Spices/herbs: Add 1/2 teaspoon of granulated garlic or dried rosemary, thyme, oregano, or Italian seasoning to the flour mixture before whisking. This will add even more flavor to the crust.
FAQs
Pizza dough can safely ferment (or be stored) in the refrigerator for 2-4 days.
You can ferment pizza dough for 2-4 days. I like to allow my dough to rise for 1 day at room temperature and for 2 days in the refrigerator.
Yes. You do not want to let the dough rise for too long. I recommend a 24 hour rise at room temperature and 48-96 hour fermentation in the refrigerator.
Most recipes will require the dough to rise at room temperature for at least 2 hours and up to 24 hours.
Related Recipes


The Best 72 Hour Pizza Dough
Ingredients
- 425 grams bread flour 3 cups + 6-7 Tablespoons
- 2 teaspoons salt
- 1/2 teaspoon active dry yeast*
- 1 1/4 cup warm water 296 ml, 105 degrees*
Instructions
Day 1
- In a large bowl, whisk together the bread flour, salt, and yeast.
- Slowly add the water to the flour mixture, stirring simultaneously.
- Once the dough has come together, dump the dough and any flour remaining in the bowl on a floured surface.
- Knead for about 10 minutes. The dough should be slightly sticky but not sticking to your hands. Add more flour to your hands/surface if needed.
- Form the dough into a ball.
- Place the dough in a greased bowl.
- Cover tightly with a lid or plastic wrap.
- Let the dough rise at room temperature for 20-24 hours.
Day 2
- Place the dough into the refrigerator. Refrigerate for 48 hours. See note below to make multiple pizzas.
Day 4
- Remove the dough from the refrigerator 1-2 hours before baking.
- After 1-2 hours, place the dough onto a lightly surface. The side of the dough that was touching the bowl should remain the bottom the entire time.
- Use your hands to spread flour on both sides of the dough.
- Gently begin to use the sides of your hands to press the center of the dough and begin to flatten it out. Leave the crust thicker and do not press the edge at all.
- Repeat this process until the dough is shaped in (somewhat) of a circle.
- Fold the crust over one of your hands. Flip the crust back and forth between your hands. Continue stretching the dough until it has thinned out.
- Place one hand flat on the dough and the other on its outside of the crust. Gently reinforce the crust.
- Continue to round out the pizza. Do not overwork. See notes for more info about baking a homemade pizza.
Notes
Nutrition
Nutrition information is automatically calculated, so should only be used as an approximation.


If I needed to admit the yeast, do you know how to go about replacing it with starter?
When doubling or tripling the recipe do you keep the yeast the same or do you double/triple it?
I only have 00 flour and instant dry yeast about a year old refrigerated, would you alter the recipe at all? I use a Breville Pizzaiolo capable of 750°F…
Thanks
Not sure!
We had a pizza night last night and this dough sent it over the top! It was incredibly delicious!
Awesome!
Fabulous pizza dough recipe! Very easy to make the dough, and I actually keep it longer than 72 hours in the fridge before making. It bakes up beautifully on my pizza steel.
Love this pizza dough recipe! The advice to be patient was certainly worth it. It definitely took me some time to get the kneading part down, but I know next time I should get the hang of it a bit sooner and better! Thank you for the thorough instructions and tips!
Cant wait to try this recipe. I have a question. does the 24 hr room temp rise depend on the amount of ADY you use ? I seen other people say do a 2 hr room temp rise before cold fermenting. Thanks
Yes exactly! I recommend the 24 hour rise for this one. It creates a better flavor.