This Strawberry Preserves Recipe is made with delicious in-season strawberries, creating a sweet spread you can use anywhere. These preserves don’t use a canning process, making it a beginner-friendly recipe. Serve these preserves on biscuits, pancakes, toast, vanilla ice cream, or whatever you please for a yummy strawberry flavor.

This strawberry preserves recipe is a great way to use extra strawberries before they go bad. I love homemade strawberry preserves, as they’re so versatile. You can pair them with sweet or savory dishes depending on your preferences.
This recipe is great for those intimidated by traditional preserve recipes requiring canning knowledge. Since these preserves are fresh, not canned, they’re simple and easy to make. Bonus – the strawberry preserves ingredients are budget-friendly and easy to find at the grocery store!
Try pairing these strawberry preserves with bread and sweet loaves, like my Easy Rustic Bread, Cornbread Recipe without Buttermilk, and Blackberry Lemon Bread.
Table of Contents
Why You’ll Love This Recipe
- Easy – Even if you’re new to making preserves, this recipe is easy to follow. Plus, you only need a few kitchen tools.
- Simple – You only need three ingredients to create this delicious strawberry preserves recipe.
- Flavorful – Using in-season strawberries helps create a yummy strawberry preserve.
- Sweet – The ripe fresh strawberries and granulated sugar help create a deliciously sweet (and tangy) batch of preserves.
- Versatile – These whole strawberry preserves are great for many dishes, from dessert glazes to marinades and salad dressings.
Ingredients & Substitutions
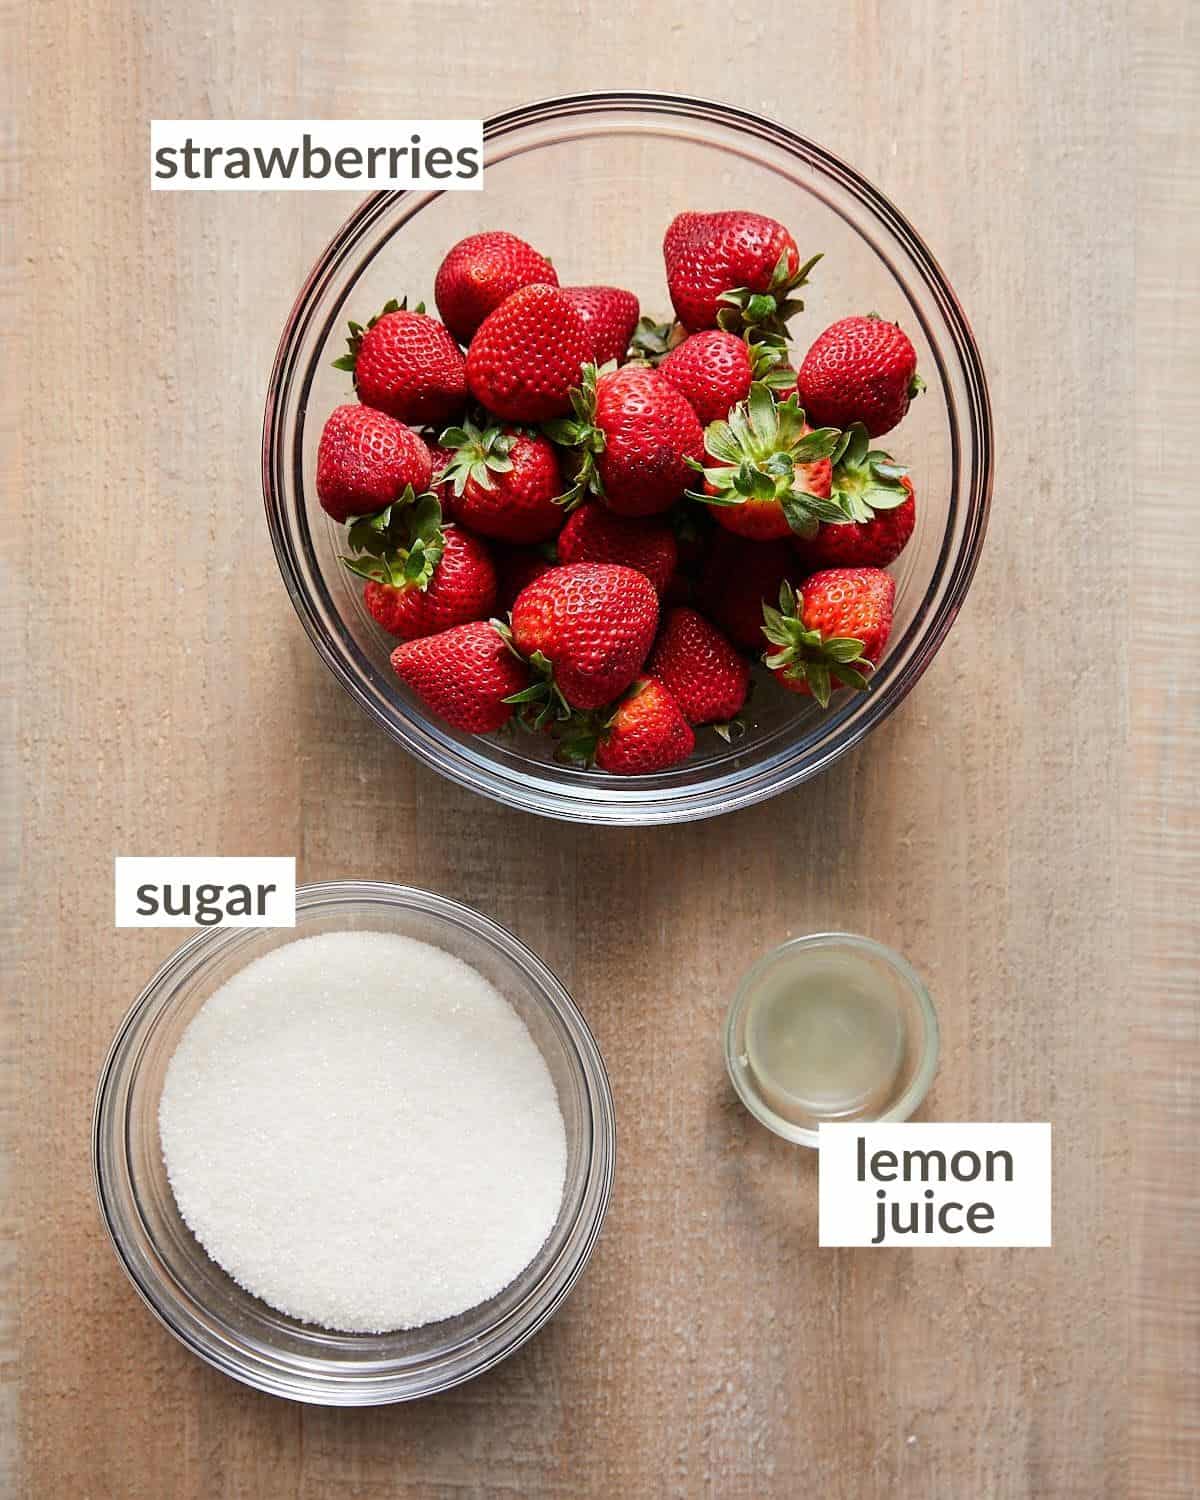
- Fresh Strawberries: If strawberries are out of season, you can create frozen strawberry preserves instead. Frozen strawberries are picked at peak season, so they will be as sweet as the in-season version. You’ll need to thaw the strawberries before continuing with the strawberry preserves recipe.
- Lemon: Lemon juice helps offset the sweetness of the preserves and helps them set. However, it can be omitted since these preserves are not canned. You’ll notice a slightly thinner texture and a sweeter flavor when leaving out the lemon juice.
Complete list of ingredients and amounts is located on the recipe card below.
How to Make Homemade Strawberry Preserves
Quick Overview
- Hull strawberries.
- Chop strawberries.
- Add strawberries, lemon, and sugar to the pan.
- Stir continuously.
- Bring to a boil.
- Turn off the heat.
- Allow the preserves to cool.
Step by Step Instructions
How To Hull Strawberries
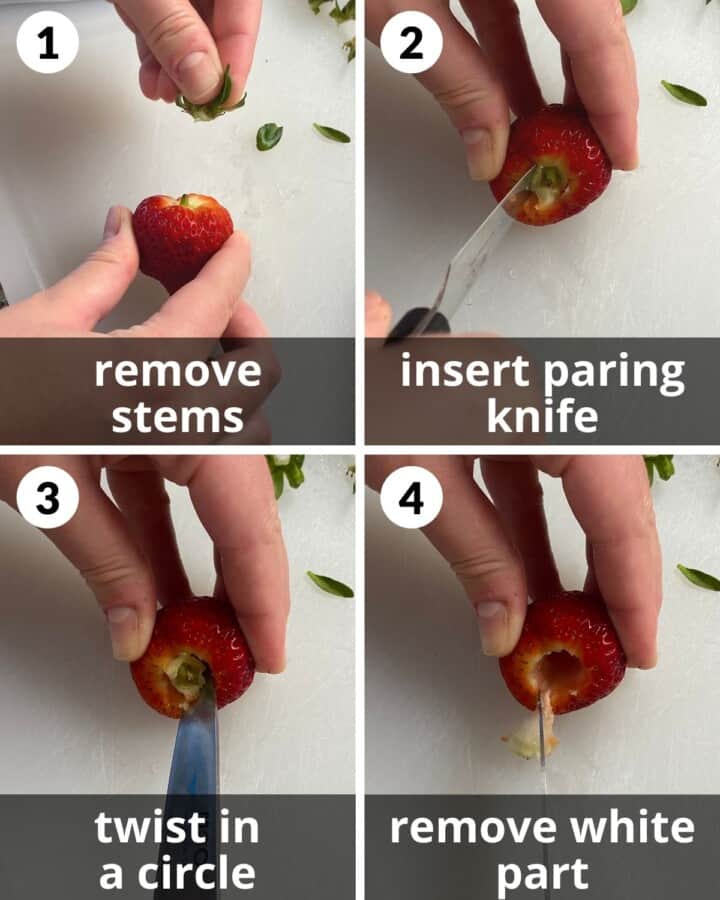
Remove the leaves and stems from the strawberries to avoid a bitter taste.
Step 1: Pull the stem/leaves off of the strawberry.
Step 2: Insert a paring knife on the edge of the white part of the strawberry angled inward. See photos above.
Step 3: Rotate the knife around making a full circle.
Step 4: Scrape the white part out with the knife.
Cooking the Strawberries

Step 5: Repeat with the remaining strawberries.
Step 6: Using a large knife roughly chop all of the strawberries.
Step 7: Over medium heat in a large pan, add the strawberries, sugar, and lemon juice, stirring continuously. The strawberries will begin to release water.

Measure the strawberry preserves temperature using a thermometer.
Step 8: Once they do, turn the heat to medium-high until the mixture boils rapidly. Boil at a full rolling boil for 20-25 minutes, stirring continuously.
Step 9: Once the mixture begins to thicken and most of the water has evaporated, turn off the heat. The jam should be syrupy, not be frothy, and will begin to stick to the sides of the pan. It should be about 220 degrees.
Step 10: Allow the preserves to cool in the pan for 30-45 minutes, stirring occasionally. If the preserves cool.
Recipe Serving Suggestions
When serving, garnish the preserves with lemon zest or a sprig of fresh mint.
I love serving this strawberry preserves recipe alongside breakfast classics and fresh orange juice. Here are a few ideas:
- Blueberry Lemon Poppy Seed Muffins
- Brioche French Toast Casserole
- Easy Homemade Biscuits
- Pumpkin Cream Cheese Bread
Expert Tips
- Use in-season berries. The best preserves are made with in-season berries since they’re sweeter. Do not use out-of-season berries for a strawberry preserves recipe, as they will create a more tangy/sour spread.
- Stir continuously. The sugar in preserves can burn easily in the pan, so it’s important to stir continuously as it cooks. Consistently stirring will help keep any bits from sticking to the pan and burning.
- Boil long enough to evaporate excess moisture. This step is essential, as it helps create a thick, gooey consistency. They’ll be watery if you leave too much moisture in the preserves.
- Cool the preserves. Allowing the preserves to cool before packing them away gives them time to set. Additionally, you can see if the preserves are thick enough once they cool. If not, they will thicken up in the fridge. Overly watery preserves can be cooked for longer to remove excess moisture.
Storage
- Allow the strawberry preserves recipe to cool fully before pouring them into an airtight container or glass jar.
- Keep refrigerated between use.
- This homemade jam recipe can last up to one month in the fridge.
Note: These preserves are not canned, like preserves purchased from the store. Canning is a method of food preservation. Store-bought jams and preserves are processed in airtight jars and at high temperatures to kill microorganisms and create an airtight seal. Opened jam should always be refrigerated and has a much shorter shelf life than shelf-stable jam.
Additions & Variations
- Reduced Sugar – If you prefer your strawberry preserves recipe to be less sweet, you can reduce the amount of sugar to 1 cup.
- Additional Berries – Create a multi-berry preserve by adding blueberries and blackberries. You can use a frozen mixed berry pack for this variation. Remember to thaw the berries out before creating the preserves.
Strawberry Preserves Vs. Jam
There are a few differences when comparing strawberry preserves vs jam. For one, the texture between the two is different. A strawberry preserves recipe uses whole fruit, so it has a chunky texture. A strawberry jam recipe utilizes mashed fruit which creates a smoother consistency.

Recipe FAQs
A strawberry preserves recipe takes about 24-48 hours to set. Some recipes may take longer to set. Check in on your preserves after they sit in the fridge for about a day. They should drip slowly off a spoon when set.
Yes, it’s possible to overcook preserves. Overcooking them leads to thick, rubbery, hard-to-spread preserves.
When your preserves are syrupy and slightly sticking to the edges of the pan, you can remove them from the heat. They should not be frothy.
Strawberry preserves are a spread made from whole strawberries. It has a chunky texture due to the large pieces of berries used during the cooking process.
More Sauce & Dip Recipes
Shop my Amazon Storefront!
If you try this recipe, please leave a star rating in the recipe card below and/or comment! I always appreciate your feedback. Follow me on Pinterest, Facebook & Instagram.

Homemade Strawberry Preserves (3 Ingredients)
Equipment
Ingredients
- 2 pounds fresh strawberries*
- 1 1/2 cups (300 g) granulated sugar
- 1/2 lemon, juiced*
Instructions
How To Hull Strawberries
- Pull the stem/leaves off of the strawberry.
- Insert a paring knife on the edge of the white part of the strawberry angled inward. See photos above.
- Rotate the knife around making a full circle.
- Scrape the white part out with the knife.
- Repeat with the remaining strawberries.
Cooking the Strawberries
- Using a large knife roughly chop all of the strawberries.2 pounds fresh strawberries*
- Over medium heat in a large pan, add the strawberries, sugar, and lemon juice, stirring continuously. The strawberries will begin to release water.1 1/2 cups (300 g) granulated sugar, 1/2 lemon, juiced*
- Once they do, turn the heat to medium-high until the mixture boils rapidly. Boil at a full rolling boil for 20-25 minutes, stirring continuously.
- Once the mixture begins to thicken and most of the water has evaporated, turn off the heat. The jam should be syrupy, not be frothy, and will begin to stick to the sides of the pan. It should be about 220 degrees.
- Allow the preserves to cool in the pan for 30-45 minutes, stirring occasionally. If the preserves cool.
Notes
- Fresh Strawberries: If strawberries are out of season, you can create frozen strawberry preserves instead. Frozen strawberries are picked at peak season, so they will be as sweet as the in-season version. You’ll need to thaw the strawberries before continuing with the strawberry preserves recipe.
- Lemon: Lemon juice helps offset the sweetness of the preserves and helps them set. However, it can be omitted since these preserves are not canned. You’ll notice a slightly thinner texture and a sweeter flavor when leaving out the lemon juice.
- Use in-season berries. The best preserves are made with in-season berries since they’re sweeter. Do not use out-of-season berries for a strawberry preserves recipe, as they will create a more tangy/sour spread.
- Stir continuously. The sugar in preserves can burn easily in the pan, so it’s important to stir continuously as it cooks. Consistently stirring will help keep any bits from sticking to the pan and burning.
- Boil long enough to evaporate excess moisture. This step is essential, as it helps create a thick, gooey consistency. They’ll be watery if you leave too much moisture in the preserves.
- Cool the preserves. Allowing the preserves to cool before packing them away gives them time to set. Additionally, you can see if the preserves are thick enough once they cool. If not, they will thicken up in the fridge. Overly watery preserves can be cooked for longer to remove excess moisture.
Nutrition
Nutrition information is automatically calculated, so should only be used as an approximation.


Sounds wonderful.