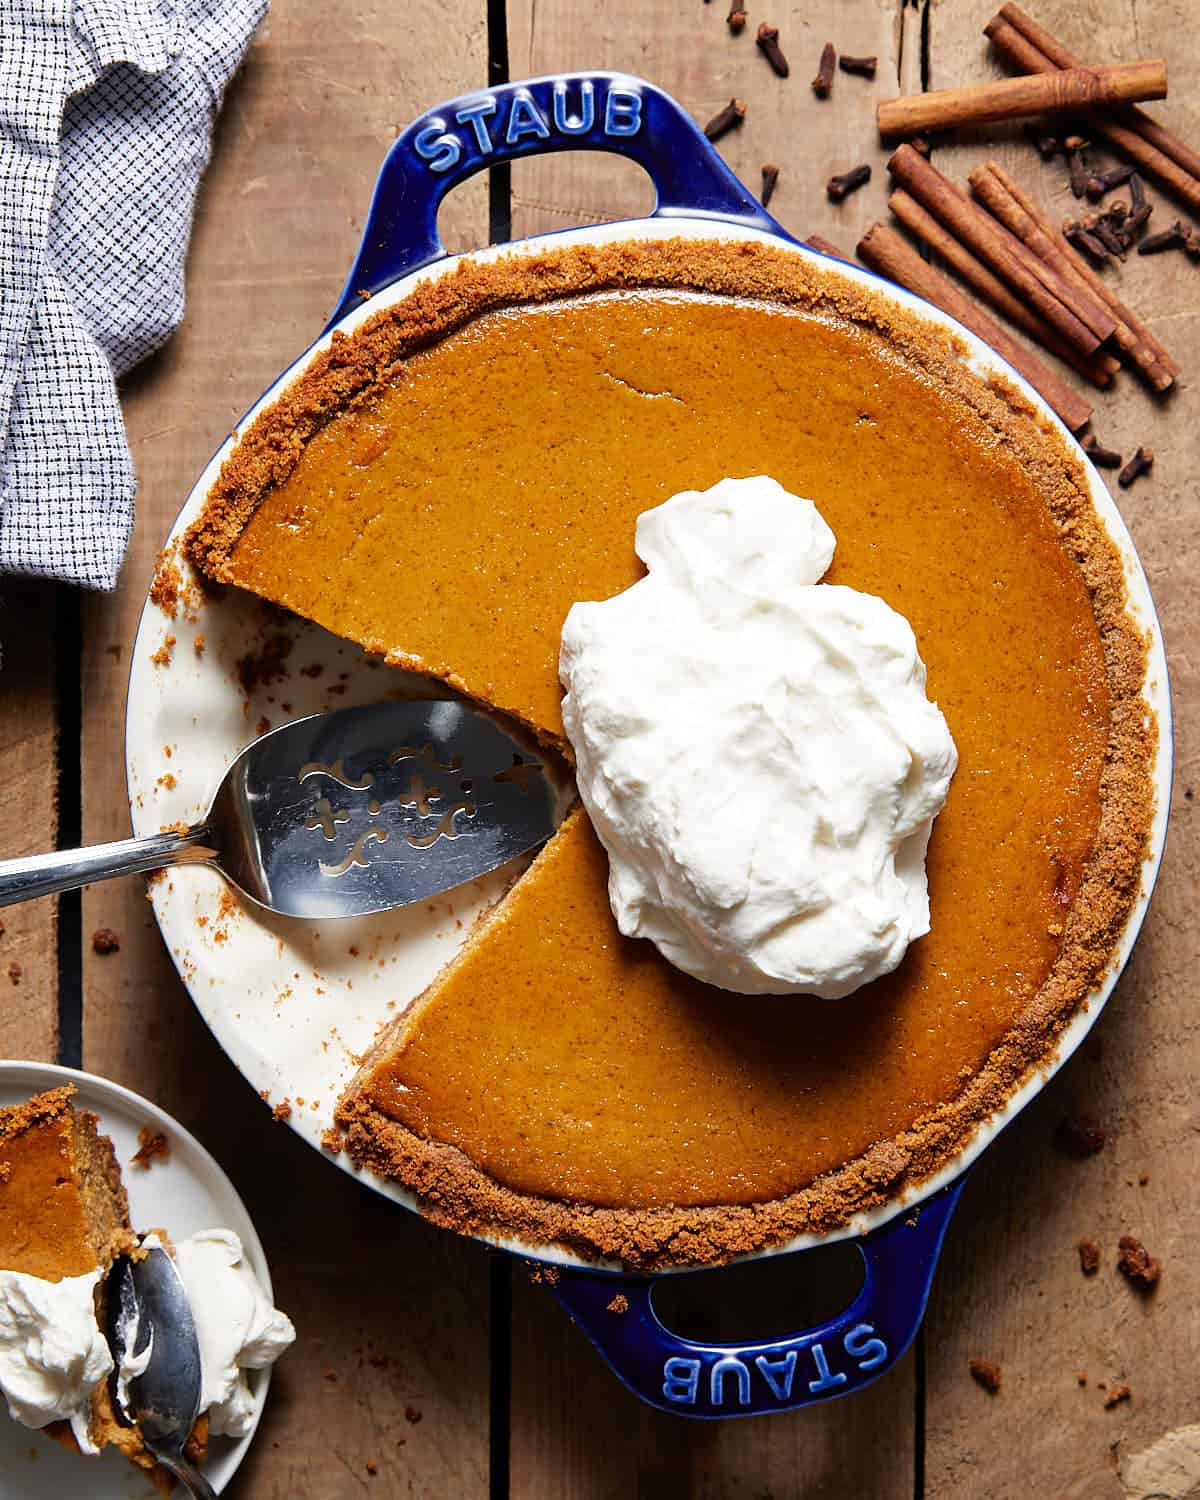
This easy Pumpkin Pie with Graham Cracker Crust is everything you love about a traditional pumpkin pie, minus the hassle of the crust. Not only is a graham cracker crust easy to make, it is just as tasty. The filling is made with buttermilk to give it an extra zing.
This pumpkin pie recipe in an easy graham cracker crust needs to be on your Thanksgiving and/or Christmas menu, along with my Easy Pumpkin Pie Recipe without Evaporated Milk or Sweetened Condensed Milk Pumpkin Pie! It is the first of many pie recipes this season.
My Pumpkin Snickerdoodle Bars are also incredible and very festive.
If you are out of oven space, try this No Bake Oreo Cheesecake Pie or my Reese’s Peanut Butter Cup Pie Recipe.
Wash this all down with a warm cup of Easy Instant Pot Hot Chocolate. Perfect for the holidays.
This recipe is made without evaporated milk. It instead uses buttermilk. Read more about Substitutes for Evaporated Milk in Pumpkin Pie.
Table of Contents
Why You’ll Love This Recipe
- Graham cracker pumpkin pie is much easier than the traditional version. The crust requires no chilling and is made from only 3 ingredients. You can also use a store-bought crust.
- The filling is spiced with cinnamon, ginger, nutmeg, or cloves giving it tons of fall flavor. I prefer to make my spice blend instead of using store-bought. Learn more about Apple Pie Spice vs. Pumpkin Pie Spice and their differences.
- Made without evaporated milk – Using buttermilk instead of evaporated milk or sweetened condensed milk results in a super rich and creamy filling with a little tanginess. I promise it is a game-changer.
- It is the perfect dessert for Thanksgiving or Christmas.
- You can make the cracker crumbs with or without a food processor. You also do not need a rolling pin like you do for a traditional pie crust.
Ingredients & Substitutions

- Graham Cracker Crust: You can swap the homemade crust for a store-bought one, like Keebler. You still should pre-bake it as the recipe states.
- Pumpkin: The only ingredient on the back of the can should be pumpkin. Be sure it has no added sugar or spices. It is not the same as canned pumpkin pie filling.
- Buttermilk: I highly recommend buttermilk. It adds a great flavor to the pie. However, you can substitute it for 1% or 2% milk. Let the buttermilk and eggs sit at room temperature for about 45 minutes to 1 hour.
- Cinnamon & Other Spices: Instead of using ginger, nutmeg, and cloves. You can use 1 1/2 teaspoons store-bought or homemade pumpkin pie spice. You still need to add the 2 teaspoons of cinnamon.
- Whipped Cream: Using an electric mixer, whip 1 cup heavy cream, 2 Tablespoons granulated sugar, and 1 teaspoon vanilla extract, until stiff peaks form.
Complete list of ingredients and amounts is located on the recipe card below.
How to Make Pumpkin Pie with Graham Cracker Crust
Quick Overview
- Make the crust in a pie plate or dish.
- Make the filling in a medium bowl.
- Pour the filling into the crust & bake.
- Cool & serve!
Step by Step Instructions
Be sure to use pressure when compacting the crust.
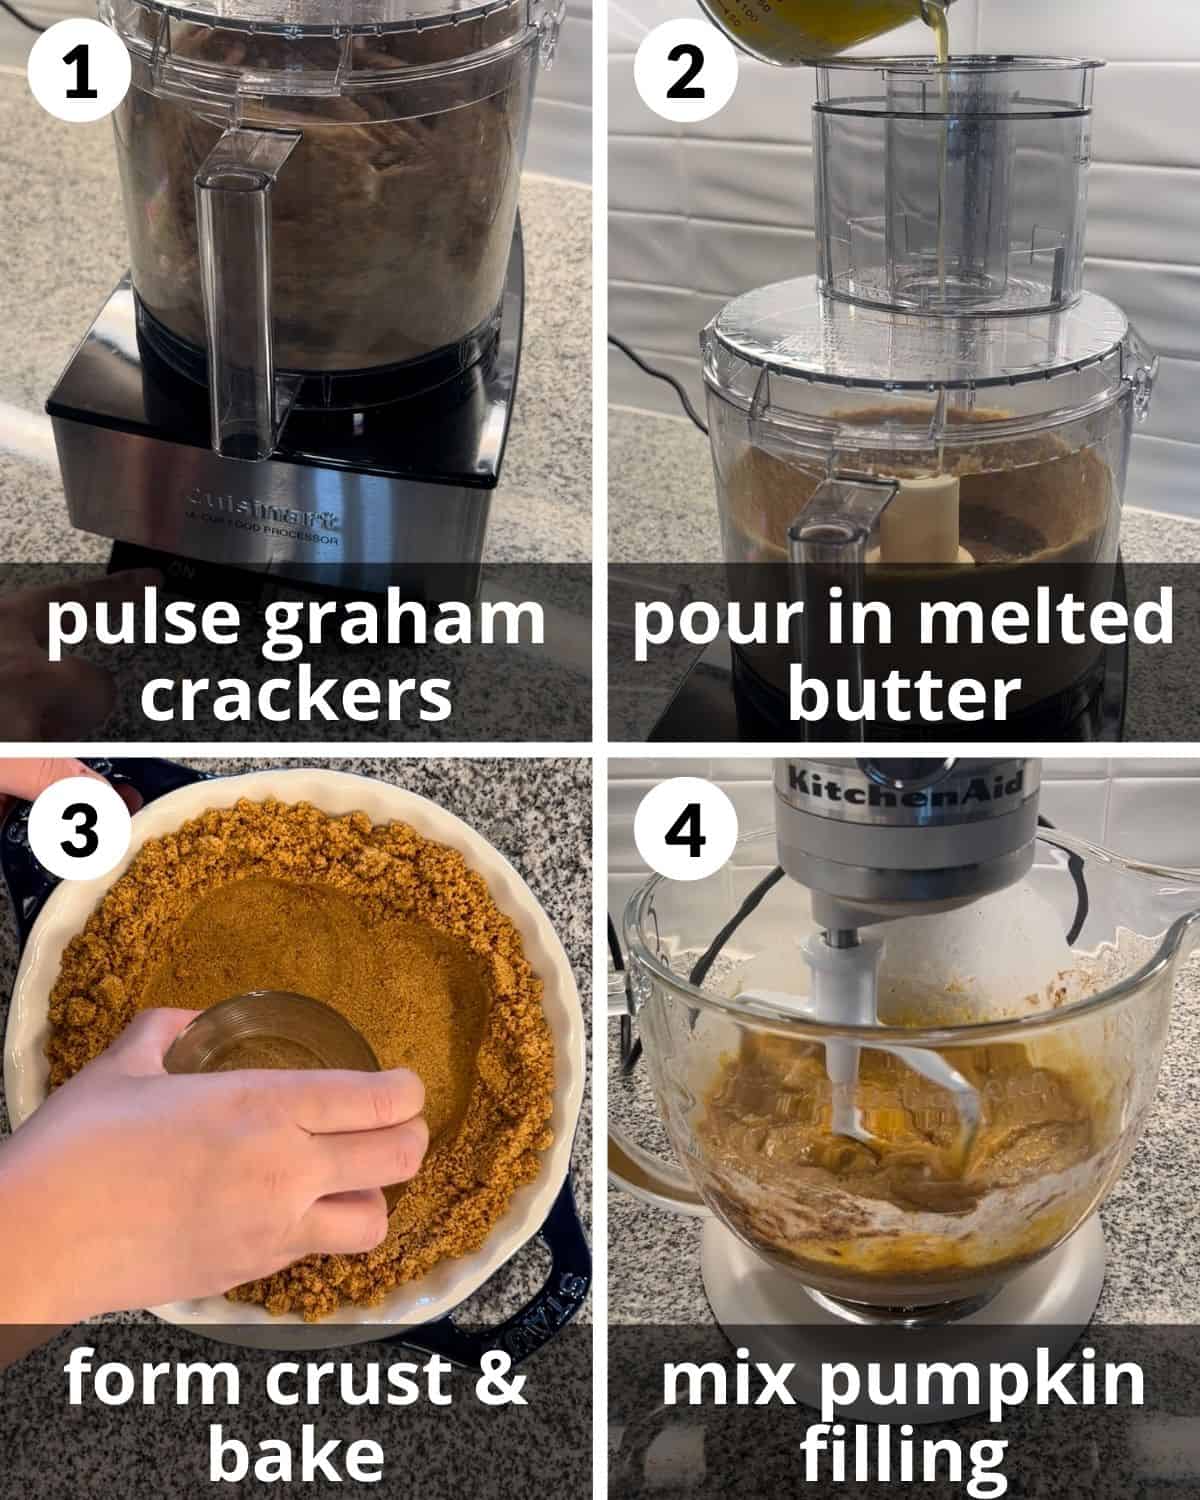
Step 1: Preheat the oven to 350 degrees. Pulse graham crackers and brown sugar in a food processor into a fine crumb. You can also grind them in a zipped top bag with a rolling pin or your hands.
Step 2: Simultaneously, pour in the melted salted butter and pulse the graham cracker mixture until the butter is combined. You can also combine them in a bowl with a spatula.
Step 3: In a 9 or 10 inch pie dish, press the graham cracker mixture into the bottom and up the sides. Use the bottom of a small glass or measuring cup and your hands to compact the mixture. Bake for 7-8 minutes.
Pumpkin Pie Filling
Step 4: While the pie crust bakes, make the filling. Add the pumpkin, buttermilk, eggs, unsalted butter, brown sugar, granulated sugar, vanilla, salt, cinnamon, ginger, nutmeg, and cloves in a large bowl. Using an electric/stand mixer or a whisk, mix together the filling until well combined.
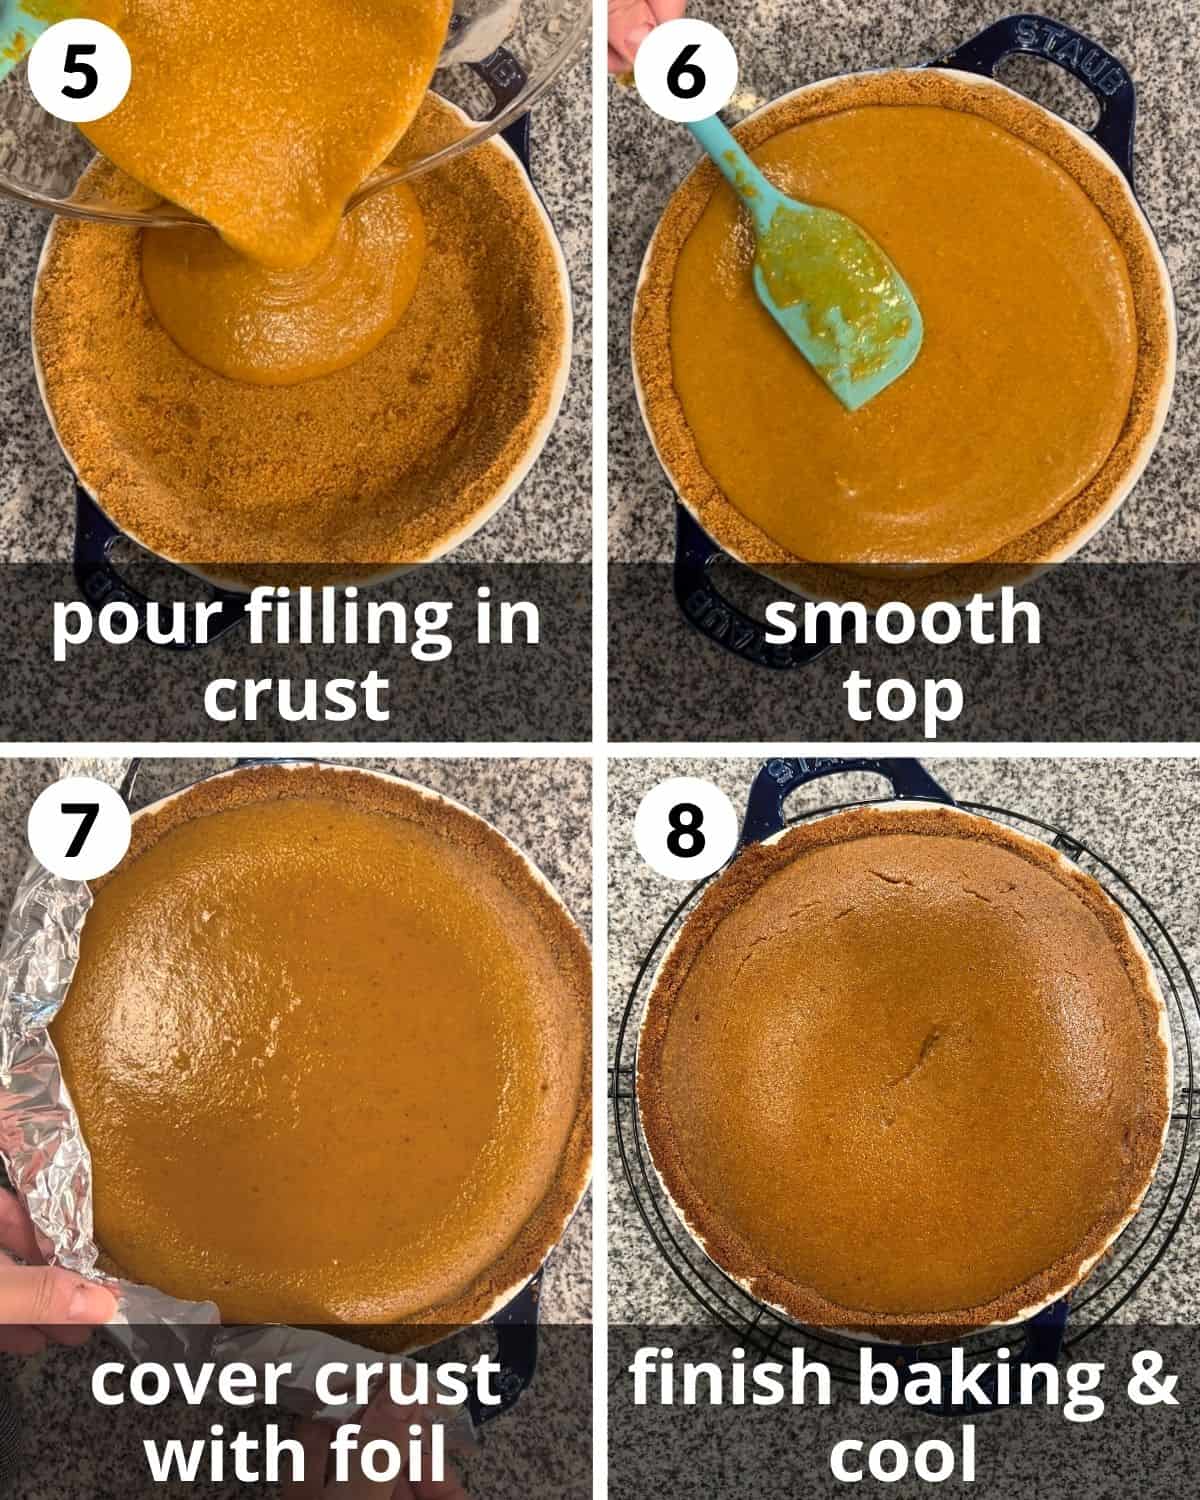
Cover the edges of the crust so they do not burn.
Step 5: Pour the pumpkin filling into the pre-baked crust.
Step 6: Use a spatula to smooth out the filling gently. The pie will be filled to the very top.
Step 7: Bake for 45-55 minutes depending on the size of your pie dish. At the 25-30 minute mark, cover the edges of the pie with foil or a pie crust shield so the edges do not burn. A 9-inch pie will take MORE time than a 10-inch pie. I recommend checking the temperature of the center or pie with a thermometer. It is done when the center is 180-185 degrees. The middle will still look wobbly and unset. It will continue to set as it cools.
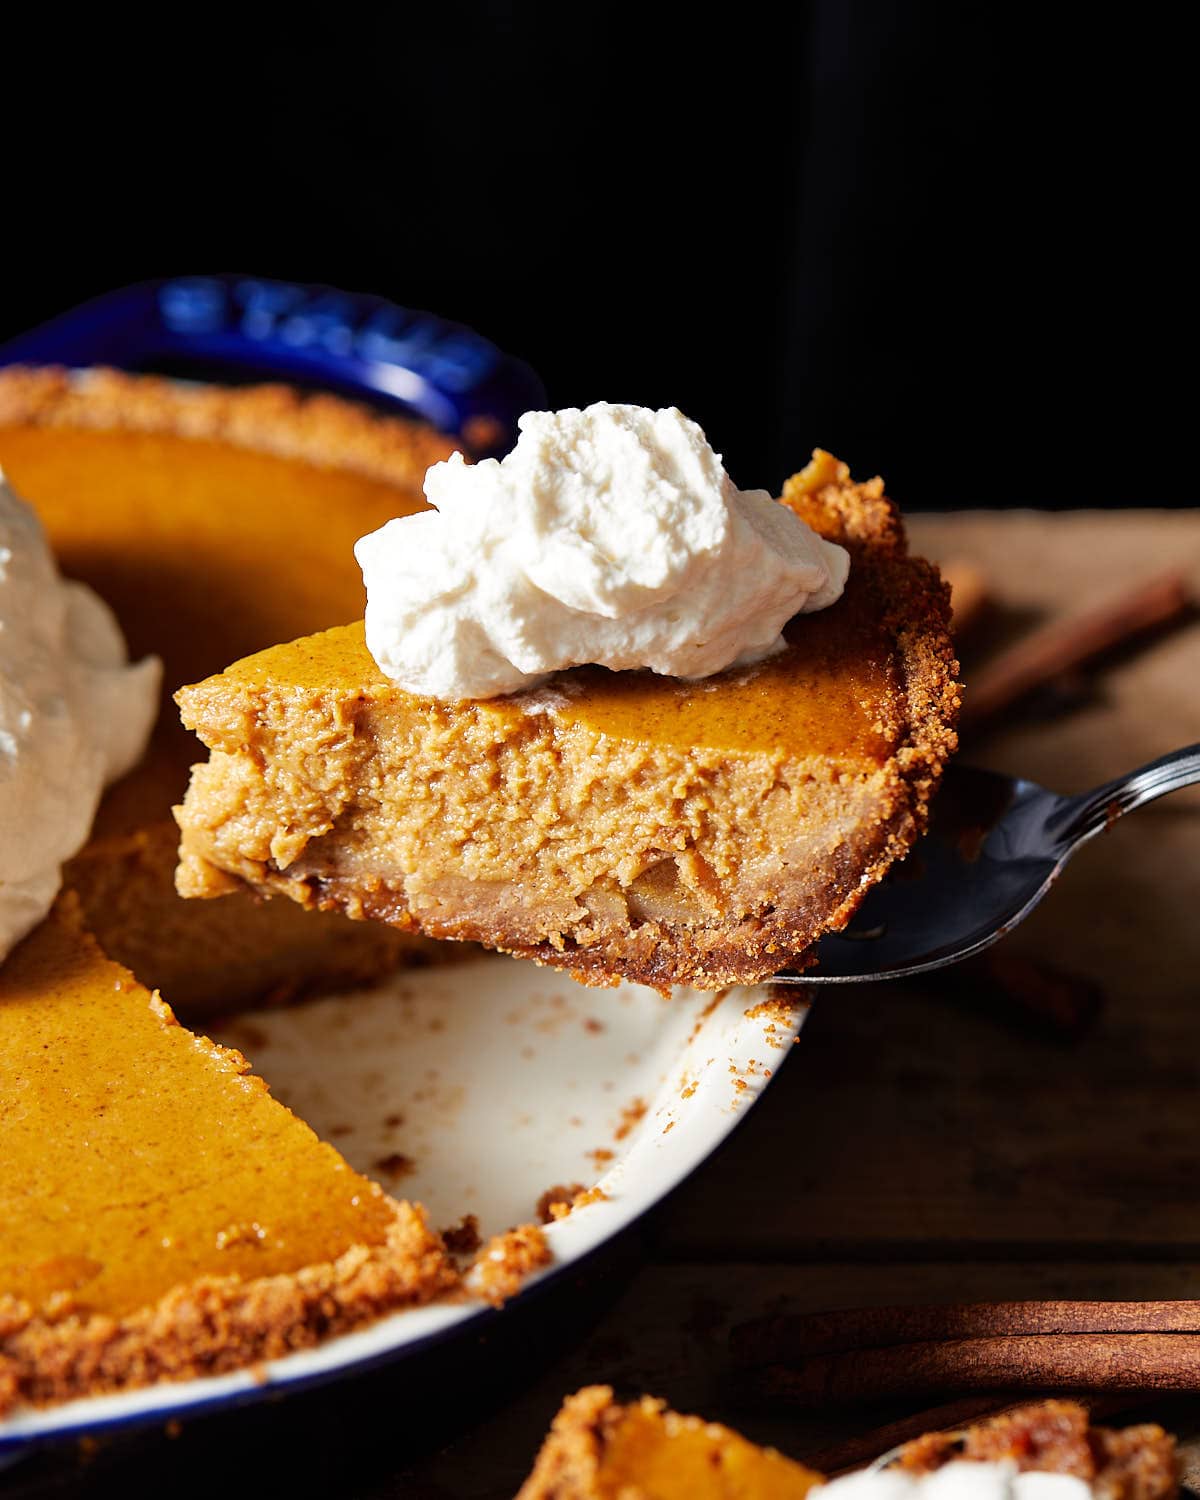
Step 8: Remove from the oven and cool on a wire rack for 2-3 hours. The center will drop and the pie will level as it cools. Cover and transfer to the refrigerator once cooled. Serve with whipped cream.
Expert Tips & Variations
- Use room temperature ingredients. Let the buttermilk and eggs sit out at room temperature for about 1 hour. After the unsalted butter is melted, let it cool for about 10-15 minutes. Using ingredients that are all about the same temperature helps them combine seamlessly.
- Use buttermilk. The slight tanginess adds more depth and flavor to the pie.
- Mix the filling well. You want to ensure the filling is smooth and there are no lumps in the mixture.
- Cool completely. The pie will be extremely hot right when it comes out of the oven, be sure to let it cool at room temperature before transferring it to the fridge. I prefer to serve the pie cold so I refrigerate the pie for at least 4 hours before slicing.
- Add the whipped cream to each slice right before serving. If the whole pie is not being eaten at once, I recommend adding it to each slice so the whipped cream and pie can be stored separately. You could also serve the pie with vanilla ice cream.
- Store in the fridge. This pie will stay good for about 3-4 days in the refrigerator. Be sure to cover it. You can also freeze individually wrapped pieces for 2 months. Read more about How Long Pumpkin Pie Lasts in the Fridge & how to store it.
- Make a no-bake graham crust pie. If you want to skip the pre-baking step, you can, but the crust will be softer.
Recipe FAQs
Baking it will help the crust to set and prevent it from absorbing the moisture from the filling. If you have ever not baked the crust, you can taste the difference.
Yes, in fact, that is why I created this recipe. These are much easier to make than traditional pie crusts. I also prefer them to store-bought pie crust.
It depends. No-bake desserts often use cracker crusts because they do not have to be baked. I like to pre-bake the crust to deepen the flavor and prevent it from getting soggy.
Yes. This prevents the crust from getting soggy.
Yes! See the recipe notes about using a store-bought crust instead.
More Dessert Recipes
If you try this recipe, please leave a star rating in the recipe card below and/or comment! I always appreciate your feedback. Follow me on Pinterest, Facebook & Instagram.

Pumpkin Pie with Graham Cracker Crust
Ingredients
Crust*:
- 12 whole graham crackers
- 5 Tablespoons brown sugar
- 5 Tablespoons salted butter melted
Filling:
- 1 15-ounce can unsweetened pure pumpkin puree
- 1 cup buttermilk room temperature*
- 3 eggs room temperature
- 4 Tablespoons unsalted butter melted & cooled slightly
- 3/4 cup brown sugar
- 1/4 cup granulated sugar
- 2 teaspoons vanilla extract
- 1/2 teaspoon salt
- 2 teaspoons ground cinnamon*
- 1 teaspoon ground ginger
- 1/2 teaspoon ground nutmeg
- 1/4 teaspoon ground cloves
- homemade whipped cream for serving*
Instructions
- Preheat the oven to 350 degrees. Pulse graham crackers and brown sugar in a food processor into a fine crumb. You can also grind them in a zipped top bag with a rolling pin or your hands.12 whole graham crackers, 5 Tablespoons brown sugar
- Simultaneously, pour in the melted salted butter and pulse the graham cracker mixture until the butter is combined. You can also combine them in a bowl with a spatula.5 Tablespoons salted butter
- In a 9 or 10 inch pie dish, press the graham cracker mixture into the bottom and up the sides. Use the bottom of a small glass or measuring cup and your hands to compact the mixture. Bake for 7-8 minutes.
- While the pie crust bakes, make the filling. Add the pumpkin, buttermilk, eggs, unsalted butter, brown sugar, granulated sugar, vanilla, salt, cinnamon, ginger, nutmeg, and cloves in a large bowl. Using an electric/stand mixer or a whisk, mix together the filling until well combined.1 15-ounce can unsweetened pure pumpkin puree, 1 cup buttermilk, 3 eggs, 4 Tablespoons unsalted butter, 3/4 cup brown sugar, 1/4 cup granulated sugar, 2 teaspoons vanilla extract, 1/2 teaspoon salt, 2 teaspoons ground cinnamon*, 1 teaspoon ground ginger, 1/2 teaspoon ground nutmeg, 1/4 teaspoon ground cloves
- Pour the pumpkin filling into the pre-baked crust.
- Use a spatula to smooth out the filling gently. The pie will be filled to the very top.
- Bake for 45-55 minutes depending on the size of your pie dish. At the 25-30 minute mark, cover the edges of the pie with foil or a pie crust shield so the edges do not burn. A 9-inch pie will take MORE time than a 10-inch pie. I recommend checking the temperature of the center or pie with a thermometer. It is done when the center is 180-185 degrees. The middle will still look wobbly and unset. It will continue to set as it cools.
- Remove from the oven and cool on a wire rack for 2-3 hours. The center will drop and the pie will level as it cools. Cover and transfer to the refrigerator once cooled. Serve with whipped cream.homemade whipped cream
Notes
- Graham Cracker Crust: You can swap the homemade crust for a store-bought one, like Keebler. You still should pre-bake it as the recipe states.
- Pumpkin: The only ingredient on the back of the can should be pumpkin. Be sure it has no added sugar or spices. It is not the same as canned pumpkin pie filling.
- Buttermilk: I highly recommend buttermilk. It adds a great flavor to the pie. However, you can substitute it for 1% or 2% milk. Let the buttermilk and eggs sit at room temperature for about 45 minutes to 1 hour.
- Cinnamon & Other Spices: Instead of using ginger, nutmeg, and cloves. You can use 1 1/2 teaspoons store-bought or homemade pumpkin pie spice. You still need to add the 2 teaspoons of cinnamon.
- Whipped Cream: Using an electric mixer, whip 1 cup heavy cream, 2 Tablespoons granulated sugar, and 1 teaspoon vanilla extract, until stiff peaks form.
- Use room temperature ingredients. Let the buttermilk and eggs sit out at room temperature for about 1 hour. After the unsalted butter is melted, let it cool for about 10-15 minutes. Using ingredients that are all about the same temperature helps them combine seamlessly.
- Cool completely. The pie will be extremely hot right when it comes out of the oven, be sure to let it cool at room temperature before transferring it to the fridge. I prefer to serve the pie cold so I refrigerate the pie for at least 4 hours before slicing.
- Store in the fridge. This pie will stay good for about 3-4 days in the refrigerator. Be sure to cover it. You can also freeze individually wrapped pieces for 2 months.
Nutrition
Nutrition information is automatically calculated, so should only be used as an approximation.


Your recipe does not say what a whole graham cracker is??
This is the best pumpkin pie ever! So delicious!!
Does it affect baking time (or anything else) if you use a glass pie dish?
Loved this recipe
Contains ingredients that I can serve my family without additives
Thank you
I tried this 3 times and every single time I ended up with a rubbery layer between the pie and the crust 🤷
Oh no! I have not gotten any feedback like this for this recipe.
There is flour pictured in the ingredients but no flour listed in the actual ingredient list or recipe? Is there flour in it?