
This Easy Rustic Bread Recipe is the recipe I recommend if you have never made bread before but want to try. It only requires bread flour, yeast, salt, and water—no sourdough starter or kneading—and the loaf does not need to be shaped perfectly to develop a crisp crust and chewy, airy center.
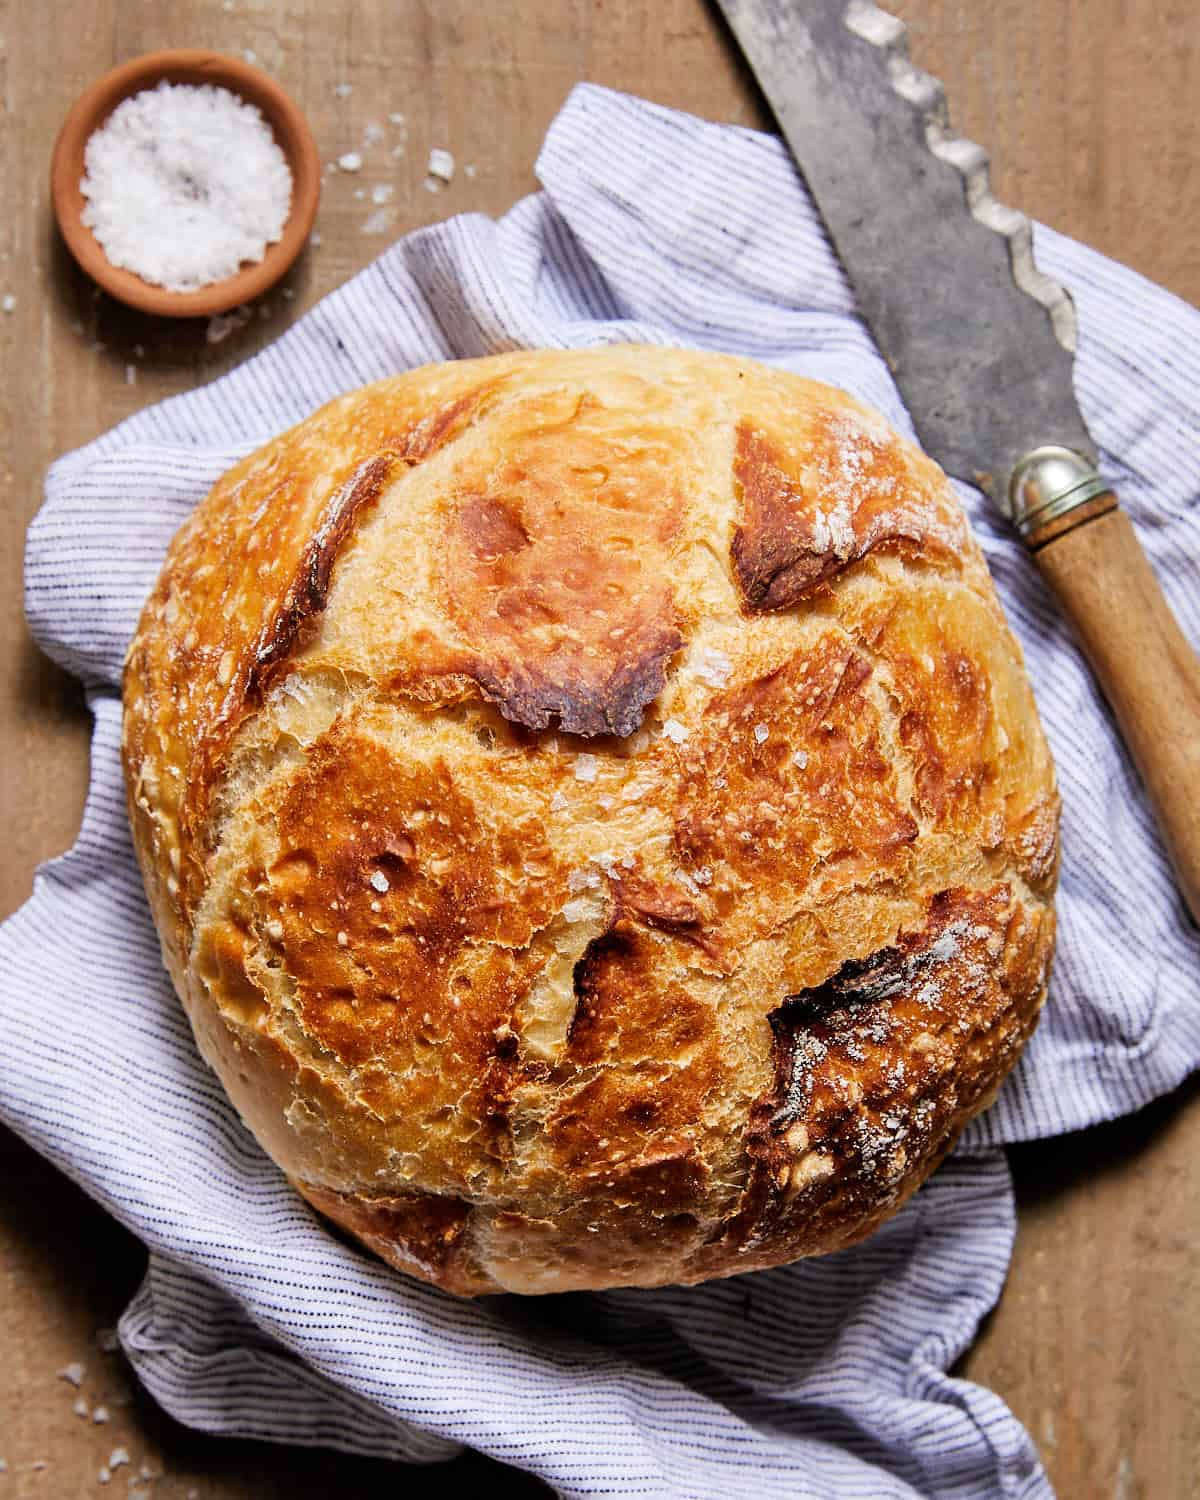
The dough is intentionally wet and sticky. As it rises, it develops the bubbles that create its airy texture; the optional refrigerated method also gives the dough more time to develop flavor. If you enjoy working with slowly fermented dough, try my 72 Hour Pizza Dough Recipe next.
🔍 At a Glance
- ⏱️ Ready in: About 4–5 hours for the same-day method; plan about one day ahead for the optional refrigerated method
- 👥 Yields: 1 round loaf (about 8 slices)
- 📌 Main Ingredients: Bread flour, active dry yeast, kosher salt, and warm water
- 🔥 Cook Method: Baked in a covered Dutch oven, then uncovered to brown
- 😋 Flavor Profile: Crisp crust with a chewy, airy center
- 📝 Great For: Making a first loaf of homemade bread without a sourdough starter or kneading
Table of Contents
- 🔍 At a Glance
- Why This Recipe Works
- Beginner Bread-Making Terms
- Ingredients & Why They Matter
- Equipment You Will Need
- Choose Your Bread-Making Schedule
- What the Dough Should Look Like
- Easy Rustic Bread Recipe Step by Step
- Pro Tips
- Common Mistakes
- If You Think Something Went Wrong
- How to Store Rustic Bread
- Recipe Serving Suggestions
- Easy Rustic Bread Recipe
- More Bread Recipes
Why This Recipe Works
- The wet dough creates an airy texture without kneading: The water hydrates the flour and allows bubbles to form while the dough rests, so you only need to stir until no dry flour remains.
- Visible checkpoints and a forgiving shape remove the guesswork: Instead of relying only on a timer, look for dough that has doubled, become bubbly across the top, and jiggles when the bowl moves. The loaf does not need to be perfectly round, smooth, or symmetrical to bake successfully.
- The Dutch oven creates the crisp crust: The covered pot traps steam around the loaf so it can expand before the exterior becomes deeply browned and crisp.
Beginner Bread-Making Terms
- Rise or proof: The resting period when yeast creates gas and makes the dough expand.
- Fermentation: The process in which yeast feeds on sugars and produces the gas and flavor that develop in the dough.
- No-knead: The dough develops structure as the flour absorbs water and rests, rather than through several minutes of hand or machine kneading.
- Shape: Gently guiding the risen dough into a rough round before baking. Shaping is not the same as kneading; the goal is to organize the dough without pressing out its bubbles.
- Score: Cutting an X into the top so the loaf has a controlled place to expand in the oven.
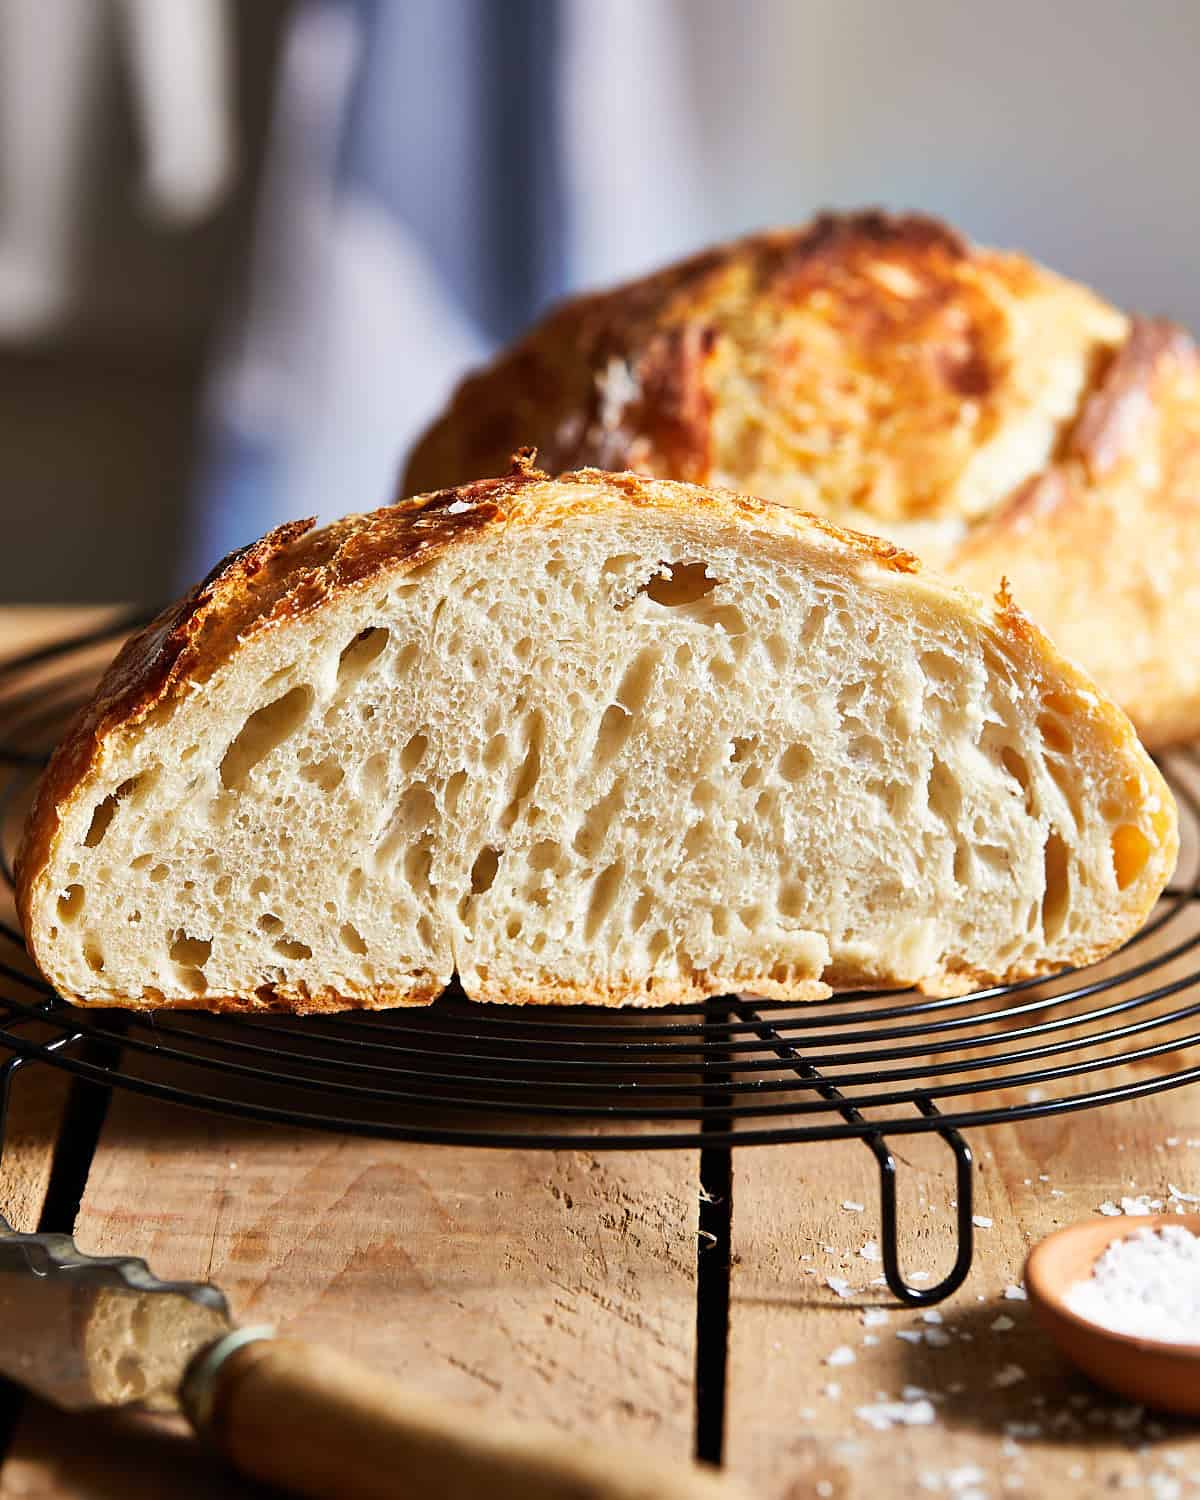
- Crumb: The soft interior and its pattern of holes.
Ingredients & Why They Matter
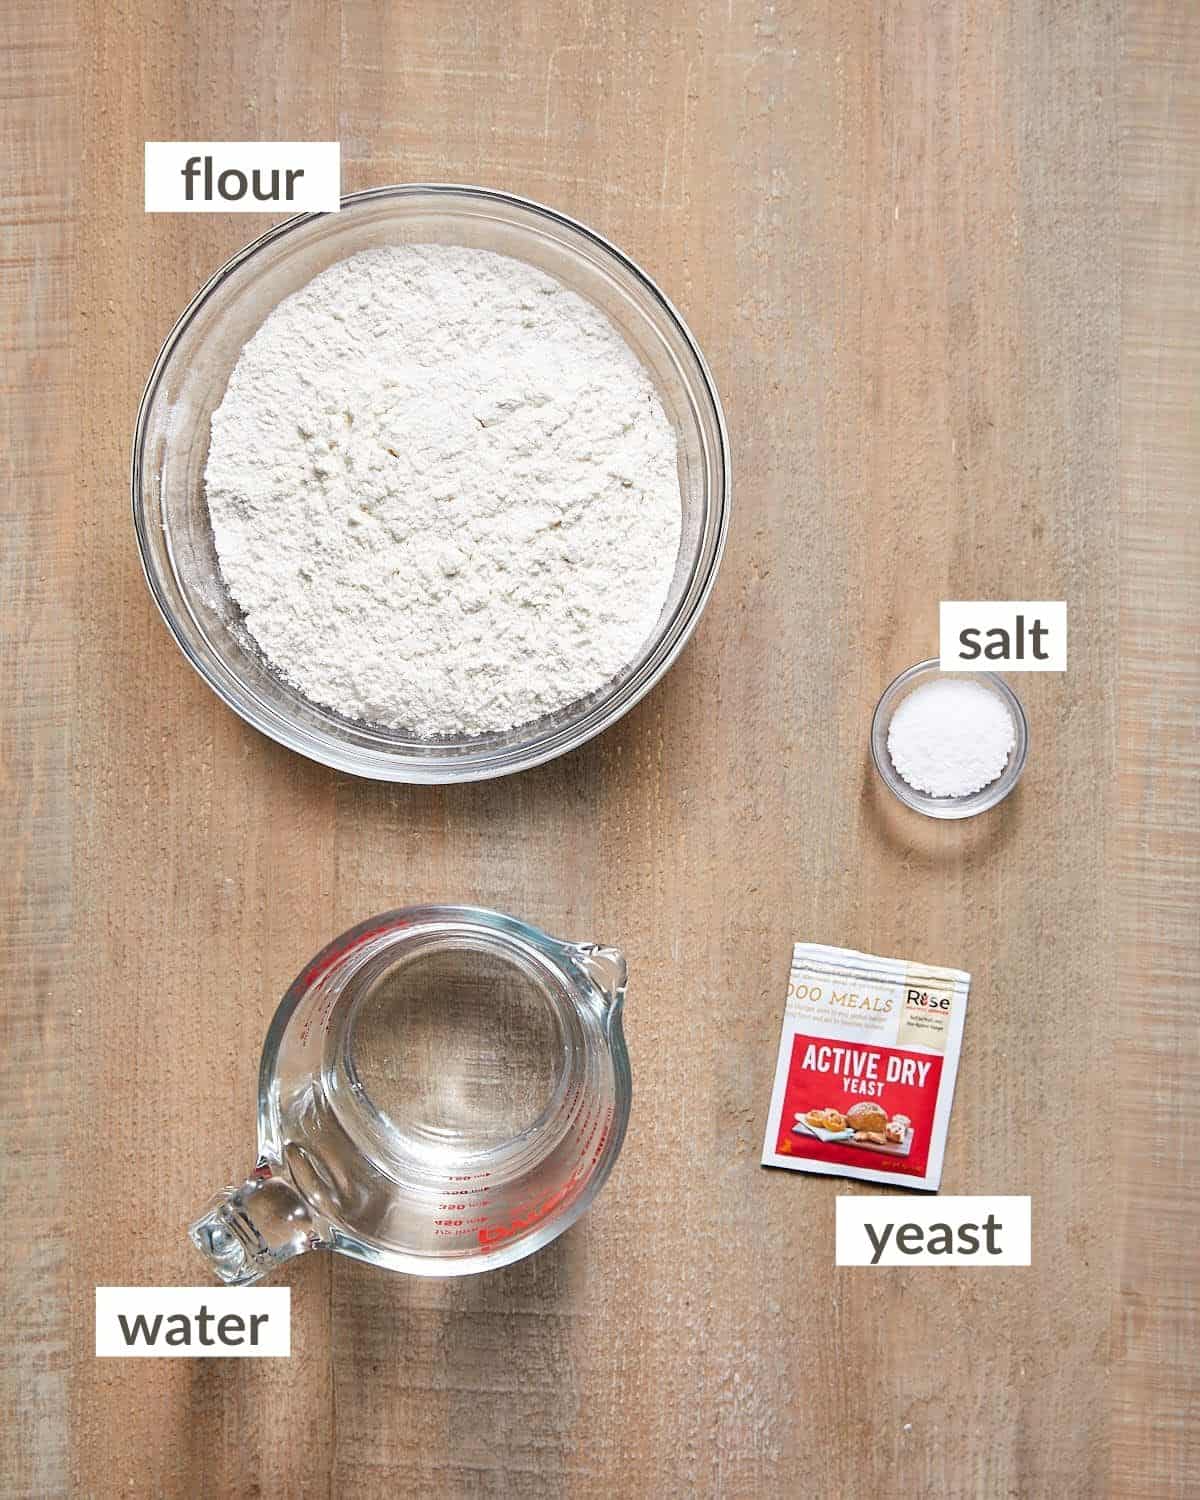
- Bread flour: I use King Arthur Bread Flour because its higher protein content gives this rustic loaf a chewier texture. All-purpose flour can be used in a pinch, but the texture may be softer. I have not tested this recipe with whole-wheat or gluten-free flour. Whole-wheat flour absorbs water differently and can produce a denser loaf, while a cup-for-cup gluten-free substitution will not provide the same structure as bread flour.
- Active dry yeast: I use Red Star Active Dry Yeast. You do not need to activate or proof it separately for this recipe; whisk it directly into the flour and salt. Instant yeast can also be used in the same amount, but it may rise faster, so follow the visual readiness cues below.
- Kosher salt: I use 2 teaspoons Morton kosher salt. If you use Diamond Crystal kosher salt, use 4 teaspoons. If you use fine sea salt or table salt, use 1 teaspoon.
- Warm water: Use water at 110°F. If you do not have a thermometer, it should feel comfortably warm but not hot. Water that feels hot can damage the yeast and prevent the dough from rising.
Find the complete ingredient amounts in the recipe card below.
How to Measure Flour Without a Scale
A food scale gives you the most consistent dough, but you can measure the flour correctly with cups. Fluff the flour in its container, spoon it lightly into the measuring cup, and sweep the excess off with the straight edge of a knife. Do not scoop the flour directly from the container or pack it into the cup; both can add too much flour and make the loaf denser.
Reader-Reported Mix-Ins
Readers have reported successful loaves with sharp cheddar; rosemary; Kalamata olives and rosemary; dried cranberries and honey; or brown sugar, raisins, and pecans. I have not tested these combinations myself. Because some comments did not include complete measurements or mixing details, the amounts below are conservative starting points rather than guaranteed variations.
- Sharp cheddar: Add 1 cup (113 g) shredded sharp cheddar. One reader reported success with this exact amount.
- Rosemary: Start with 1 tablespoon finely chopped fresh rosemary or 1 teaspoon dried rosemary. One reader reported using 2 tablespoons but did not specify whether it was fresh or dried.
- Kalamata olive and rosemary: Start with 3/4 cup (100 g) chopped Kalamata olives and 1 tablespoon finely chopped fresh rosemary or 1 teaspoon dried rosemary. Drain and pat the olives thoroughly dry.
- Cranberry and honey: Start with 3/4 cup (85 g) dried cranberries and 1 1/2 tablespoons (32 g) honey.
- Brown sugar, raisin, and pecan: Start with 2 tablespoons (27 g) packed brown sugar, 1/2 cup (75 g) raisins, and 1/2 cup (55 g) chopped pecans.
Whisk dried herbs or brown sugar into the dry ingredients. Stir honey into the warm water. Fold cheese, olives, dried fruit, or nuts into the mixed dough before covering it for the rise.
Mix-ins may affect the rise, so follow the visual cues rather than relying only on time. Sweetened loaves may also brown faster. Loosely shield the top with foil if necessary and bake until the center reaches 200–205°F.
Equipment You Will Need
Must-Have Equipment
- Large mixing bowl: Use one with enough room for the dough to at least double without overflowing. Mine is about 5 quarts, but the exact size is not important as long as the dough has plenty of room to expand.
- Sturdy spoon or silicone spatula: You need something strong enough to mix the wet, sticky dough and scrape it out of the bowl.
- Plastic wrap or another tight-fitting bowl cover: A tight cover prevents the dough from drying out while it rises.
- Parchment paper: This prevents sticking and gives you handles for safely lowering the soft loaf into the hot pot.
- Sharp paring knife: Use it to cut the X in the top of the dough. You do not need to purchase a bread lame.
- Heavy, oven-safe 6-quart Dutch oven with a lid: This is the size I use for this loaf. Confirm that the pot, lid, handles, and knob are all safe at 450°F. If you need one, this is my beginner-friendly Dutch oven recommendation.
- Oven mitts: The Dutch oven, lid, and handles will be extremely hot.
- Wire cooling rack: Airflow around the loaf helps prevent the bottom crust from becoming damp as it cools.
- Plastic bench scraper or flexible spatula: You need one of these to release, fold, shape, and transfer the sticky dough without adding too much flour.
This recipe was tested as one loaf in a covered 6-quart Dutch oven. I have not tested a half batch, a doubled batch, another type of baking vessel, or a no-Dutch-oven method. For two loaves, prepare two separate batches and bake them separately rather than doubling the dough in one bowl.
Helpful but Optional
- Food scale: Strongly recommended for measuring the flour accurately and producing the most consistent dough, but cup measurements are included. This is the food scale I love and use every day.
- Instant-read thermometer: Helpful for checking both the 110°F water and the bread’s 200–205°F internal temperature. Visual doneness cues are also included.
- Bread lame: Makes scoring easy, but a sharp paring knife works well for this recipe.
Choose Your Bread-Making Schedule
Both methods make one loaf. Choose one rise path rather than completing both.
| Method | After Mixing | Before Baking | Best For |
|---|---|---|---|
| Same day | Rise at room temperature until doubled and bubbly, usually 2–3 hours. In a very warm kitchen, begin checking after 1 hour. | When the dough is nearly ready, preheat the Dutch oven for at least 30 minutes | Starting and finishing the bread on the same day; about 4–5 hours total including cooling |
| Make ahead | Refrigerate immediately for about 24 hours, until doubled and bubbly | Shape and score directly from the refrigerator, then rest the loaf for about 30 minutes before baking | Mixing the dough one day and baking it the next |
Make-Ahead Method
The numbered instructions below follow the same-day method. To make the dough one day ahead, use this variation instead:
- Mix and cover the dough as directed, then refrigerate it immediately. Do not complete the room-temperature rise first.
- Refrigerate for about 24 hours, until the dough has doubled and looks bubbly across the top. Twelve hours was not enough in testing.
- Continue with Step 8 below: turn out, shape, and score the dough directly from the refrigerator, then place the scored loaf on parchment.
- Let the loaf rest on the parchment for about 30 minutes while the Dutch oven preheats, then use the same baking temperature and times as the same-day loaf.
What the Dough Should Look Like
| Stage | What You Should See | What Not to Do |
|---|---|---|
| Just mixed | A wet, sticky, shaggy mass with no pockets of dry flour | Do not add extra flour to make it kneadable |
| Finished rising | At least doubled in volume, bubbly across the top, and jiggly when the bowl moves | Do not move on solely because 2–3 hours have passed if the dough has not visibly expanded |
| Ready to shape after refrigeration | At least doubled, bubbly across the top, and still cold; I found the chilled dough easier to handle | Do not wait for fully risen dough to come completely to room temperature before shaping |
| Shaped | A rough round that may still look soft and imperfect | Do not press out the visible bubbles or aim for a perfectly smooth ball |
| Fully baked | Deep golden brown with a center temperature of 200–205°F | Do not rely on crust color alone or slice it immediately |
Easy Rustic Bread Recipe Step by Step
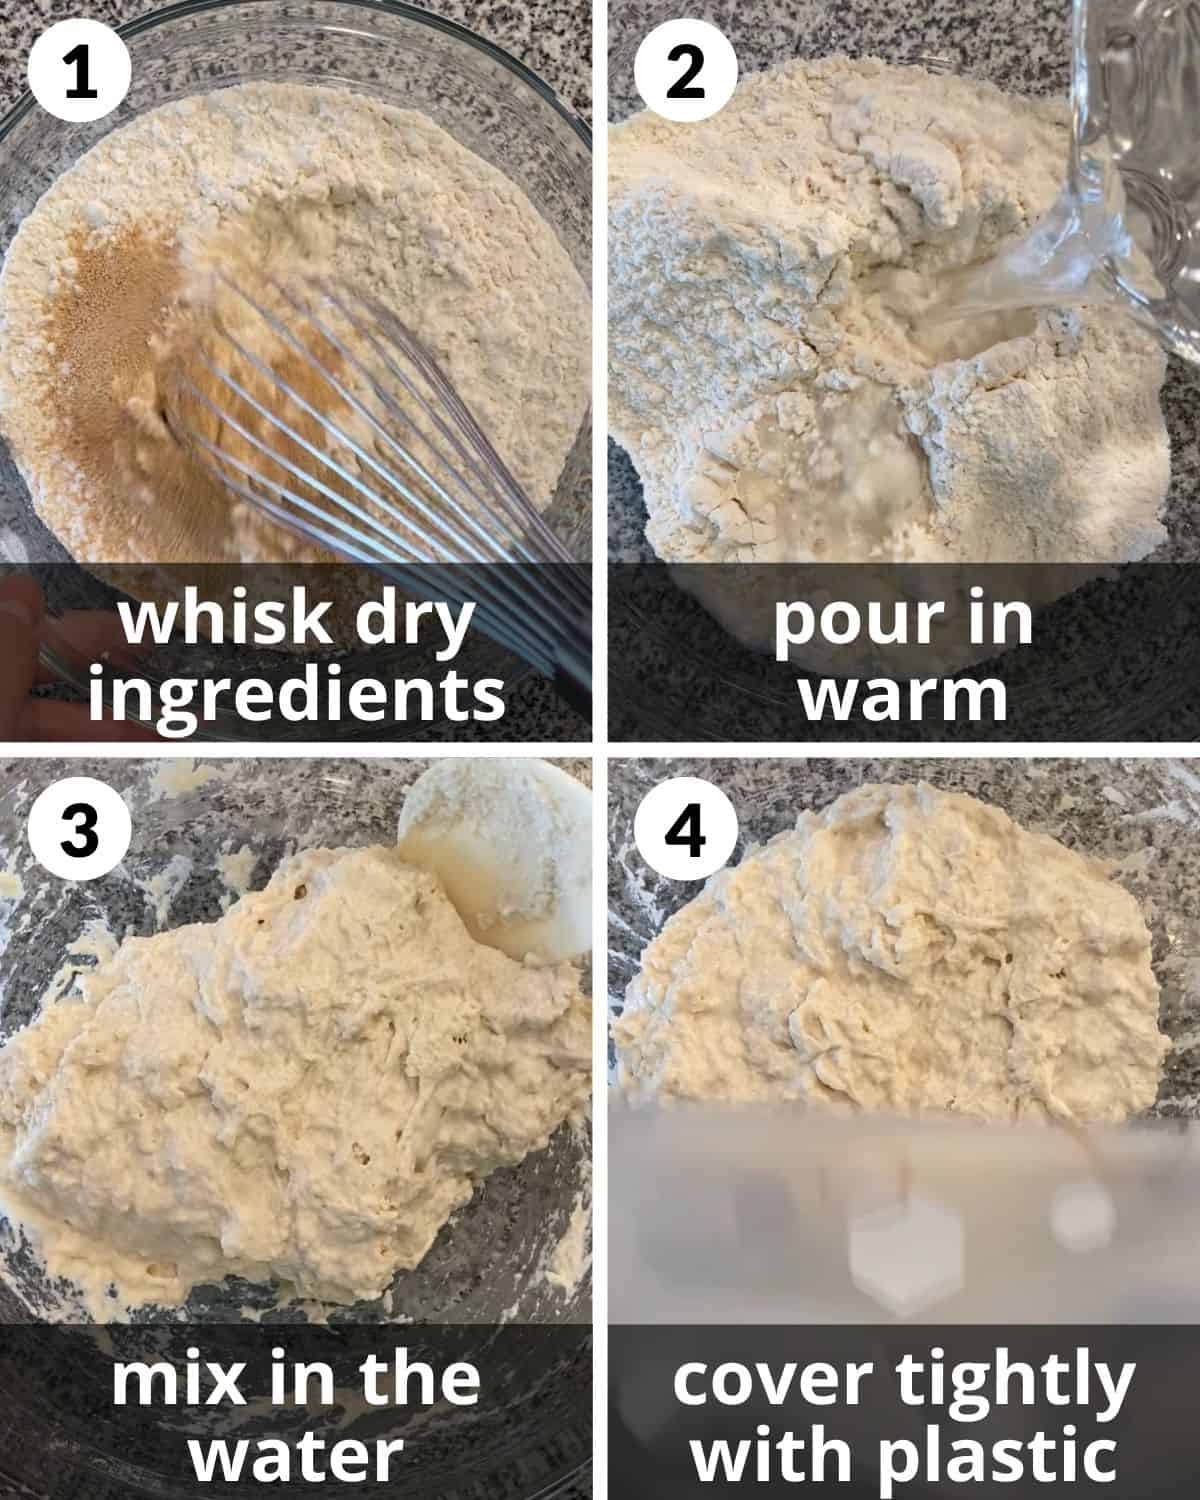
- Combine the dry ingredients. Add the bread flour, yeast, and salt to a large mixing bowl. Whisk until the yeast and salt are evenly distributed and there are no obvious clumps.
- Add the warm water. Pour the 110°F water evenly over the dry ingredients. Without a thermometer, the water should feel comfortably warm but not hot.
- Mix the dough. Stir from the bottom of the bowl until no dry flour remains. Scrape the bottom and sides so you do not miss any pockets. The mixture will look wet, sticky, shaggy, and somewhat lumpy. It will not form a firm ball and will be too wet to knead by hand; this is exactly how it should look.
- Cover the dough. Scrape the dough from the sides toward the center of the bowl, then cover the bowl tightly with plastic wrap. If helpful, mark the dough’s starting height on the outside of the bowl with a piece of tape.
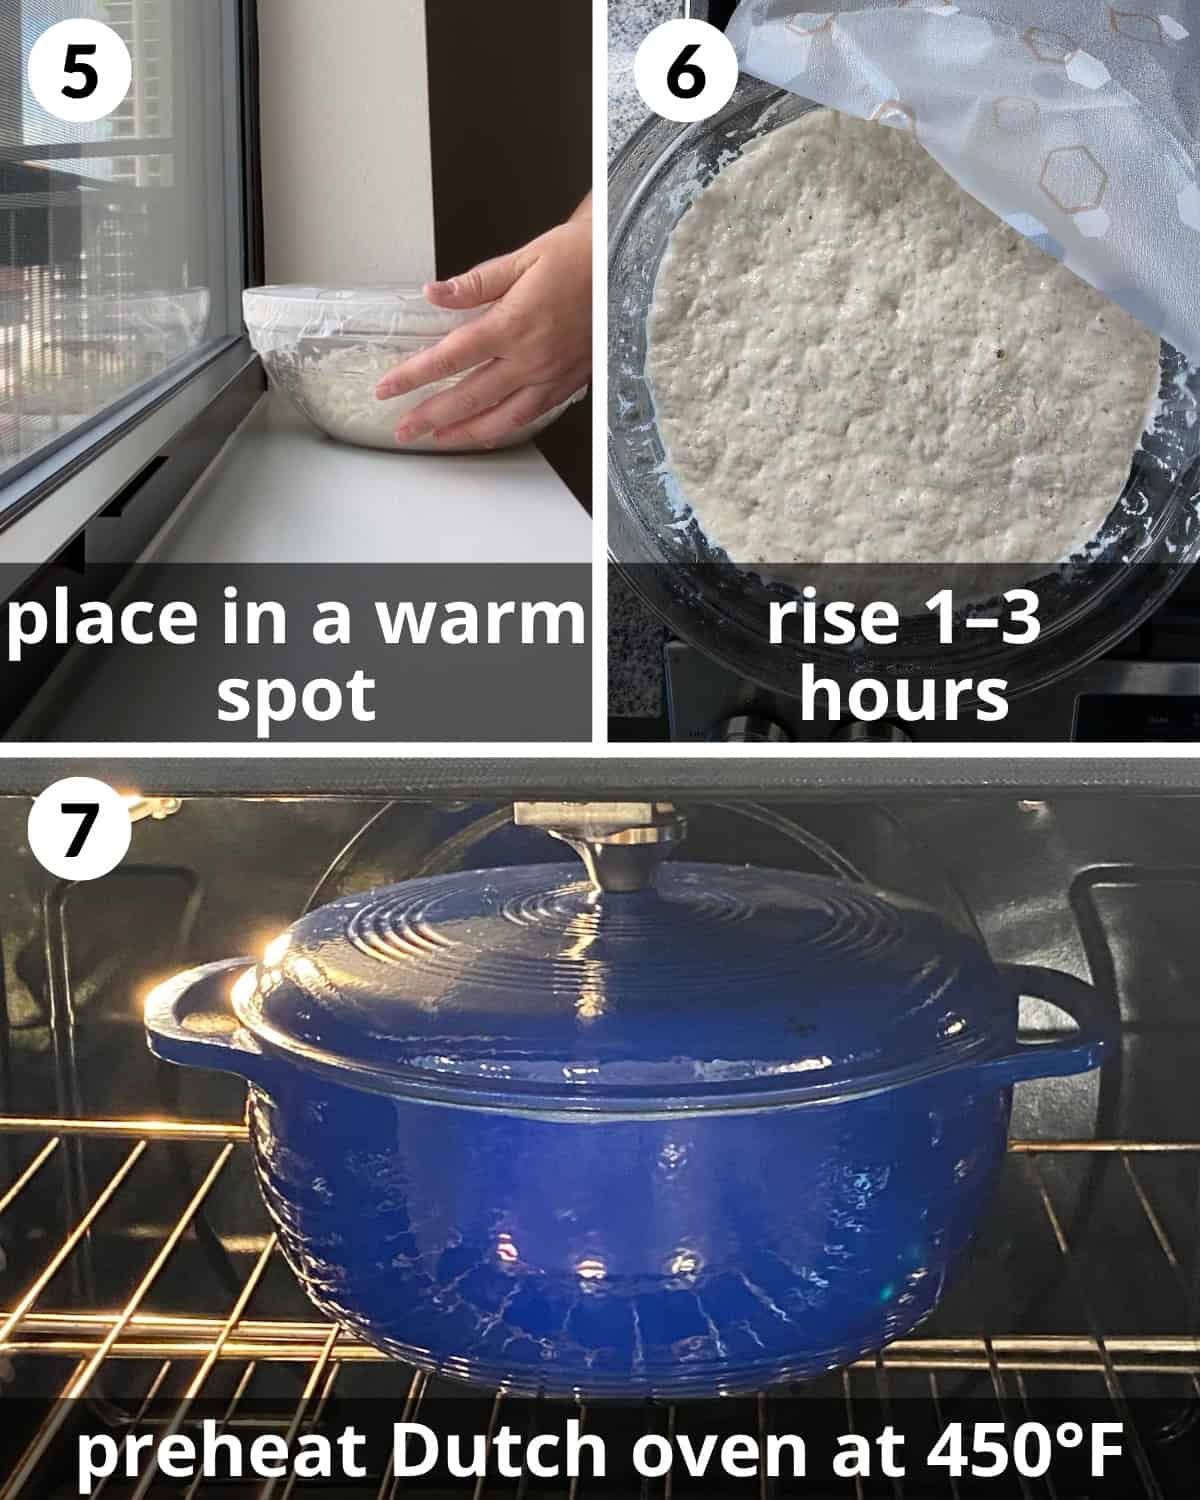
- Set up the same-day rise. Place the covered bowl in a draft-free spot at room temperature.
- Let the dough rise. Leave the covered dough at room temperature for 2–3 hours. In a very warm kitchen, begin checking it after 1 hour; otherwise, begin at 2 hours. When the dough is close to doubled and becoming bubbly, begin preheating the Dutch oven. Do not shape it until it has at least doubled, looks bubbly across the top, and jiggles when you gently move the bowl. If it has not reached these cues by 3 hours, give it more time.
- Preheat the Dutch oven. While the dough finishes rising, place the Dutch oven and lid on the middle rack and preheat the oven to 450°F for at least 30 minutes. Make sure the pot, lid, handles, and knob are rated for this temperature.
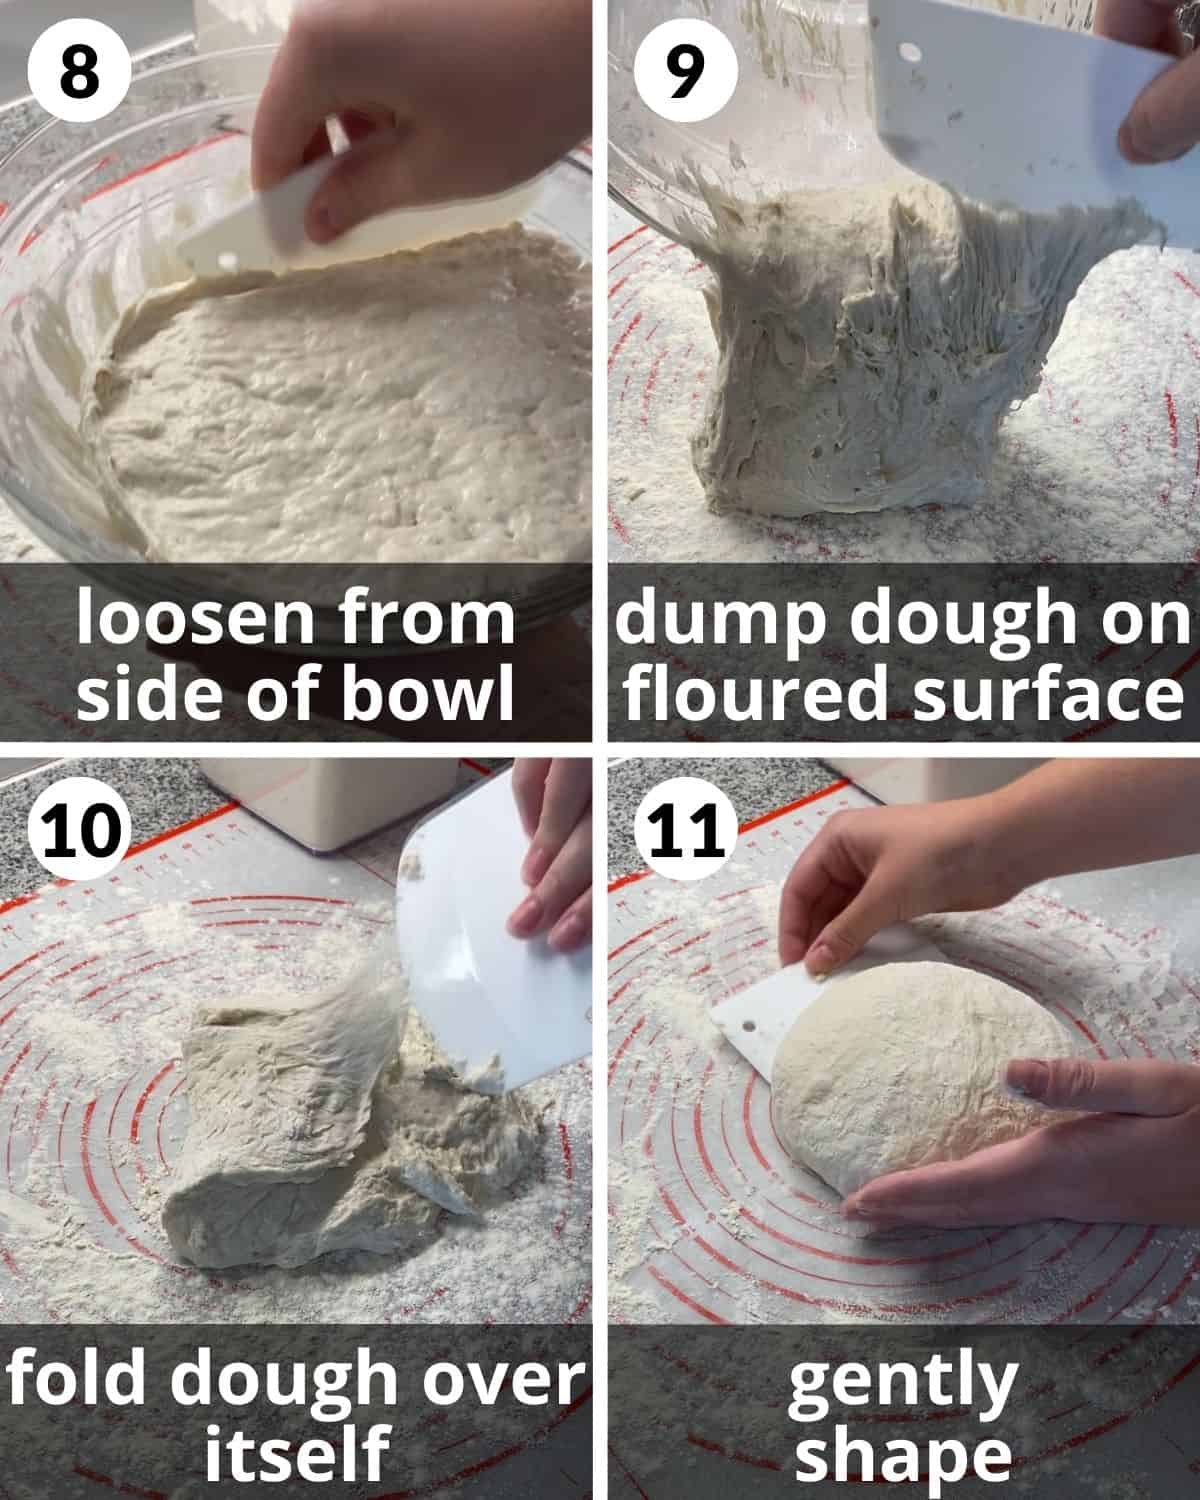
- Release the dough from the bowl. Run a silicone spatula, plastic bench scraper, or flexible spatula around the entire edge, scraping inward to loosen the sticky dough without pressing out its bubbles.
- Transfer the dough. Generously flour a clean work surface, then turn the dough onto it. The dough will be soft and may begin to spread; this is normal. Flour the scraper or your hands lightly if they begin to stick.
- Fold the dough gently. Slide the bench scraper or flexible spatula under one edge and lift that edge toward the center. Repeat around the dough a few times, just until it begins to hold together.
- Shape the loaf. Flip the dough so the folded seam is underneath. With one hand beside the dough and the scraper on the opposite side, gently tap and tuck the edges inward to encourage a rough round. Stop once it holds its shape reasonably well. Do not press down or squeeze out the bubbles.
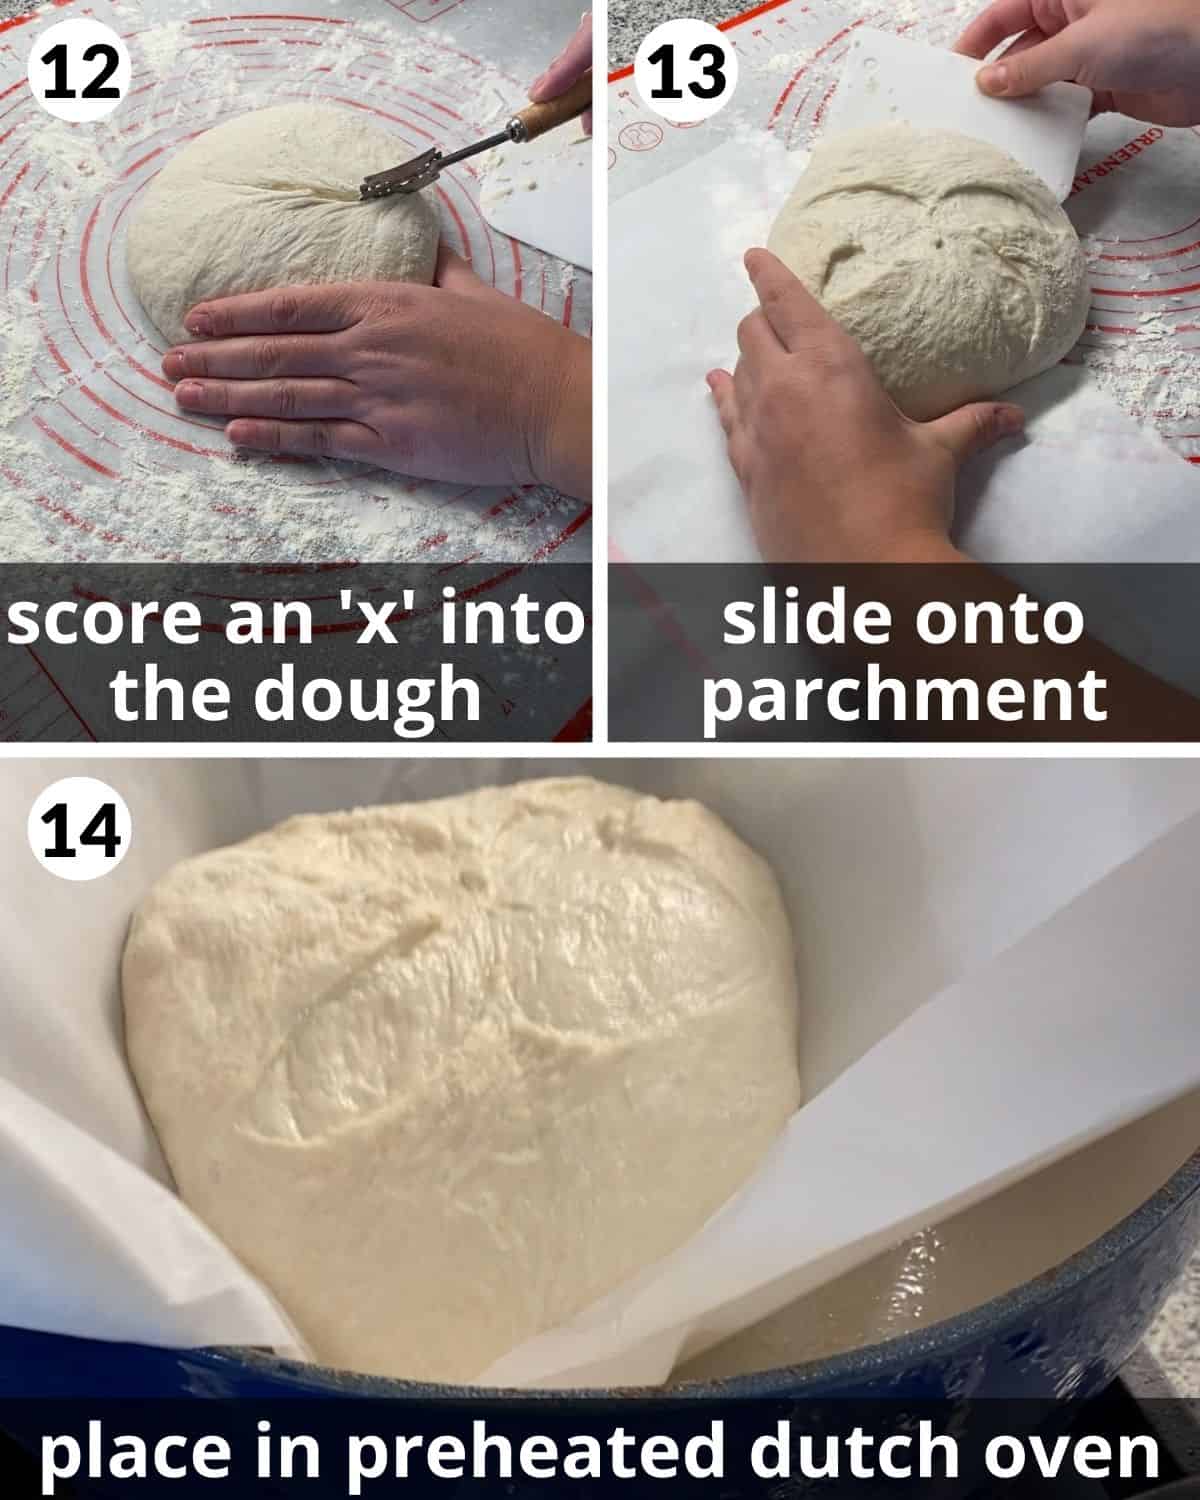
- Score the top. Use a sharp paring knife or bread lame to cut an X into the top. Scoring gives the expanding dough a controlled place to open in the oven. It does not need to look perfectly even.
- Move the loaf to parchment. Place a sheet of parchment beside the dough. Keep one hand lightly against the side of the loaf and slide the scraper underneath it. Gently turn the loaf onto the center of the parchment without pressing on the top.
- Lower the loaf directly into the Dutch oven. The same-day loaf does not rise again after shaping. Clear a heat-safe place for the hot pot. Wearing oven mitts, remove the Dutch oven and lid. Hold the ends of the parchment and carefully lower the loaf into the center of the pot.
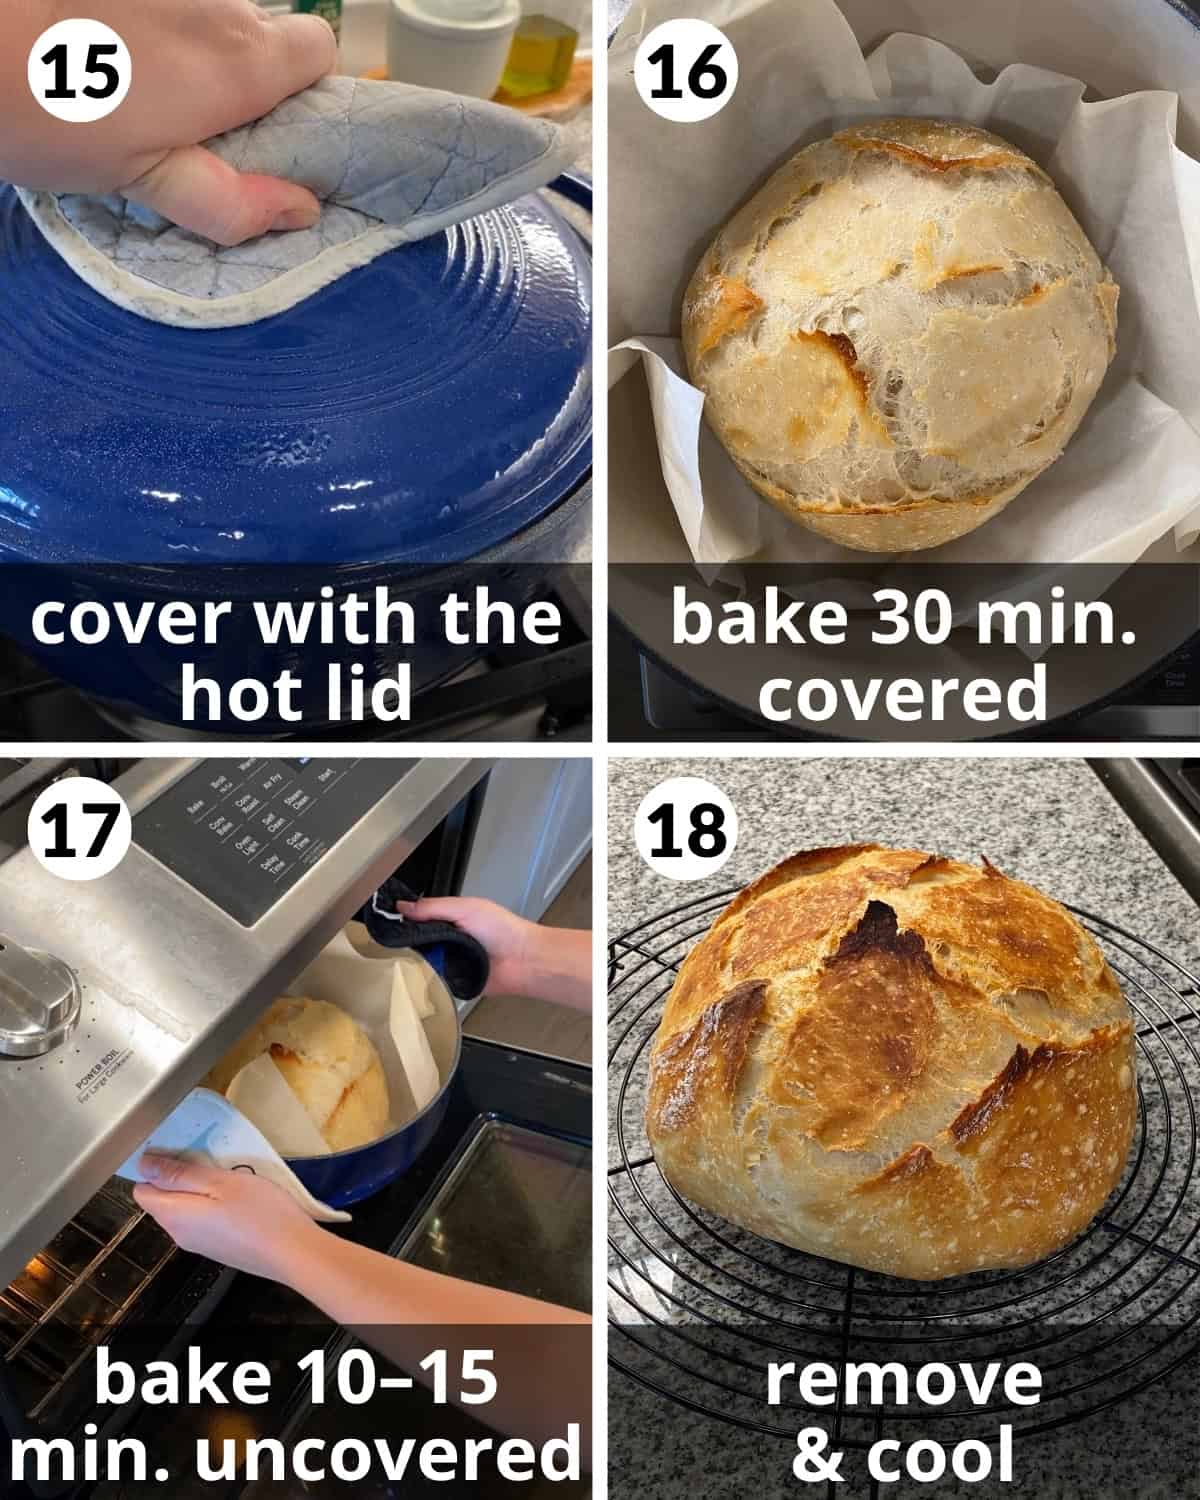
- Cover the Dutch oven. Using oven mitts, place the preheated lid on the pot and return it to the middle rack. The covered pot traps steam released by the dough, which helps the loaf expand before the crust becomes firm.
- Bake the loaf covered. Bake for 30 minutes without lifting the lid. Opening the pot early releases the steam needed for the loaf’s initial rise and crust development.
- Finish baking uncovered. Wearing oven mitts and keeping your face and hands away from the escaping steam, remove the lid. Bake for another 10–15 minutes, until the crust is deep golden brown and firm. The center should register 200–205°F. Without a thermometer, carefully lift the loaf and tap the bottom; it should sound hollow.
- Cool before slicing. Use the parchment to lift the loaf out of the pot and transfer it to a wire rack. Let it cool for about 1 hour before slicing. Cooling allows the steam to redistribute and the crumb to set instead of becoming gummy.
💡Bri’s Best Tip
Handle the dough gently while shaping it. Pressing or tightening the loaf too aggressively can deflate the bubbles developed during the rise. Use a bench scraper or flexible spatula to guide it into a rough round; the loaf does not need to look perfectly smooth.
Pro Tips
- Mark the dough’s starting height: Place a piece of tape or rubber band around the outside of the bowl immediately after mixing. This makes it much easier to tell when the dough has doubled.
- Use cold dough to your advantage: I found the refrigerated dough easier to handle, so shape and score it directly from the refrigerator rather than warming it first.
- Preheat the Dutch oven for the full 30 minutes: A thoroughly heated pot gives the loaf immediate heat and traps the steam that helps it expand. Confirm that every part of the pot is safe at 450°F.
Common Mistakes
- Using expired yeast or water that is too hot: Old yeast may not provide a dependable rise, while hot water can damage it. Check the date and use 110°F water that feels comfortably warm, not hot.
- Completing both rise methods: The 2–3-hour room-temperature rise and the refrigerated rise of about 24 hours are alternatives. Do not let the dough fully rise at room temperature and then refrigerate it for another day.
- Adding flour until the dough feels kneadable: This dough is supposed to remain very sticky. Kneading in additional flour changes the ingredient balance and can produce a dense loaf with fewer open holes.
- Giving the same-day loaf another rise after shaping: This tested method goes directly from shaping and scoring into the hot Dutch oven. Only the refrigerated loaf receives the 30-minute post-shaping rest.
- Opening the Dutch oven during the covered bake: Lifting the lid early releases the trapped steam. Leave it covered for the full 30 minutes.
If You Think Something Went Wrong
| What You See | Likely Reason | What to Do |
|---|---|---|
| The dough looks extremely wet and sticky | This is an intentionally very wet no-knead dough, so a loose texture is expected | Do not add extra flour to make it kneadable. Use a floured work surface and a bench scraper or flexible spatula when shaping. |
| The dough has not doubled after 3 hours | The kitchen may be cool, which slows the yeast | Leave it covered and give it more time. Move on when it has visibly doubled and looks bubbly, not simply when the timer ends. |
| The dough shows almost no activity even after additional time | The yeast may be expired, or the water may have been hot enough to damage it | Check the yeast’s expiration date and make sure the water feels comfortably warm, not hot. If there are still no bubbles or visible expansion after several additional hours, start again with fresh yeast. |
| Refrigerated dough rose and then collapsed, has a residue line above its current level, or has become extremely loose | The dough likely fermented beyond its ideal window | Shape it gently and bake it rather than allowing more time, but expect a flatter loaf. Next time, use the dough sooner. |
| The refrigerated dough smells more noticeably yeasty | A stronger fermented aroma is normal after the cold rise | Continue if the dough otherwise looks normal. Discard it if you see mold or other clear signs of spoilage. |
| The shaped loaf is spreading | This is a soft dough, or too many bubbles were pressed out during shaping | Use a scraper to guide it into a rough round and work gently. Do not knead in enough flour to create a stiff ball. |
| The crust is browning before the center is done | The exposed crust is receiving heat faster than the interior | If the center is below 200°F, loosely shield the top with foil and continue baking until the center reaches 200–205°F. |
| The center seems gummy | The bread may be underbaked or may have been sliced before the crumb finished setting | Bake until the center reaches 200–205°F and cool the loaf for about 1 hour before cutting. |
| The loaf is gummy or does not develop an open crumb at high altitude | Elevation may affect the rise and moisture loss, but this recipe has not been tested at high altitude | I cannot recommend exact changes without testing. Use a trusted high-altitude baking guide and rely on the visual rise cues and a finished internal temperature of 200–205°F. |
How to Store Rustic Bread
- On the counter: Once the loaf has cooled, keep it at room temperature for 1–2 days.
- Do not refrigerate it: The refrigerator dries bread out more quickly. After 1–2 days, slice and freeze the remaining loaf instead.
- To keep frozen slices from sticking: Place small pieces of parchment between the slices before transferring them to a freezer bag. Alternatively, freeze the slices in a single layer just until firm, then transfer them to the bag together.
- To serve from frozen: Put a frozen slice directly in the toaster, or let it thaw on the counter for about 10 minutes.
- Freezer storage: Keep the frozen slices tightly sealed for up to 3 months.
Recipe Serving Suggestions
I will be honest: I usually eat this bread hot and rarely wait for it to cool completely. For the cleanest slices and best-set crumb, let it cool for about 1 hour as directed; cutting it sooner can make the center slightly gummy.
- With pasta: Serve thick slices beside Easy Pink Sauce Pasta to soak up the creamy tomato sauce.
- With soup or chili: Pair the loaf with Instant Pot Chicken and Rice Soup or Instant Pot Chili.
- For garlic bread: I like using leftover slices with my Easy Garlic Bread Spread.
- For breakfast: I often toast leftover slices in the morning. You can put them in a toaster or follow my method for Toast in the Oven. You can also use day-old bread for Sourdough French Toast.

Easy Rustic Bread Recipe
Equipment
- Bench Scraper or flexible spatula
Ingredients
- 3 1/2 cups bread flour 455 g; King Arthur Bread Flour used
- 1 packet active dry yeast 7 g or 2 1/4 teaspoons; Red Star used
- 2 teaspoons Morton kosher salt or 4 teaspoons Diamond Crystal kosher salt or 1 teaspoon fine sea salt/table salt
- 1 2/3 cups warm water 395 ml; 110°F
Instructions
- Combine the dry ingredients. Add the bread flour, active dry yeast, and Morton kosher salt to a large mixing bowl. Whisk until evenly distributed. You do not need to activate or proof the yeast separately.3 1/2 cups bread flour
1 packet active dry yeast
2 teaspoons Morton kosher salt - Add the warm water. Pour the 110°F water evenly over the dry ingredients. Without a thermometer, it should feel comfortably warm but not hot.1 2/3 cups warm water
- Mix the dough. Stir from the bottom of the bowl until no dry flour remains, scraping the bottom and sides as needed. The dough should look very wet, sticky, shaggy, and somewhat lumpy; it will not form a kneadable ball. Do not add extra flour.
- Cover the dough. Scrape the dough toward the center of the bowl and cover it tightly with plastic wrap. If helpful, mark its starting height on the outside of the bowl.
- Set up the same-day rise. Place the covered bowl in a draft-free spot at room temperature.
- Let the dough rise. Let it rise for 2–3 hours. In a very warm kitchen, begin checking after 1 hour; otherwise, begin at 2 hours. When it is close to doubled and becoming bubbly, begin preheating the Dutch oven. Continue once the dough has at least doubled, looks bubbly across the top, and jiggles when the bowl moves.
- Preheat the Dutch oven. While the dough finishes rising, place the Dutch oven and lid on the middle rack and preheat the oven to 450°F for at least 30 minutes. Confirm that the pot, lid, handles, and lid knob are safe at this temperature.
- Release the dough. Run a silicone spatula, plastic bench scraper, or flexible spatula around the edge of the bowl, scraping inward to loosen the dough without pressing out its bubbles.
- Transfer the dough. Generously flour a clean work surface, then turn the dough onto it. The dough will be soft and may begin to spread; this is normal.
- Fold the dough gently. Use the scraper to lift one edge toward the center. Repeat around the dough a few times, just until it begins to hold together.
- Shape the loaf. Flip the dough so the folded seam is underneath. Use one hand and the scraper to gently tap and tuck the edges into a rough round without pressing out the bubbles.
- Score the top. Cut an X into the top with a sharp paring knife or bread lame. It does not need to look perfectly even.
- Move the loaf to parchment. Use the scraper to support the soft dough as you move it onto the center of a sheet of parchment paper.
- Lower the loaf directly into the Dutch oven. The same-day loaf does not rise again after shaping. Wearing oven mitts, remove the hot pot and lid. Use the parchment as handles to carefully lower the loaf into the pot.
- Cover the Dutch oven. Replace the preheated lid and return the pot to the middle rack.
- Bake the loaf covered. Bake for 30 minutes without lifting the lid.
- Finish baking uncovered. Wearing oven mitts and keeping your face and hands away from the escaping steam, remove the lid. Bake for another 10–15 minutes, until the crust is deep golden brown and firm. The center should register 200–205°F. Without a thermometer, carefully lift the loaf and tap the bottom; it should sound hollow.
- Cool before slicing. Use the parchment to lift the loaf from the pot and transfer it to a wire rack. Cool for about 1 hour before slicing so the crumb can finish setting.
Notes
- Flour measurement: For the most consistent dough, weigh 455 g bread flour. Without a scale, fluff the flour, spoon it lightly into the measuring cup, and level it with a straight edge. The dough should remain very wet and sticky; use flour on the work surface and a bench scraper or flexible spatula instead of adding flour until it becomes kneadable.
- Yeast and rise: Active dry or instant yeast can be used in the same amount, but instant yeast may rise faster. In a very warm kitchen, begin checking the dough after 1 hour. Continue once it has at least doubled and looks bubbly across the top.
- Salt conversion: The recipe was tested with Morton kosher salt. Substitute 4 teaspoons Diamond Crystal kosher salt or 1 teaspoon fine sea salt or table salt for the 2 teaspoons Morton.
- Make-ahead method: After mixing, cover and refrigerate the dough immediately for about 24 hours, until doubled and bubbly; do not complete the room-temperature rise first. Twelve hours was not sufficient in testing. Shape and score the dough directly from the refrigerator, place it on parchment, and rest it for about 30 minutes while the Dutch oven preheats. Bake at the same temperature and for the same amount of time as directed above.
- Storage: Store the cooled loaf on the counter for 1–2 days, then slice and freeze the remainder for up to 3 months. Separate slices with parchment or freeze them in a single layer until firm. Toast directly from frozen or thaw on the counter for about 10 minutes; do not refrigerate the baked bread because it dries out.
Nutrition
Nutrition information is automatically calculated, so should only be used as an approximation.
More Bread Recipes



Did you make this recipe?
If you try this recipe, please leave a star rating in the recipe card below and/or comment! I always appreciate your feedback.
Follow me on all of the platforms below.









This recipe came out amazing!! I have tried several variations. I think the King Auther bread flour made a huge difference. I only use red star yeast it is great with rising.
A question on the amount of flour. King Arthur bread flour is 120 g per cup. 3 1/3 cups is 400 grams. The recipe calls for 3 1/3 cup or four and 34 g. Not an enormous difference especially with the variability of flour used when the loaf is formed but I don’t want to make this until I know more exactly what the correct amount is. Thank you!
Very good recipe, flavor depth and texture are better than the $10 loaves at my local stores, and the ingredients only cost about $2 made at home! This is A stellar recipe from a baker who is very easy on the eyes to boot! 😉
Thank you!! This recipe is one of my favorites as well.
I am new to bread making and do not know what you mean by “mix in the water, until all flour is absorbed.” Do I stir it or just push the water around?
This just means to mix until all of the water is incorporated.
Can I cut this in half for a smaller bread pan?
I am not sure! I have not tried that.
Excellent recipe, really easy to follow and most importantly the bread is delicious!! Thank you 🙂
Thank you so much!
Does this double ok? Or should I just do separate bowls?
I would make 2 separate loaves.
I love this recipe and the resulting bread! It is a never fail bread recipe. The directions are exact and easy to follow. All of my family loves it! Thank you for sharing
That makes me so happy to hear! Merry Christmas! ?
This bread was as easy as shown. The texture is outstanding
Awesome! Glad you enjoyed.
Loved the recipe. Especially the no-knead part!
I recommend this recipe instead: https://biteswithbri.com/cast-iron-skillet-chicken-breast/